#Introduction
This year, I helped organize MadHacks, Wisconsin’s largest in-person hackathon. Last year (in 2024), I was able to help out in a volunteer capacity, but I really stepped up my involvement this time around. The event was, by most accounts, a success, taking place in the newly built Morgridge Hall with 419 participants and 114 projects submitted.
A lot of my involvement with the coordination of the event manifested in miscellaneous technical projects, but there were also a few fun sidebars like being on the local news and hosting a variety of events. Since the event took place a little while ago, how about I catalog, in no particular order, some notable picks?
#Emails
Airtable, our data platform for managing applicants, has a fantastic feature called “Automations” that allows you to perform various actions on your data. One of these actions is a Gmail integration that will fire off an email from a signed-in Google account.
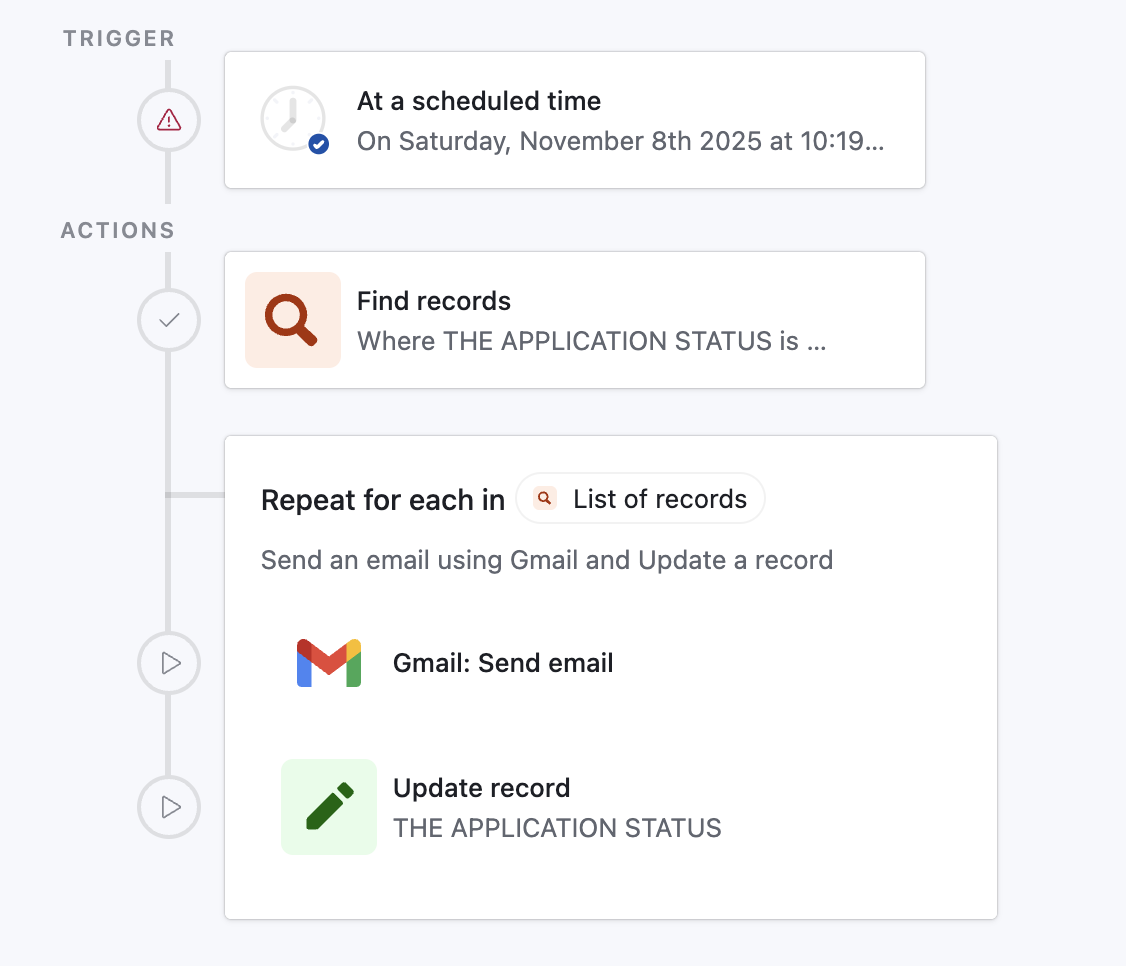
Here’s one of our automations that will email applicants who are marked as accepted in batches. The “send email” action from Gmail has some flexibility, allowing you to insert placeholders like name and email from the application you’re iterating over.
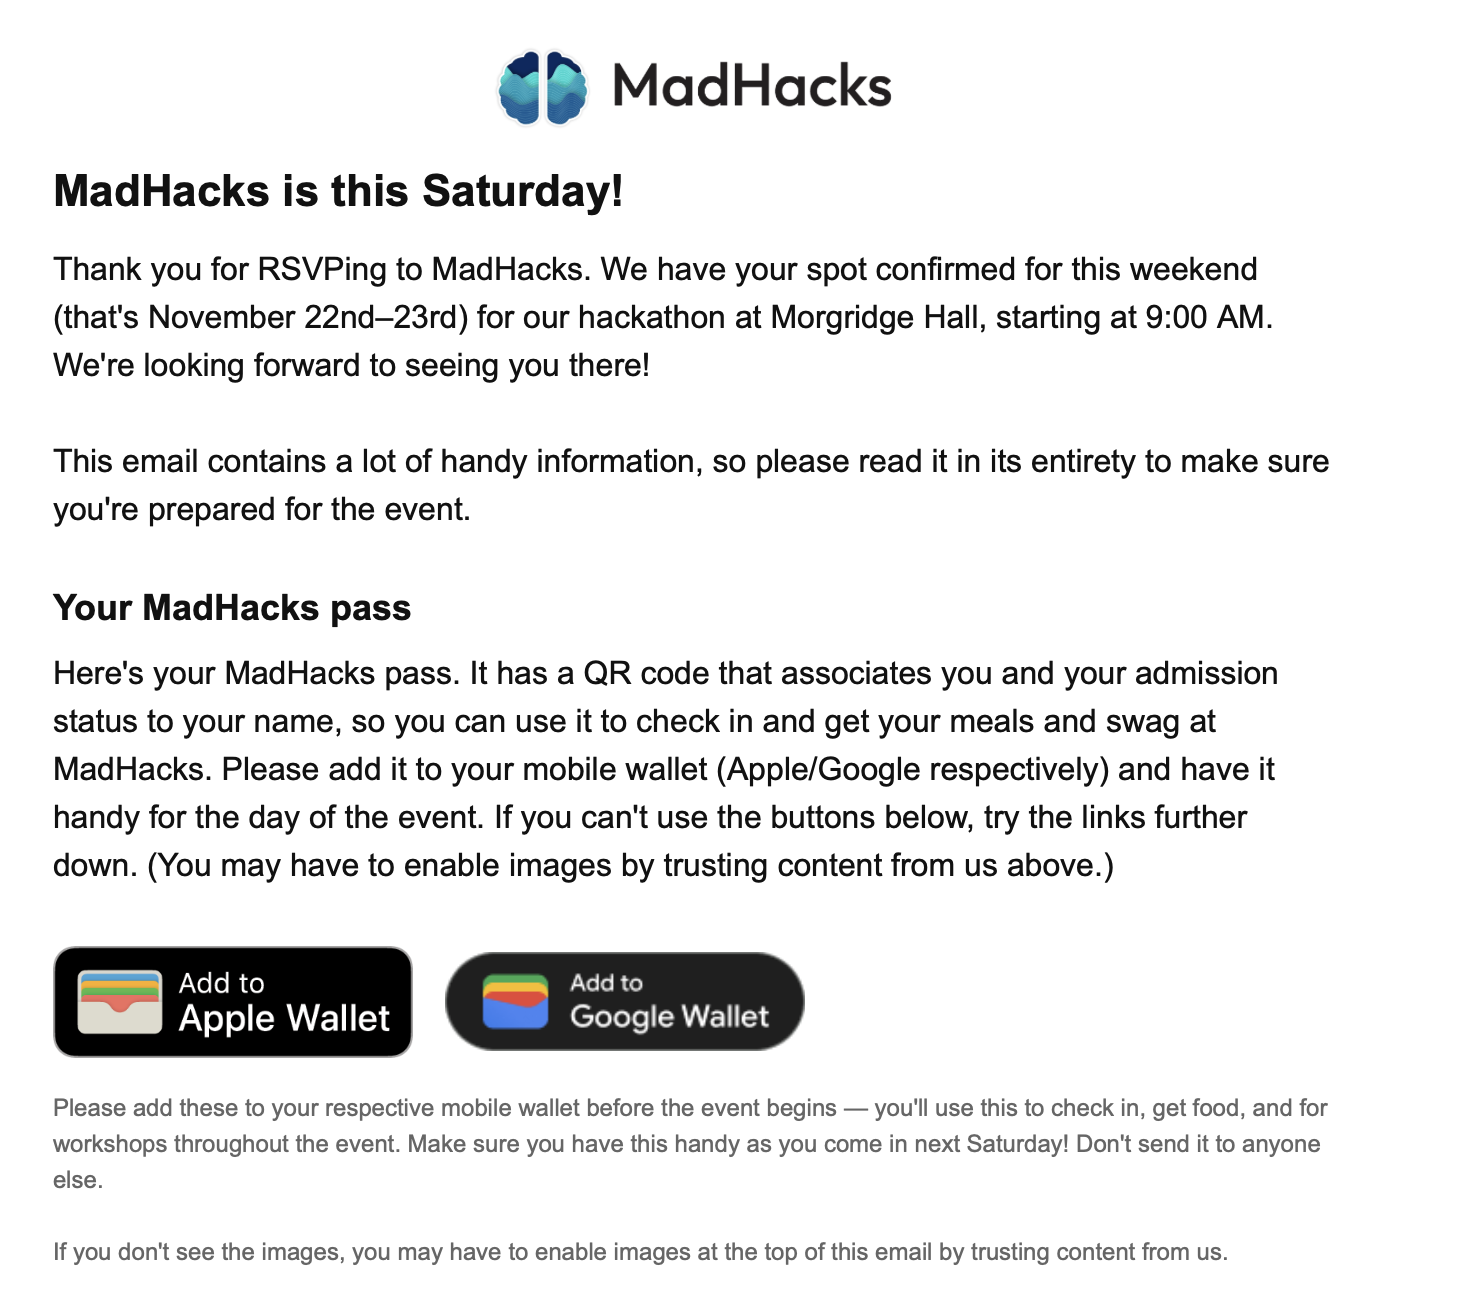
Airtable markdown isn’t flexible enough, though. We want to send admitted participants an email containing instructions before the event begins, including where to park, where to show up day-of, and how to receive their mobile passes.
For some reason, Airtable only supports a few extremely basic HTML tags in its email markup. You aren’t able to embed images, custom tables, or any other non-standard formatting using its built-in actions. Crazily enough, most threads in the Airtable forum running into this issue have “accepted answers” suggesting using Make or Zapier, which are both external workflow platforms that cost extra money and require the installation of separate actions.
The notion of signing up, paying for, and linking an entire separate application for the sole purpose of sending emails with rich HTML in them sounded ludicrous to me. I conceded that I would be willing to use some external integration to blast our emails, but I wanted it to be cheap (if not free) and use our existing Gmail account.
There are off-the-shelf email delivery services like Postmark or Resend that let you programmatically send emails using their APIs. However, since we were already using Gmail, this seemed like it would add unnecessary overhead. Thankfully, I discovered Nodemailer, an npm package, which allows you to use a Gmail account as the sender and fire off emails using server-side JavaScript.
Nodemailer outright advises that “[Gmail] is not recommended for production workloads” in their documentation, but I felt confident enough using it for the blast to hackers for multiple reasons: this was only one set of emails, our Gmail account has higher rate limits (because it is marked as a non-profit workspace account), and I didn’t care about analytics or deliverability metrics. Using Nodemailer in this way is still basically having their software puppet your account, so there’s always a non-zero chance of getting flagged and having email attempts blocked when using this method.
I made a small SvelteKit project with a +server.ts POST endpoint that accepted a user ID, email, and subject line. When it received a request, it would insert the corresponding fields into an HTML template I had written, and use Nodemailer to fire the email off to the proper recipient.
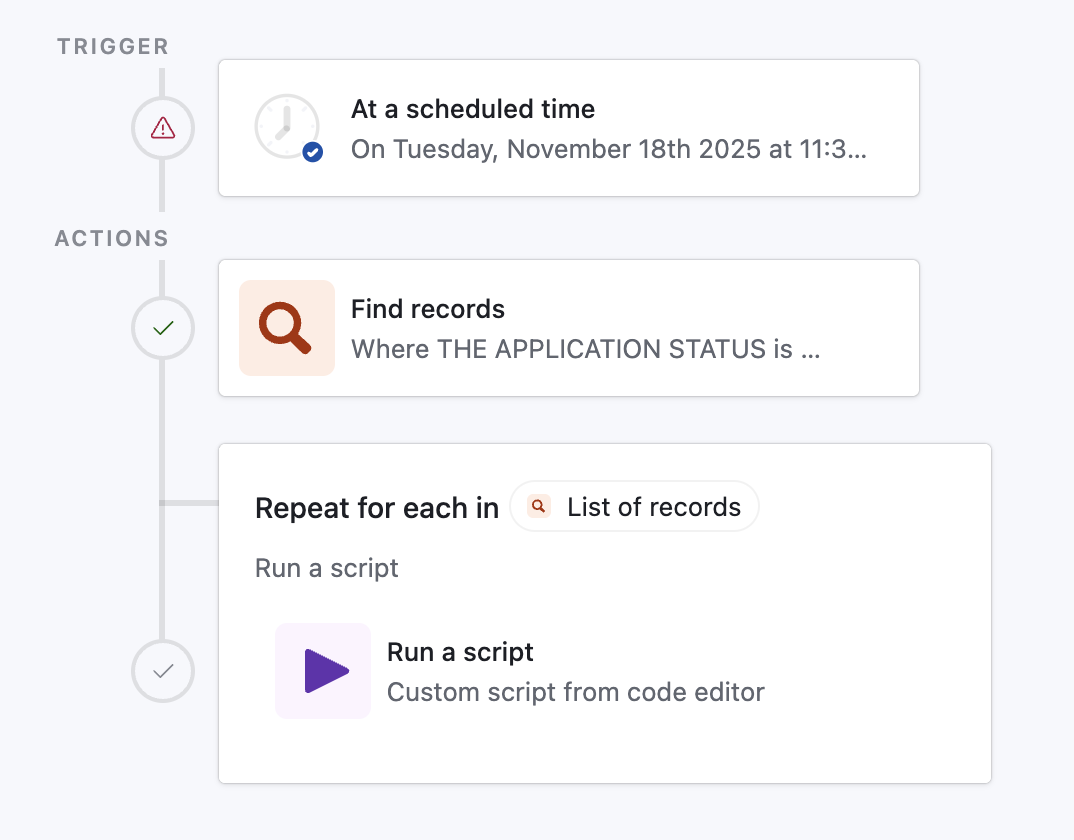
Then, in Airtable, I set the repeated action to be a custom script. That way, for every participant, instead of the built-in “send email” command, it would hit my server through a fetch and fire off a Nodemailer email.
Airtable allows you to write custom scripts in JavaScript. Here’s what I wrote:
5 collapsed lines
1function delay(ms) {2 const start = Date.now();3 while (Date.now() - start < ms) { }4}5
6delay(500);7
8const { to, id, subject } = input.config();9
10const res = await fetch('https://<redacted>/api/webhook/mail', {11 method: 'POST',12 headers: {13 'Content-Type': 'application/json'14 },15 body: JSON.stringify({ to, id, subject })16});6 collapsed lines
17
18if (!res.ok) {19 throw new Error(`Request failed: ${res.status} ${res.statusText}`);20}21
22output.set('ok', true);Some notes on this script:
- Usually, busy waiting (what my
delayfunction is doing) is a bad practice that burns CPU cycles doing nothing. However, I was paranoid about Nodemailer sending too many requests in too short a period of time and spooking Gmail, so this was the best way to enforce a half-second delay in between each piece of mail sent. input.config()is Airtable’s syntax for accepting parameters into a script. Since I was iterating over the list of RSVP’d applicants, I was able to directly pass their email and QR code ID into the function.- If you’re going to copy this code to do something similar, please make sure you have some form of authentication on the endpoint. I was using an unguessable subdomain that only had the server running on it for the time that I needed it, but it’s still good practice to make sure that adversaries can’t spam your endpoint to send emails to whoever they’d like.
After that was set up, I configured the Airtable automation to blast the emails at 6:00 AM (as I hoped that people would check their email in the morning and see ours at the top of their inbox). I went to sleep, hoping to wake up to all 400 emails successfully sent. Alas…
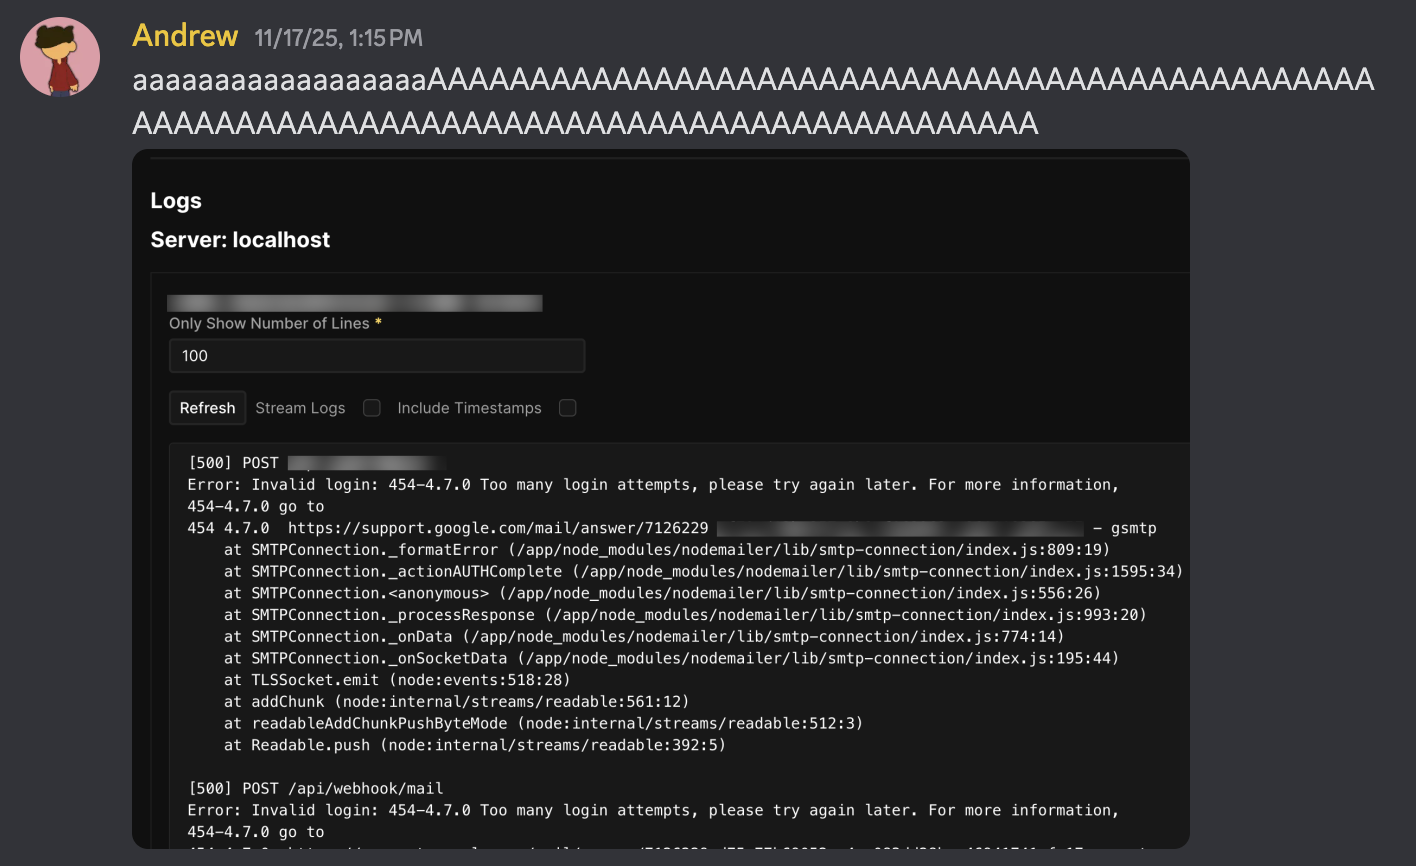
I woke up at 1:00pm to find approximately 20 out of 400 emails had been sent — nearly 4 hours after they were scheduled. Something was definitely wrong. Opening the MadHacks Gmail account showed that, even worse, some people had seen their friend/teammate get sent an email and were now sending us emails panicking that they thought they hadn’t been properly admitted to the event.
This hadn’t happened in any of the tests I had done with Airtable or Nodemailer, so I was floored. The Gmail account didn’t show any emails bouncing — in fact, the 20 or so that had been sent were delivered perfectly. I cautiously opened the logs of the SvelteKit server the email endpoint was listening on, and that’s when I saw a console flooded with Too many login attempts, please try again later. The one thing I had feared!
I was under the impression that such an error wouldn’t occur given my precautions. Not only did I add the 500ms of delay in between each email, but I had hoisted the Nodemailer initialization code out from the POST endpoint function into its own module-scoped code. Because my SvelteKit server was a long-lived Node.js process, I assumed that this meant that the nodemailer.createTransport function would only be run once, and succeeding calls to my Nodemailer instance would simply reuse the transport object.
Unfortunately, as I learned, that’s not quite how Nodemailer works. Its default behavior opens a new connection for each email it sends, which initiates a full TLS handshake (and triggers a Google login request with my app password). No wonder Gmail rate limited me — Nodemailer was trying to log in nearly 400 times!
It turns out that there is a way to have Nodemailer reuse a login/TCP connection to send batches of email — they call it “Pooled SMTP Connections”. In my defense, on the documentation page they have about setting up Nodemailer with Gmail, they do not mention the phrase “pool” a single time. It’s only in the “Pooled SMTP Connections” page they have hidden further down the sidebar that they dare mention:
Pooled connections work with all authentication methods, including OAuth2. This is particularly useful when sending through services like Gmail or Outlook that support OAuth2.
Yeah, it is “particularly useful”! So “particularly useful”, in fact, that you should include it in the pages for the aforementioned services!
So, I threw open Visual Studio Code and made an edit to the Nodemailer initialization code:
1const transporter = nodemailer.createTransport({2 service: 'gmail',3 auth: {4 user: 'team@madhacks.io',5 pass: env.APP_PASSWORD6 },7 pool: true,8 maxConnections: 1,9 maxMessages: 10010});Believe it or not, that’s all that I had to do. I re-deployed the SvelteKit server, re-triggered the Airtable automation, and watched as 400 emails sent out flawlessly before my very eyes.
It would be great if Airtable grew to support rich HTML tags so I don’t have to go through this fiasco again in the future, but, if they don’t, at least I now know how to make the homespun solution work.
#Being on the News
MadHacks’ very own Taylor Wilmot was able to get in touch with a number of news outlets around Madison to report on the event. During WMTV’s visit, she was gracious enough to suggest that I be interviewed, and I got to be recorded for television!
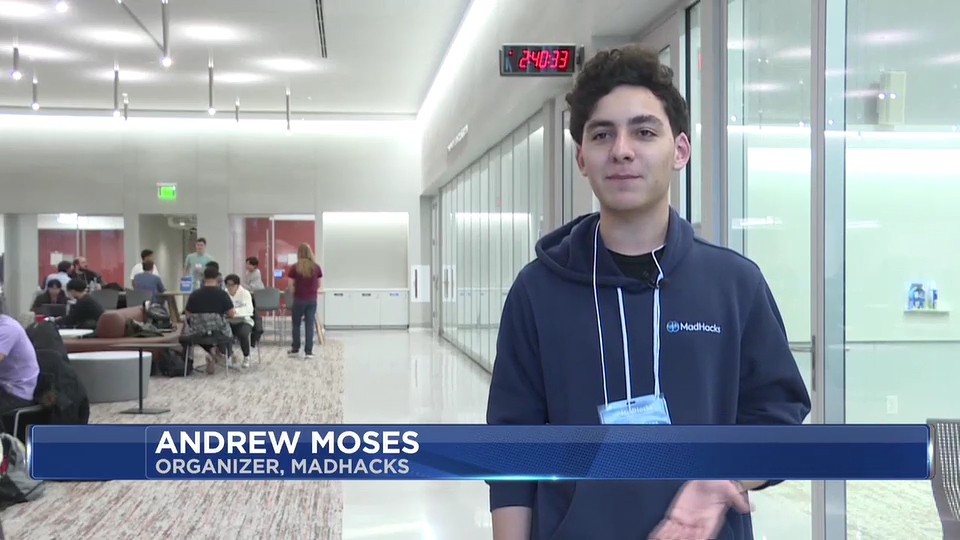
Image credit: WMTV
I was pretty nervous to be interviewed, but Nicole Herzog (the news correspondent) was extremely kind and let me answer her questions at my own pace. I was running on only a few hours of sleep, but I think I was still able to give some coherent information on what MadHacks is and what hackathons are to anyone watching the broadcast who hadn’t heard of this kind of event.
Here’s the link to the story (which includes the video)1. My excerpt was:
People see computer science as this kind of thing where people sit alone in a room and code the night away, but it’s really a social thing. And that’s what we try to do with MadHacks. A lot of computer science classes are really about individual things, smaller minutia in the topic, but we want to prove that it’s about the community aspect; it’s about really coming together and building something cohesive.
Programming isn’t monotonous. It’s not something that’s only in your classes, it’s not something that’s just a job… programming is so much more than that. By using the arts of computer science, you can make anything and have such a good time doing it.
That’s genuinely how I feel about computer science and programming in general, so I’m happy I was given the opportunity to explain the perspective to people who may have had a preconceived stigma about the field. My thanks to Taylor, Nicole, and WMTV for allowing me to participate!
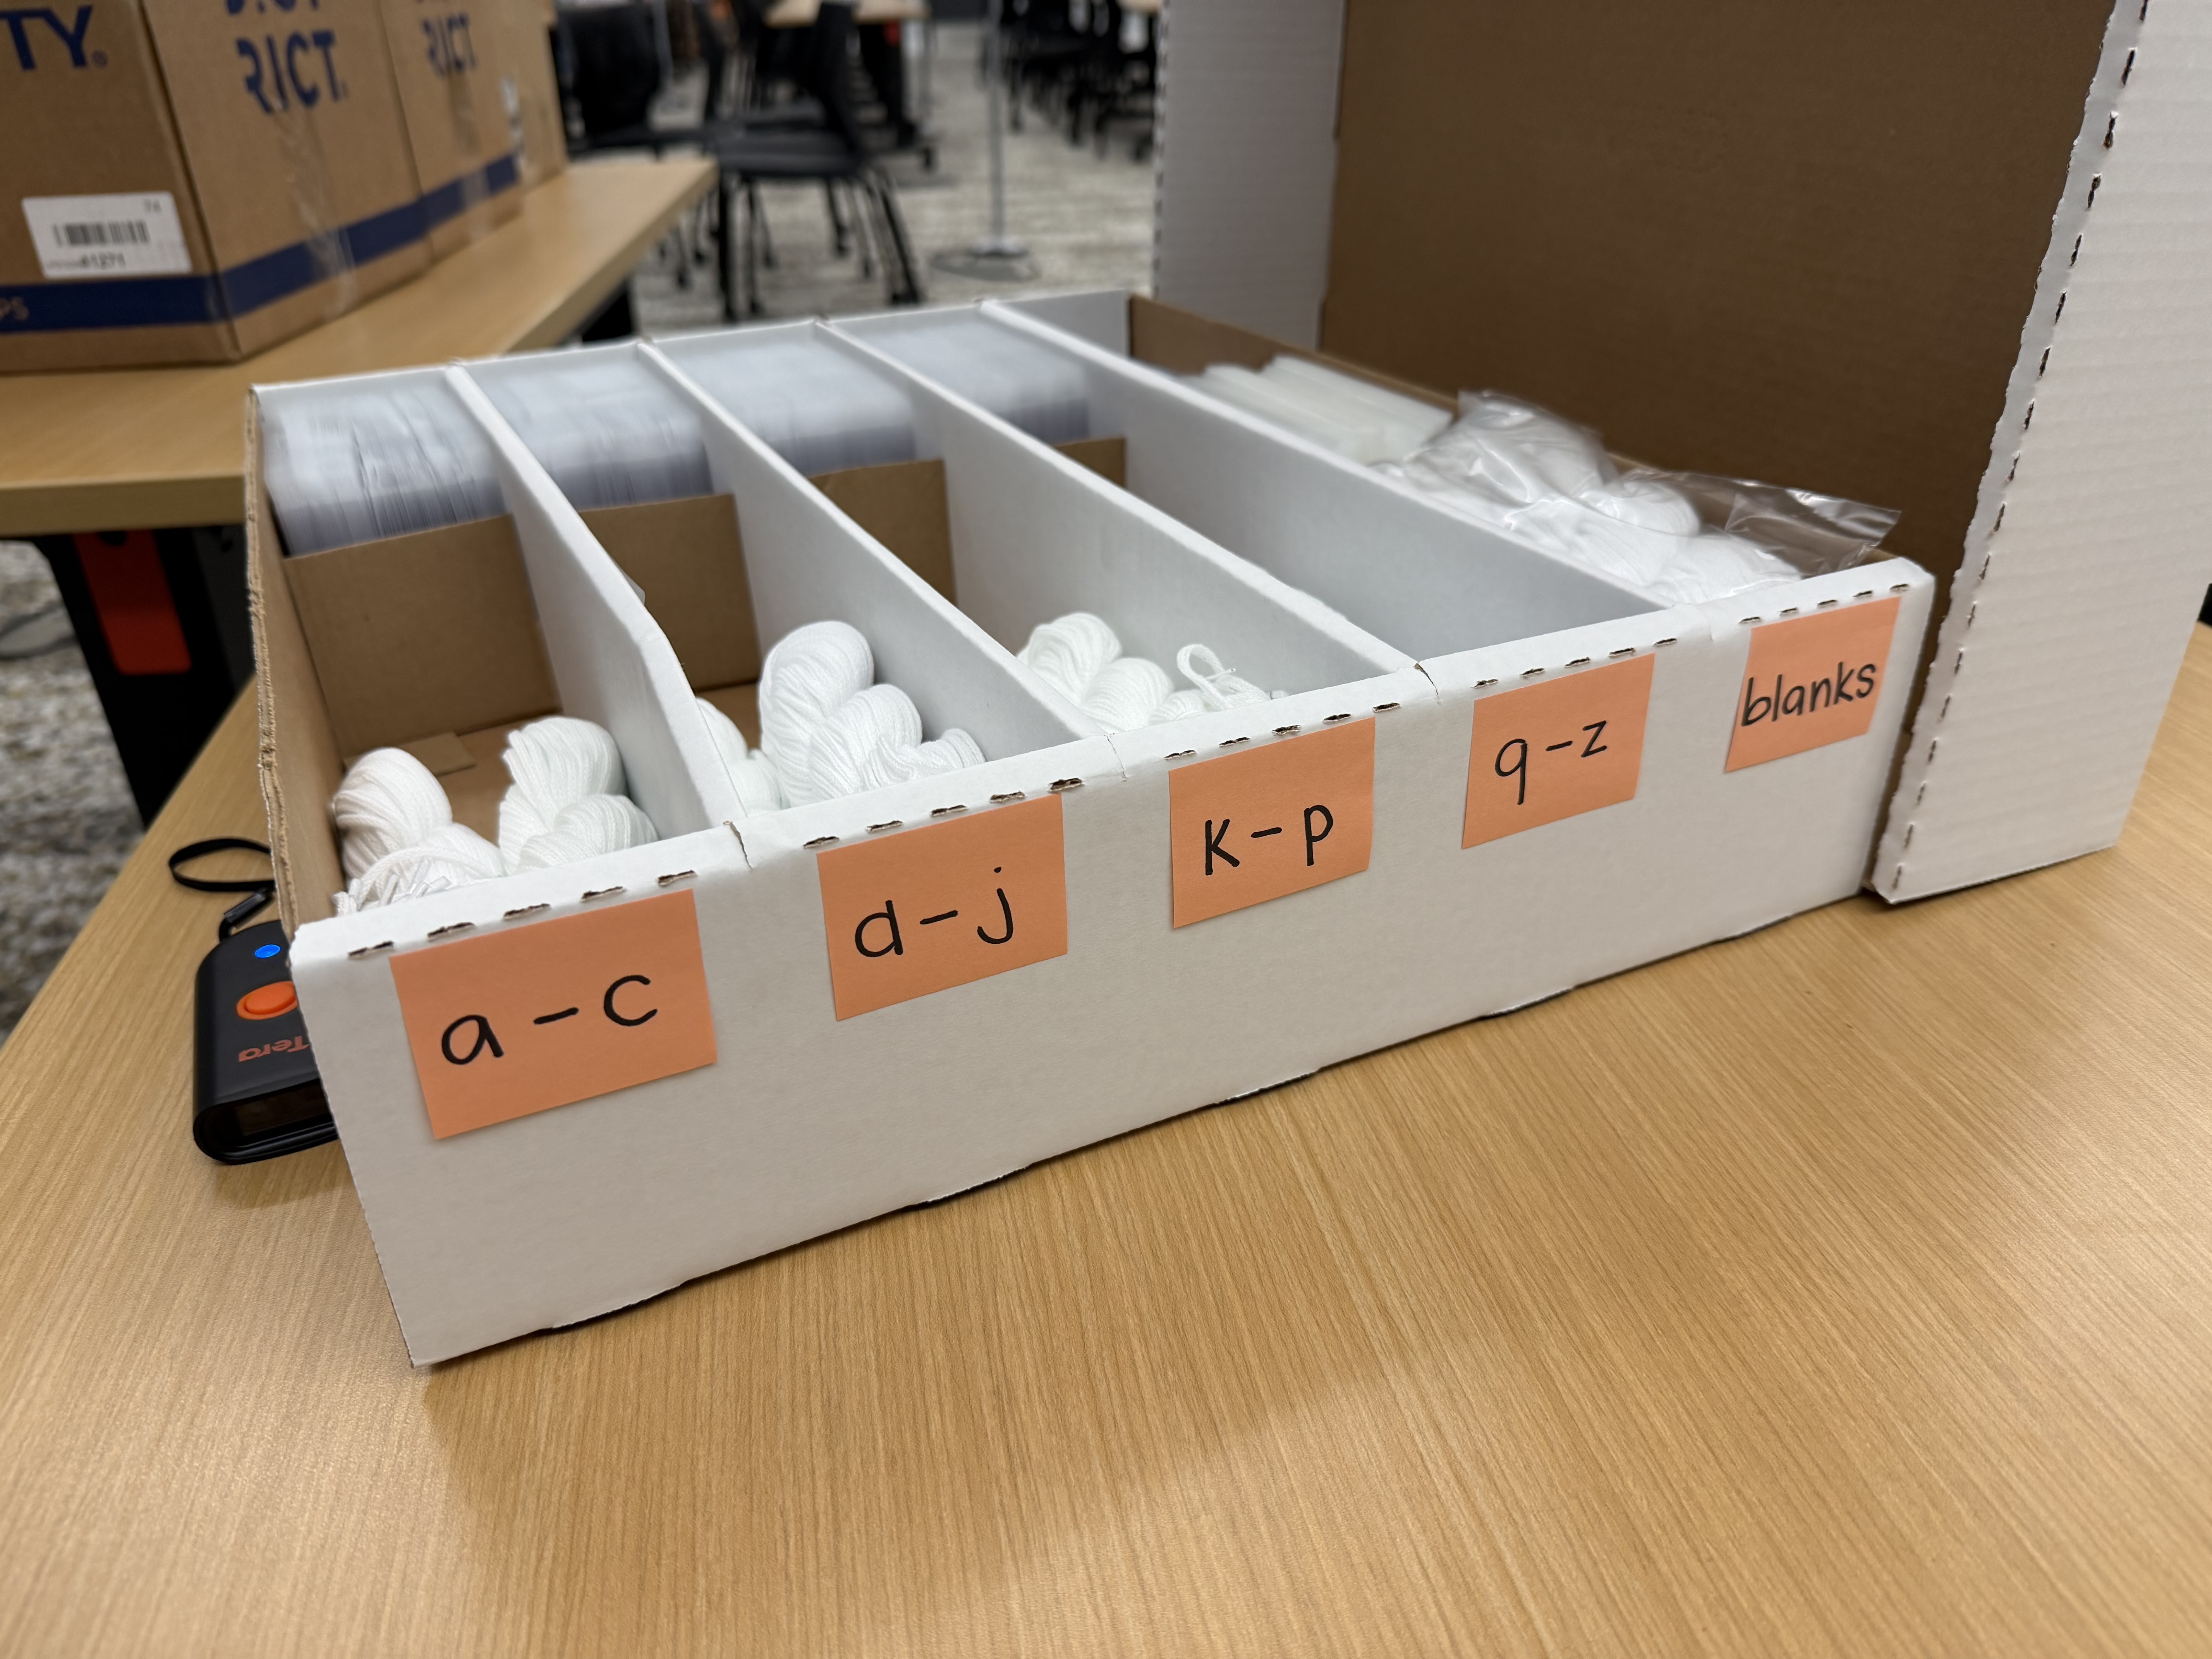
#Name Tags
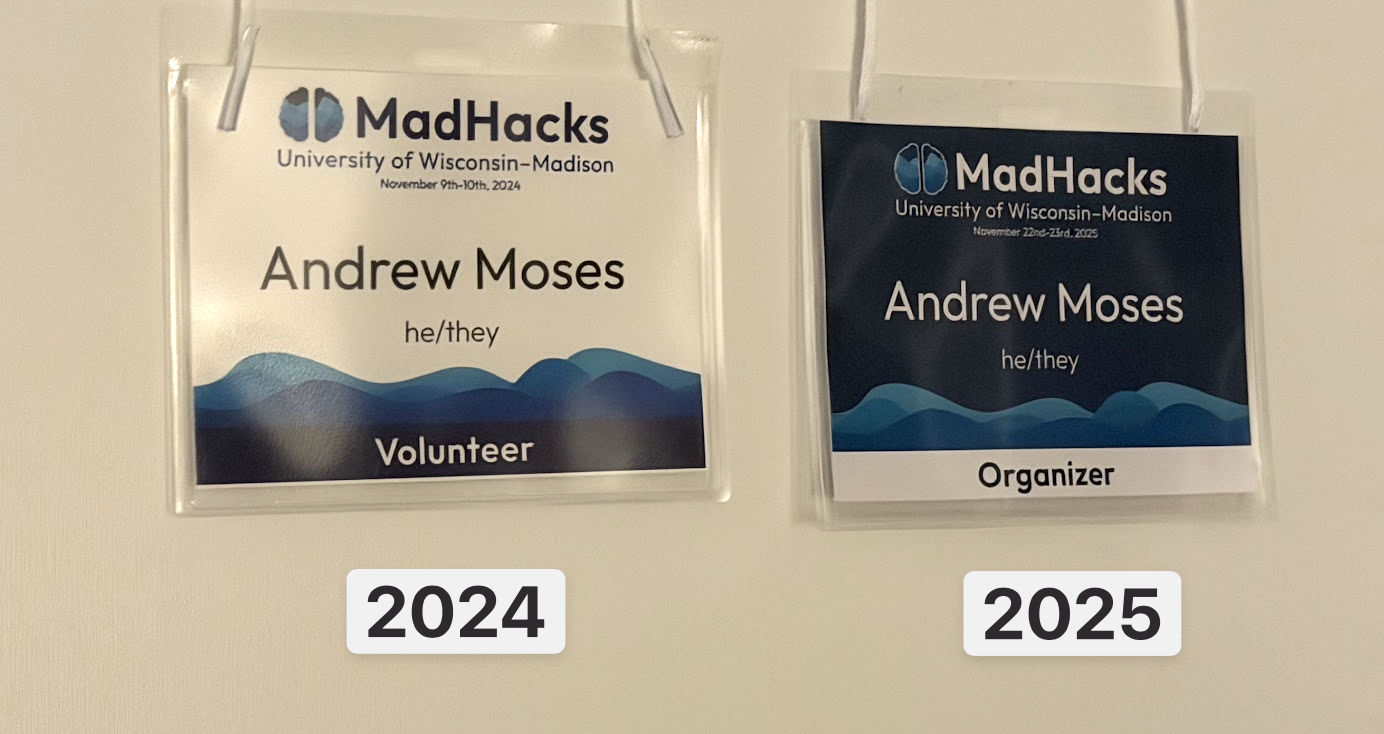
Participants admitted to MadHacks are given name tags with their name and pronouns on them. I’ve always found this to be a neat part of the event, since they look cool and allow you to put a face to people whose names you may have peripherally heard of.
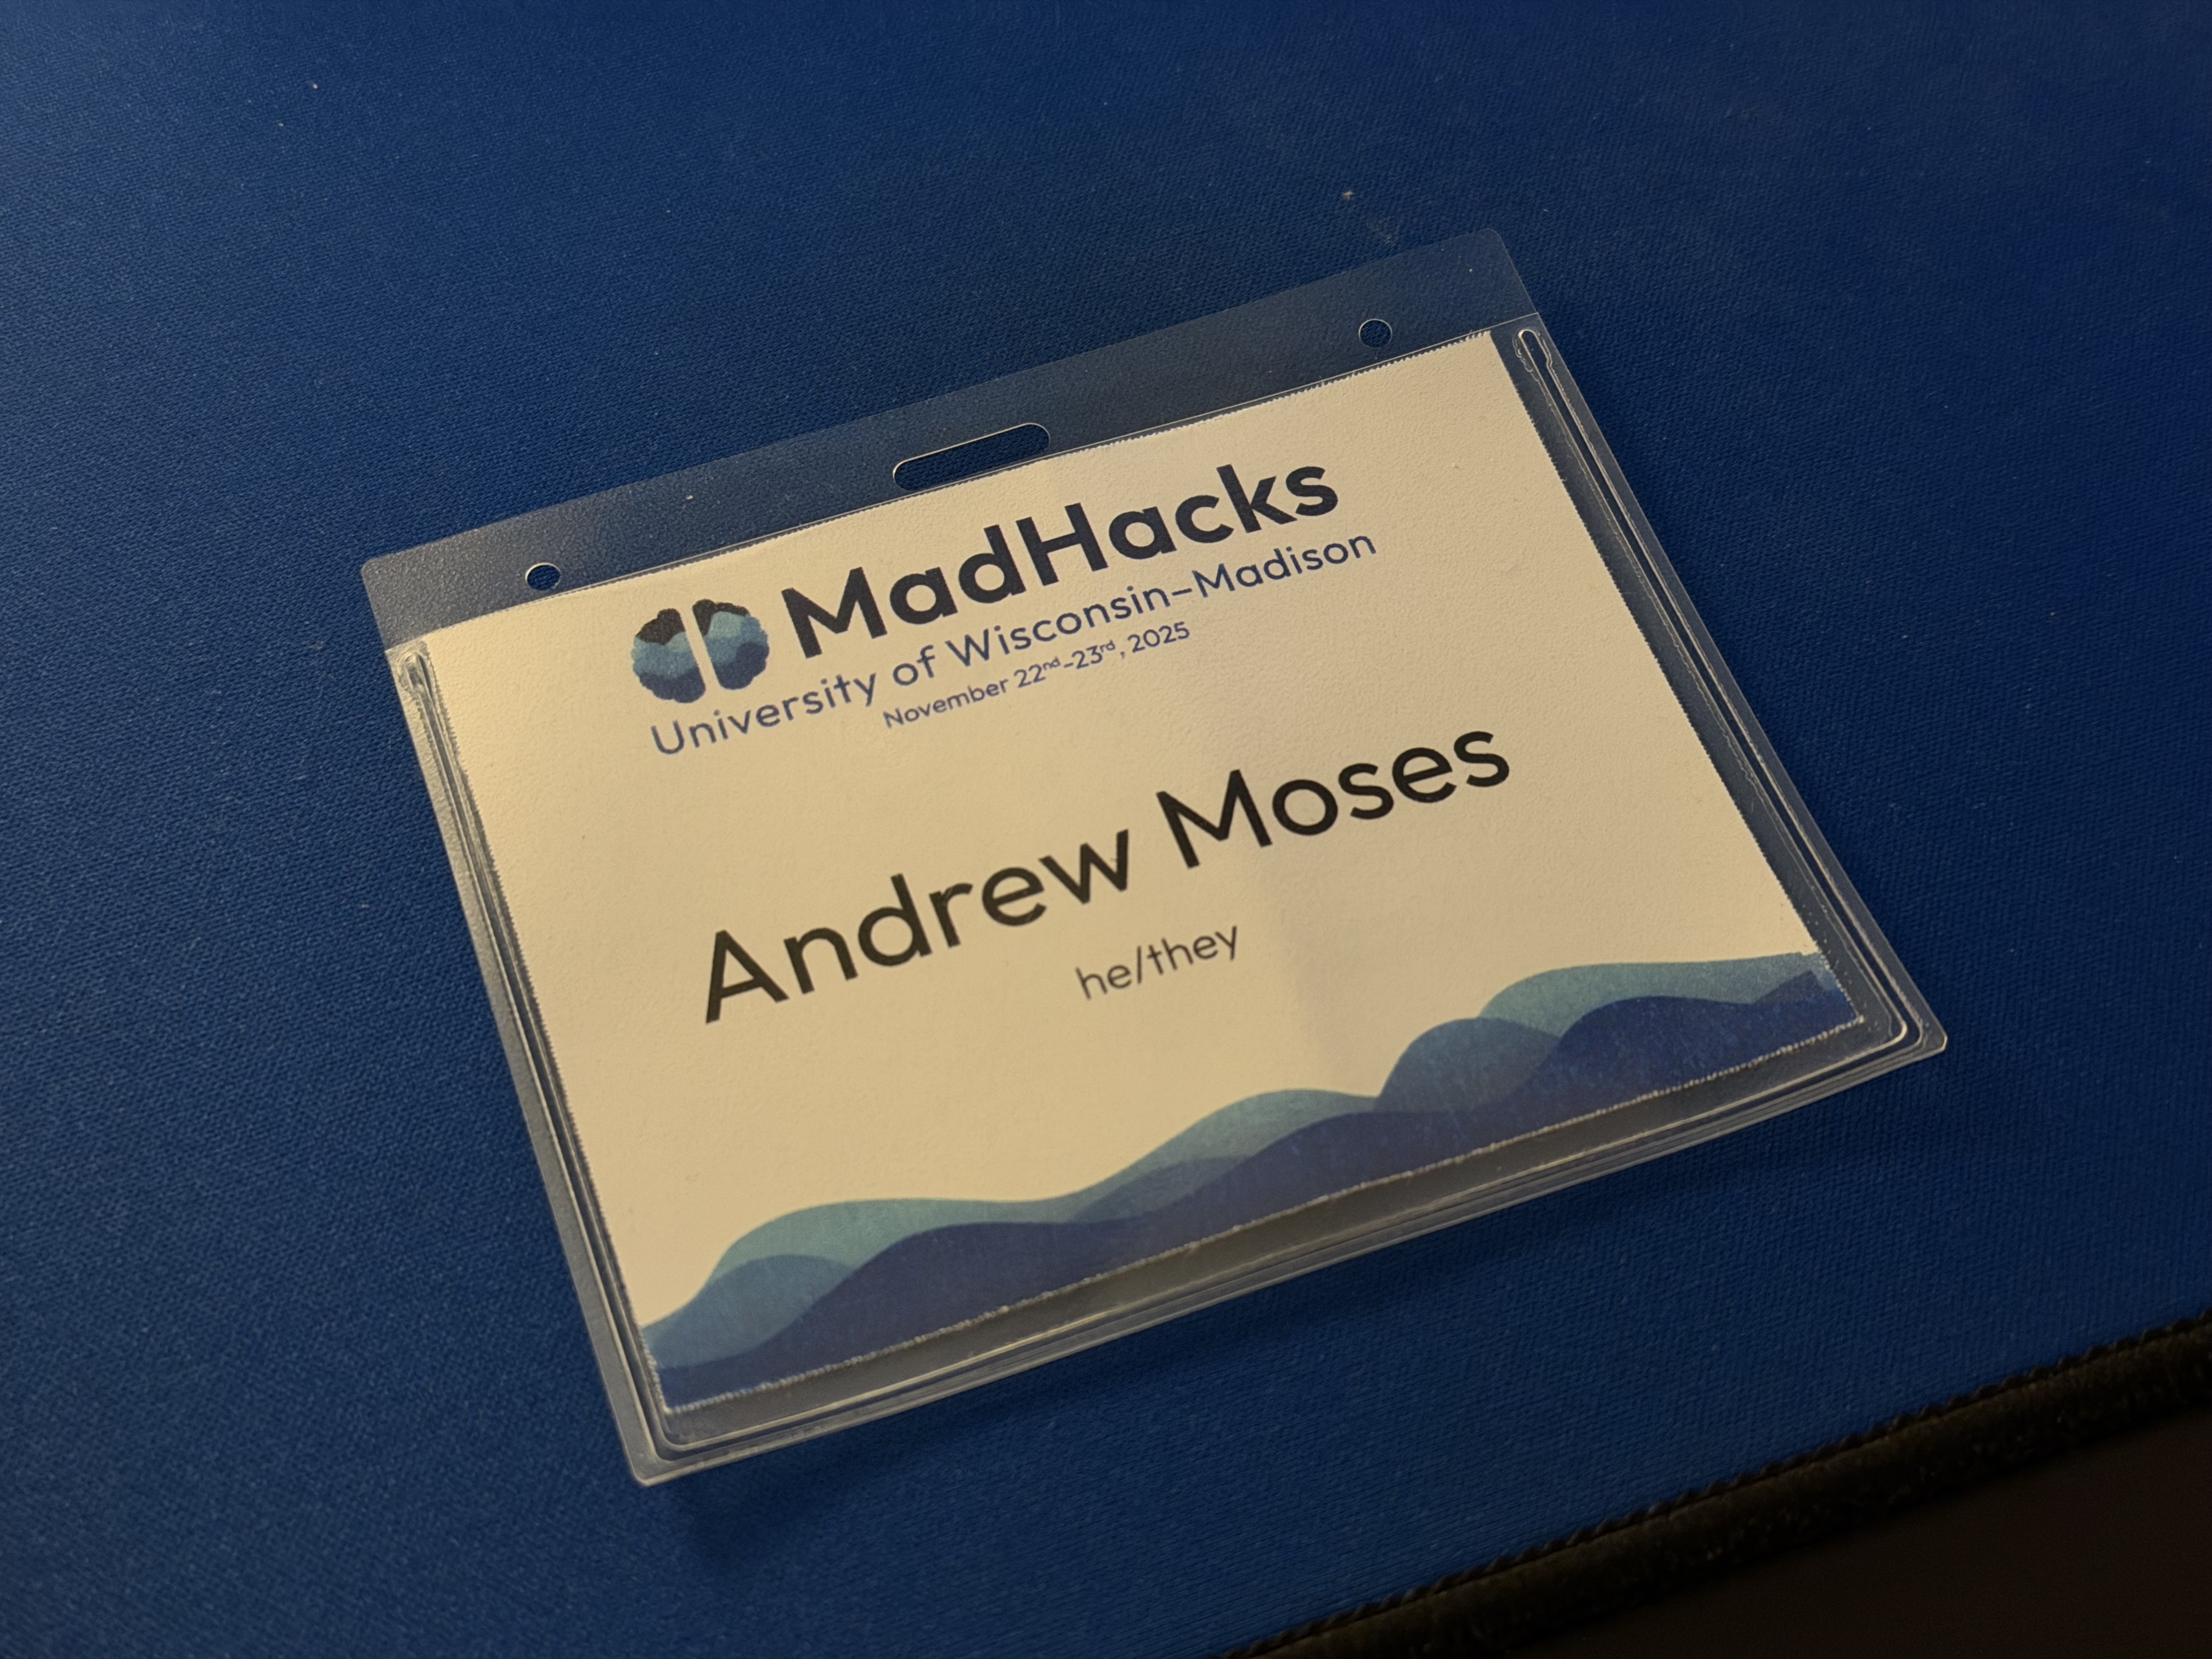
Front/back of a dummy pass with my name on it
I was in charge of creating the name tags for this year’s event. Michael, the name tag emeritus, graciously sent me the folder containing all the assets he used to create name tags for MadHacks 2024. This was a particularly dense bundle of 44 files, spanning .pdfs, .afpubs, and spreadsheets with concerning titles like “still_going.csv”. I took the base template and moved it into its own folder to work on.
The template had been created in Affinity Publisher, which is a product similar to Adobe’s InDesign. Both pieces of software have a feature named “data merge”, which allows you to create a base template to be cloned and populated from the values of a .csv file.
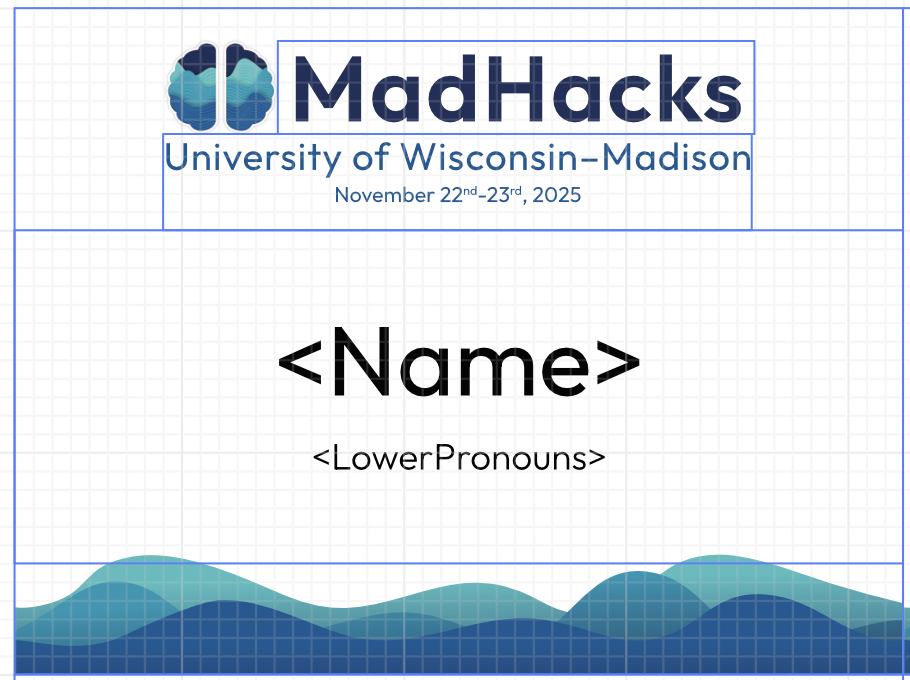
The MadHacks name tag template
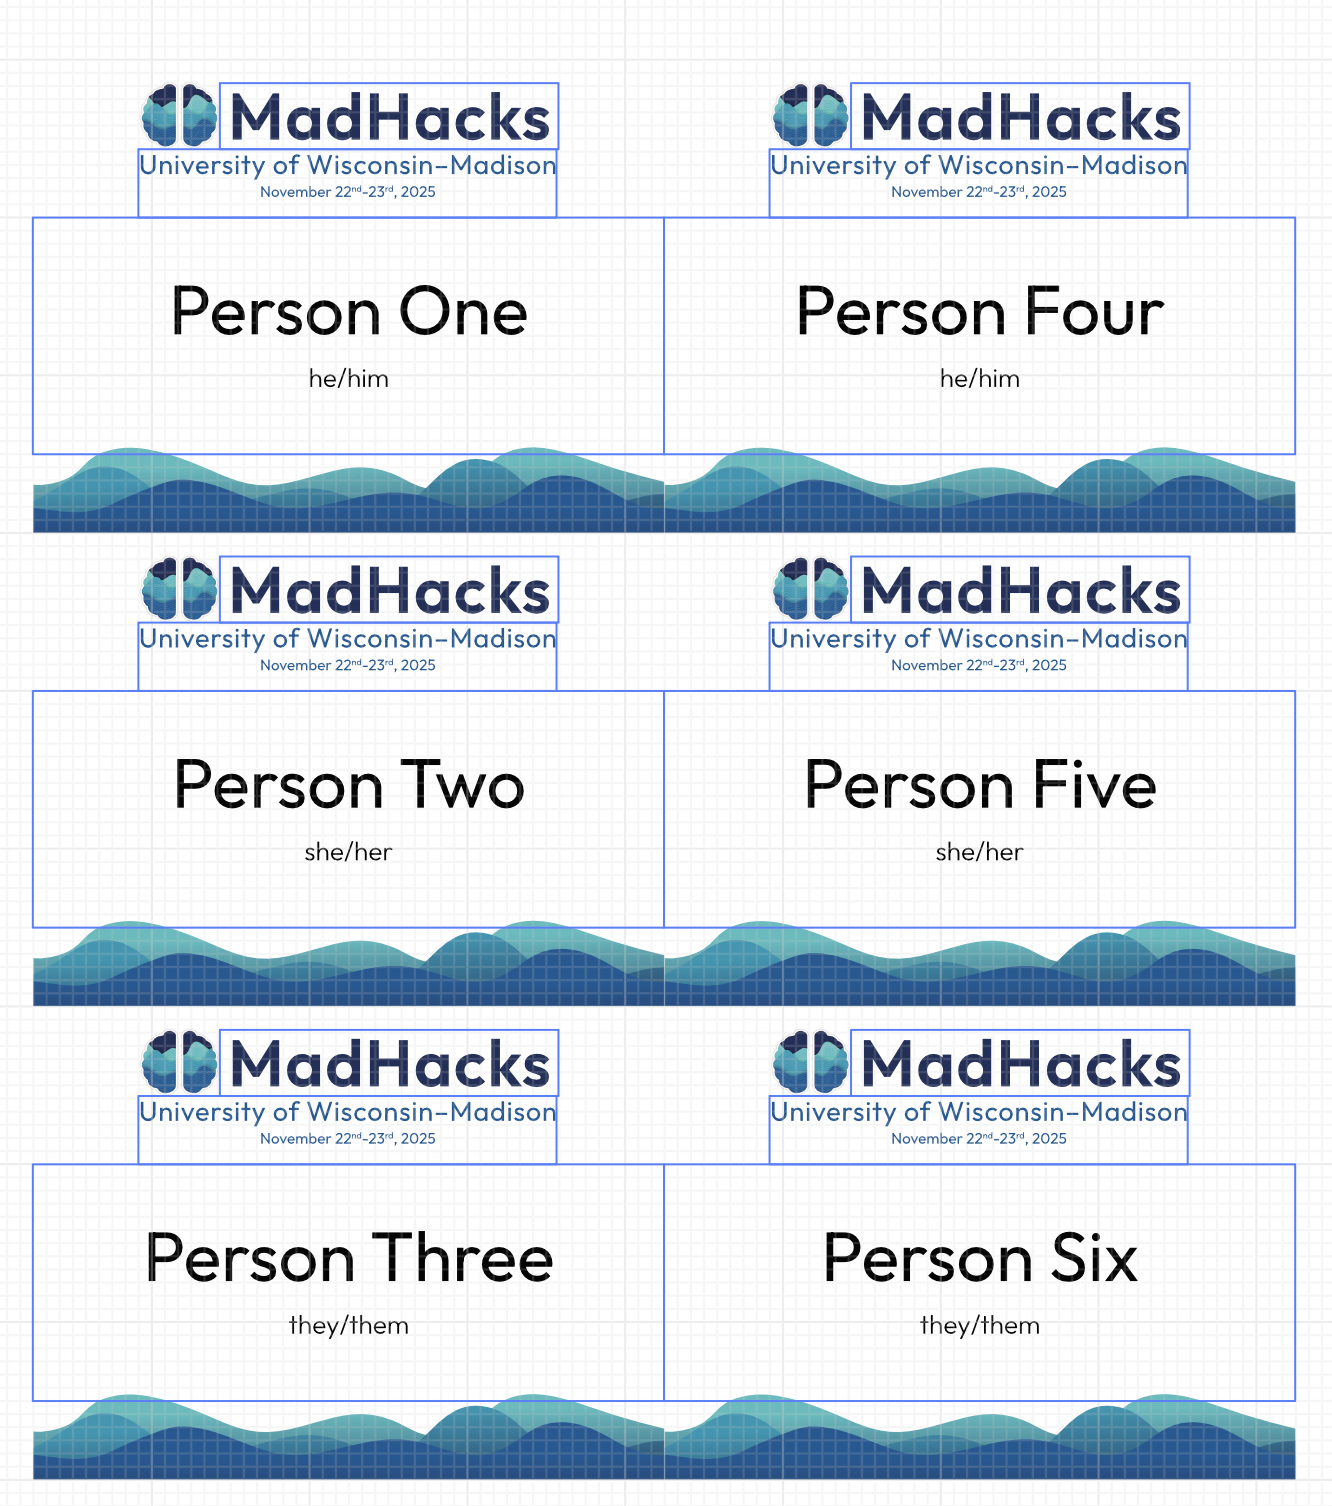
Once the participants of MadHacks had been accepted and finalized, I exported the main data sheet from Airtable and tediously mapped everyone into a .csv file with the respective fields set up to be data merged into the name tag format. I’m skipping over a lot here — there were tons of edge cases with different pronoun formats, the ~15 combinations of judge/mentor/volunteer/organizer that people chose, and long surnames that pushed the other text layers out of the card bounds. The mapping was easy enough once I had the .csv in the correct format — for a small example, the following csv…
1Name,LowerPronouns,QR_ID2Person One,he/him,mh_ffuS2g3Person Two,she/her,mh_chO2f4Person Three,they/them,pb2ASv5Person Four,he/him,mh_01dZvs6Person Five,she/her,mh_fovZZX7Person Six,they/them,mh_dskS51…would be converted to this sheet:
For the back, QR code images (whose code format I’ll discuss in just a second) were procedurally generated by Affinity Publisher’s “QR Code Tool”, which very nicely allows you to select a data merge field (csv column) as its source when generating.
New for this year, I designed a different format for what the organizer/volunteer/judge/non-hacker name tags look like. Previously, they shared the design with the participants’ name tags, save for a strip at the bottom with a section describing someone’s volunteering capacity. I thought this made some people assisting with the event a little too difficult to distinguish, so I swapped the color palette to make the latter tags stand out.
That completed the designs and exports of the tags. All I had to do, then, was to print the freshly generated .pdfs onto the pre-perforated cardstock that came with the name tag kit. Easy, right? Somehow, no!
Most printers have a section — known as a “bypass tray” — to insert any special print media of your choice, which is helpful for printing on non-standard materials like the name tag template.

However, when using this particular tray, it was never clear which side of the template to feed in first, which led to me unfortunately burning a few precious sheets attempting to figure out which direction came out right-side-up2. Once I got that figured out, I was able to successfully print on the correct side of the page.
Though now printing on the correct side, I noticed that the tags were full of awful visual artifacts and speckling.
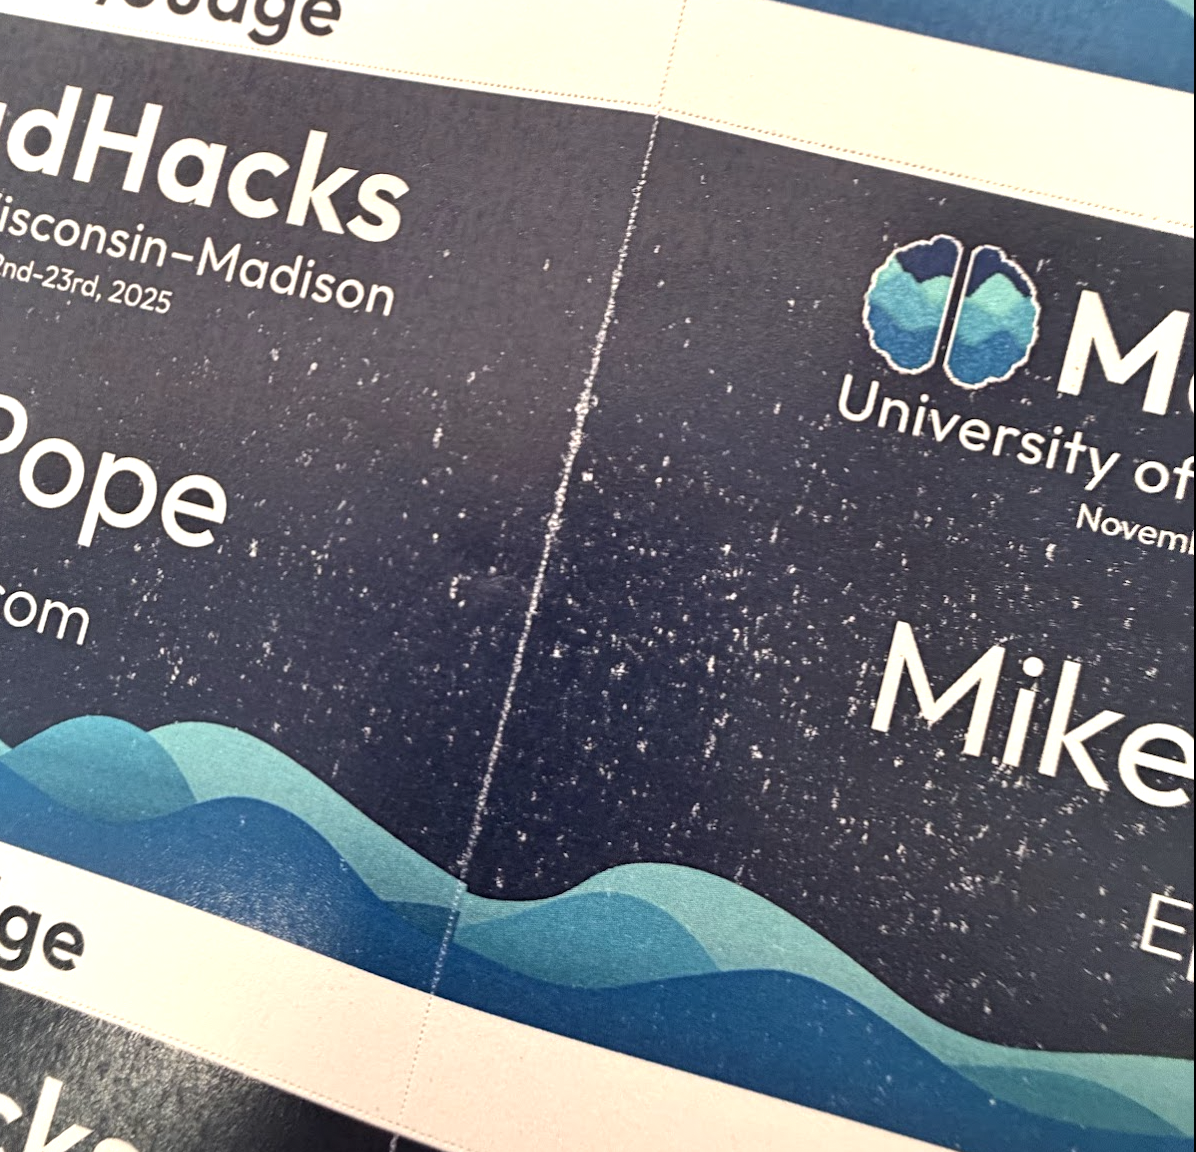
Some printer trivia: the feed speed and temperature of modern laser printers come calibrated for regular, off-the-shelf printer paper, and will usually have print issues with thicker materials like the cardstock I was using. I knew that, which is why I was already using the default “cardstock” print setting, but it turns out that the option still wasn’t hot enough and I needed to go into the settings and bump the heat even higher to get the toner to adhere. (On the Ricohs I was using, “Thick Paper 3” worked well.)
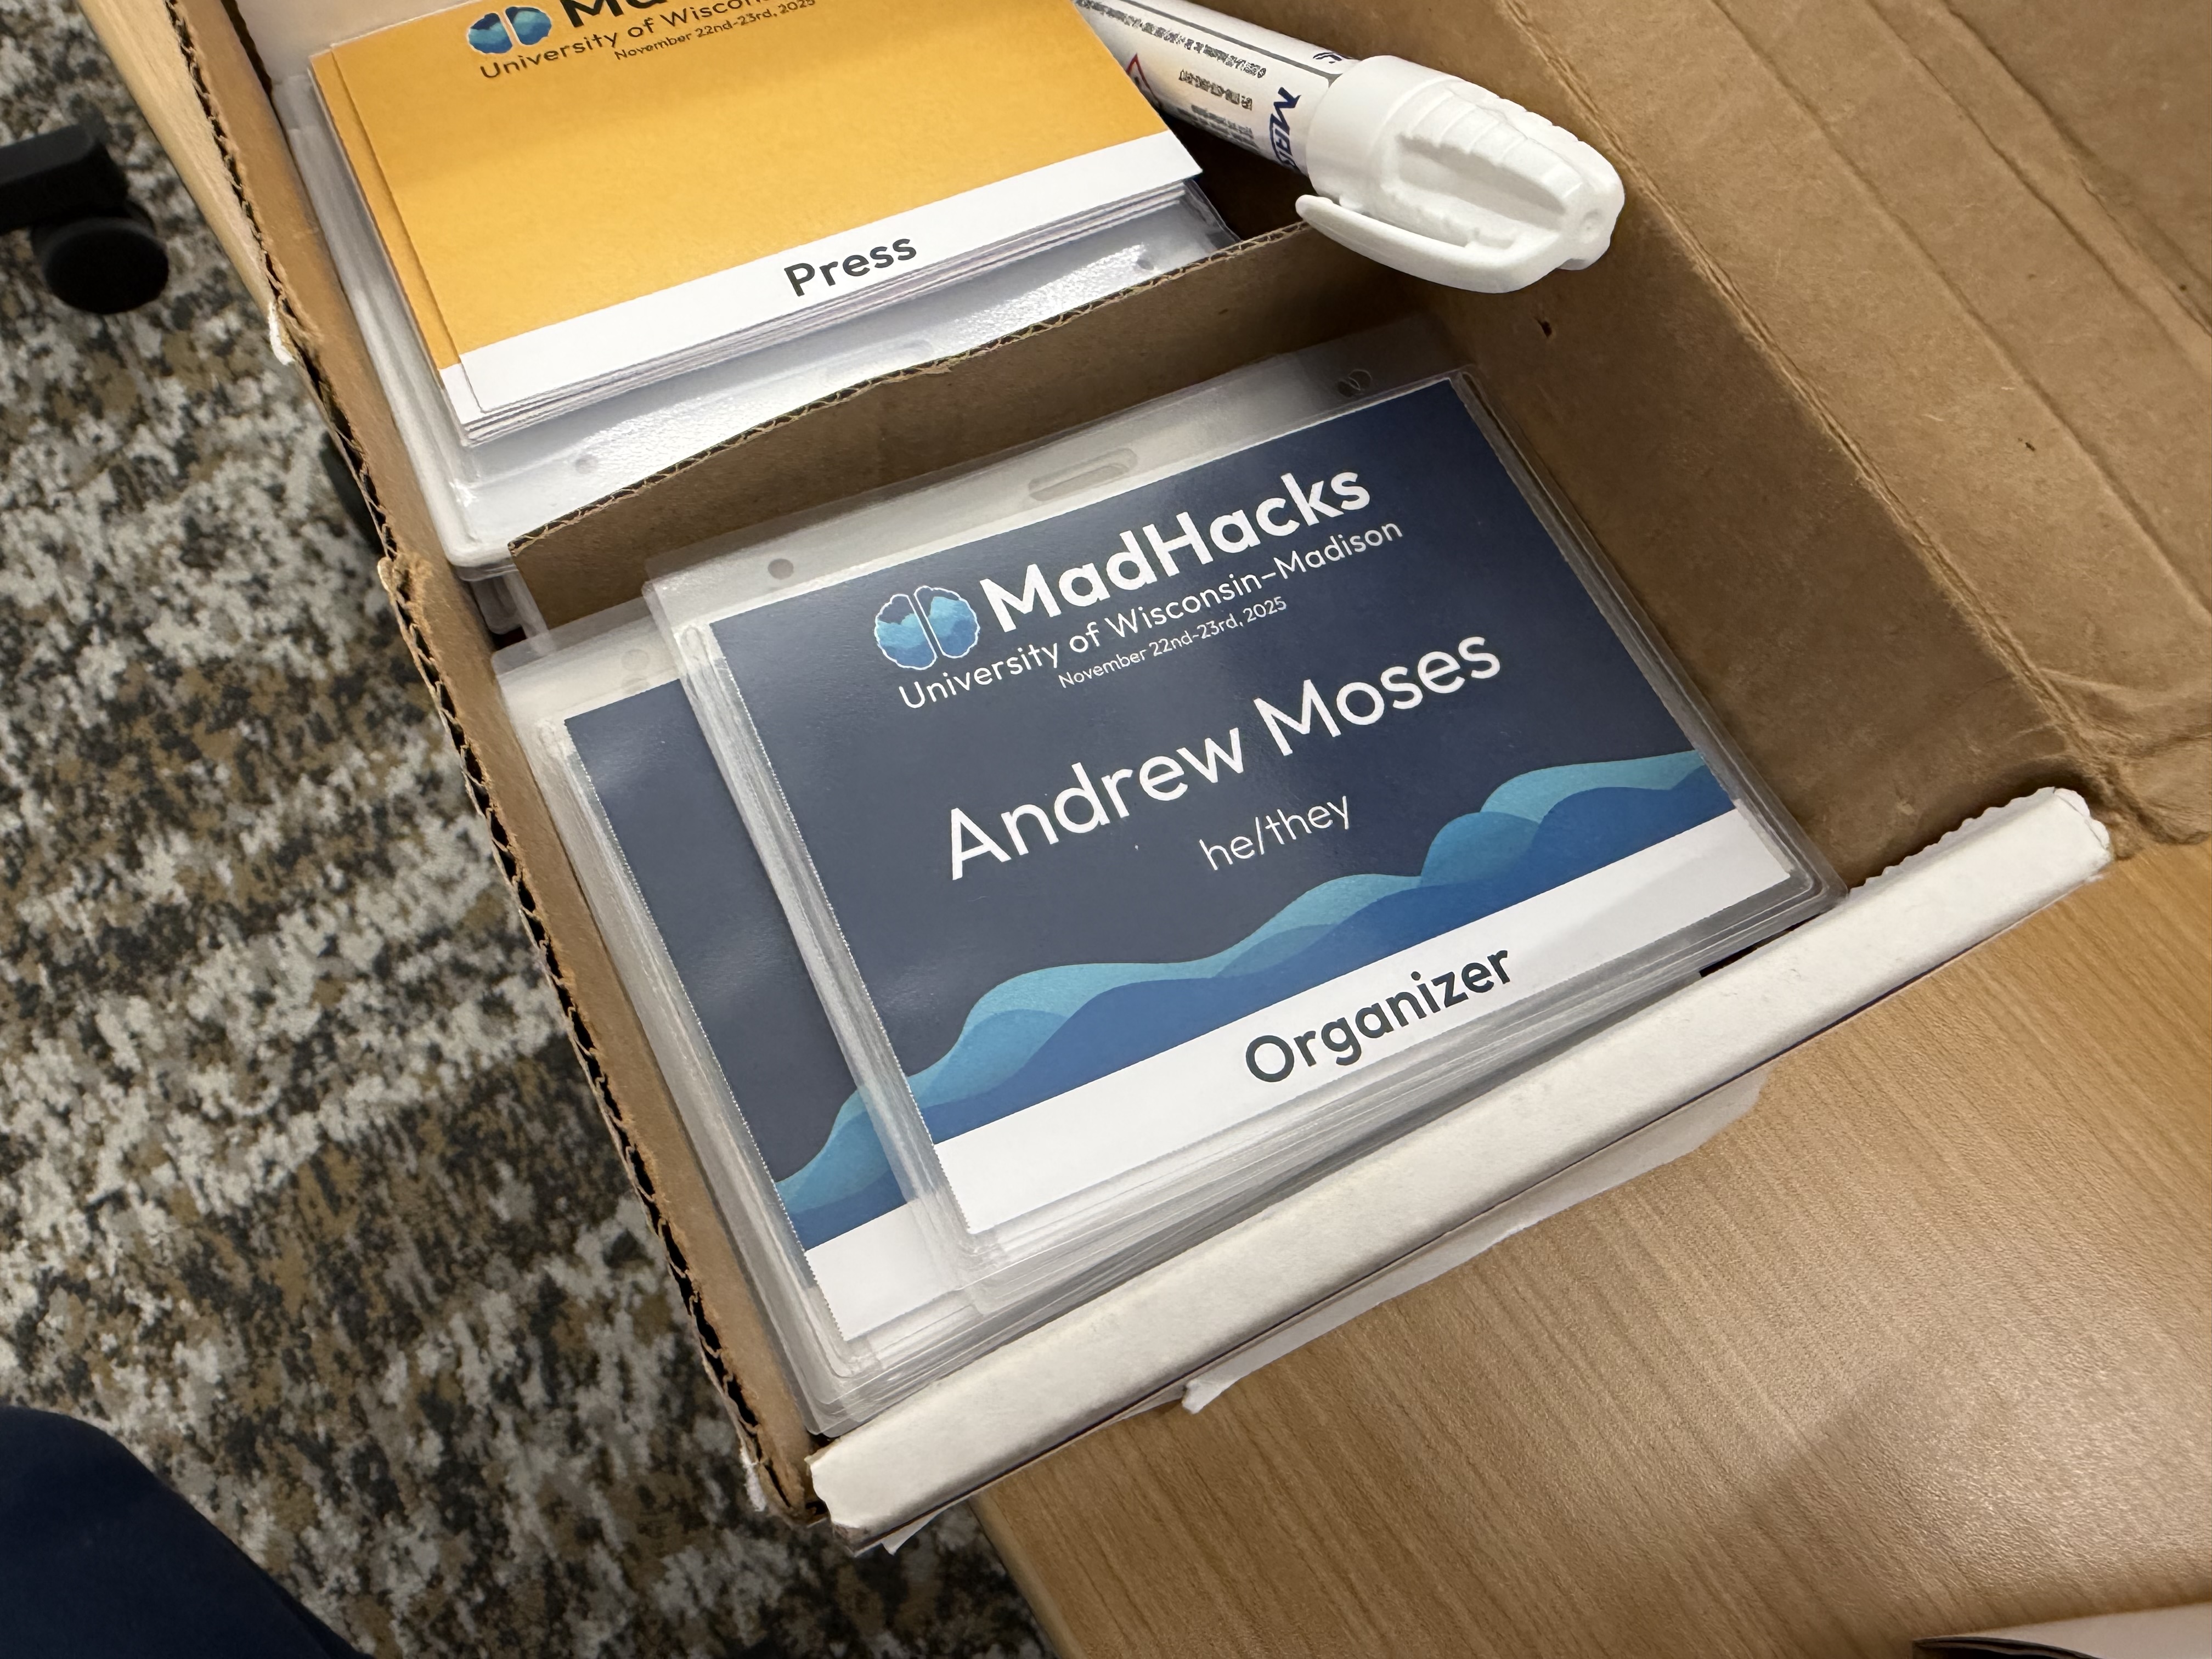
Once that setting was changed, we were in business, and over the course of an hour I was able to print nearly 500 tags total, spanning participants, organizers, volunteers, judges, mentors, and a few members of the press.
Shoutout to the other MadHacks organizers and volunteers for graciously breaking the sheets into their individual tags and sleeving them so I didn’t have to.
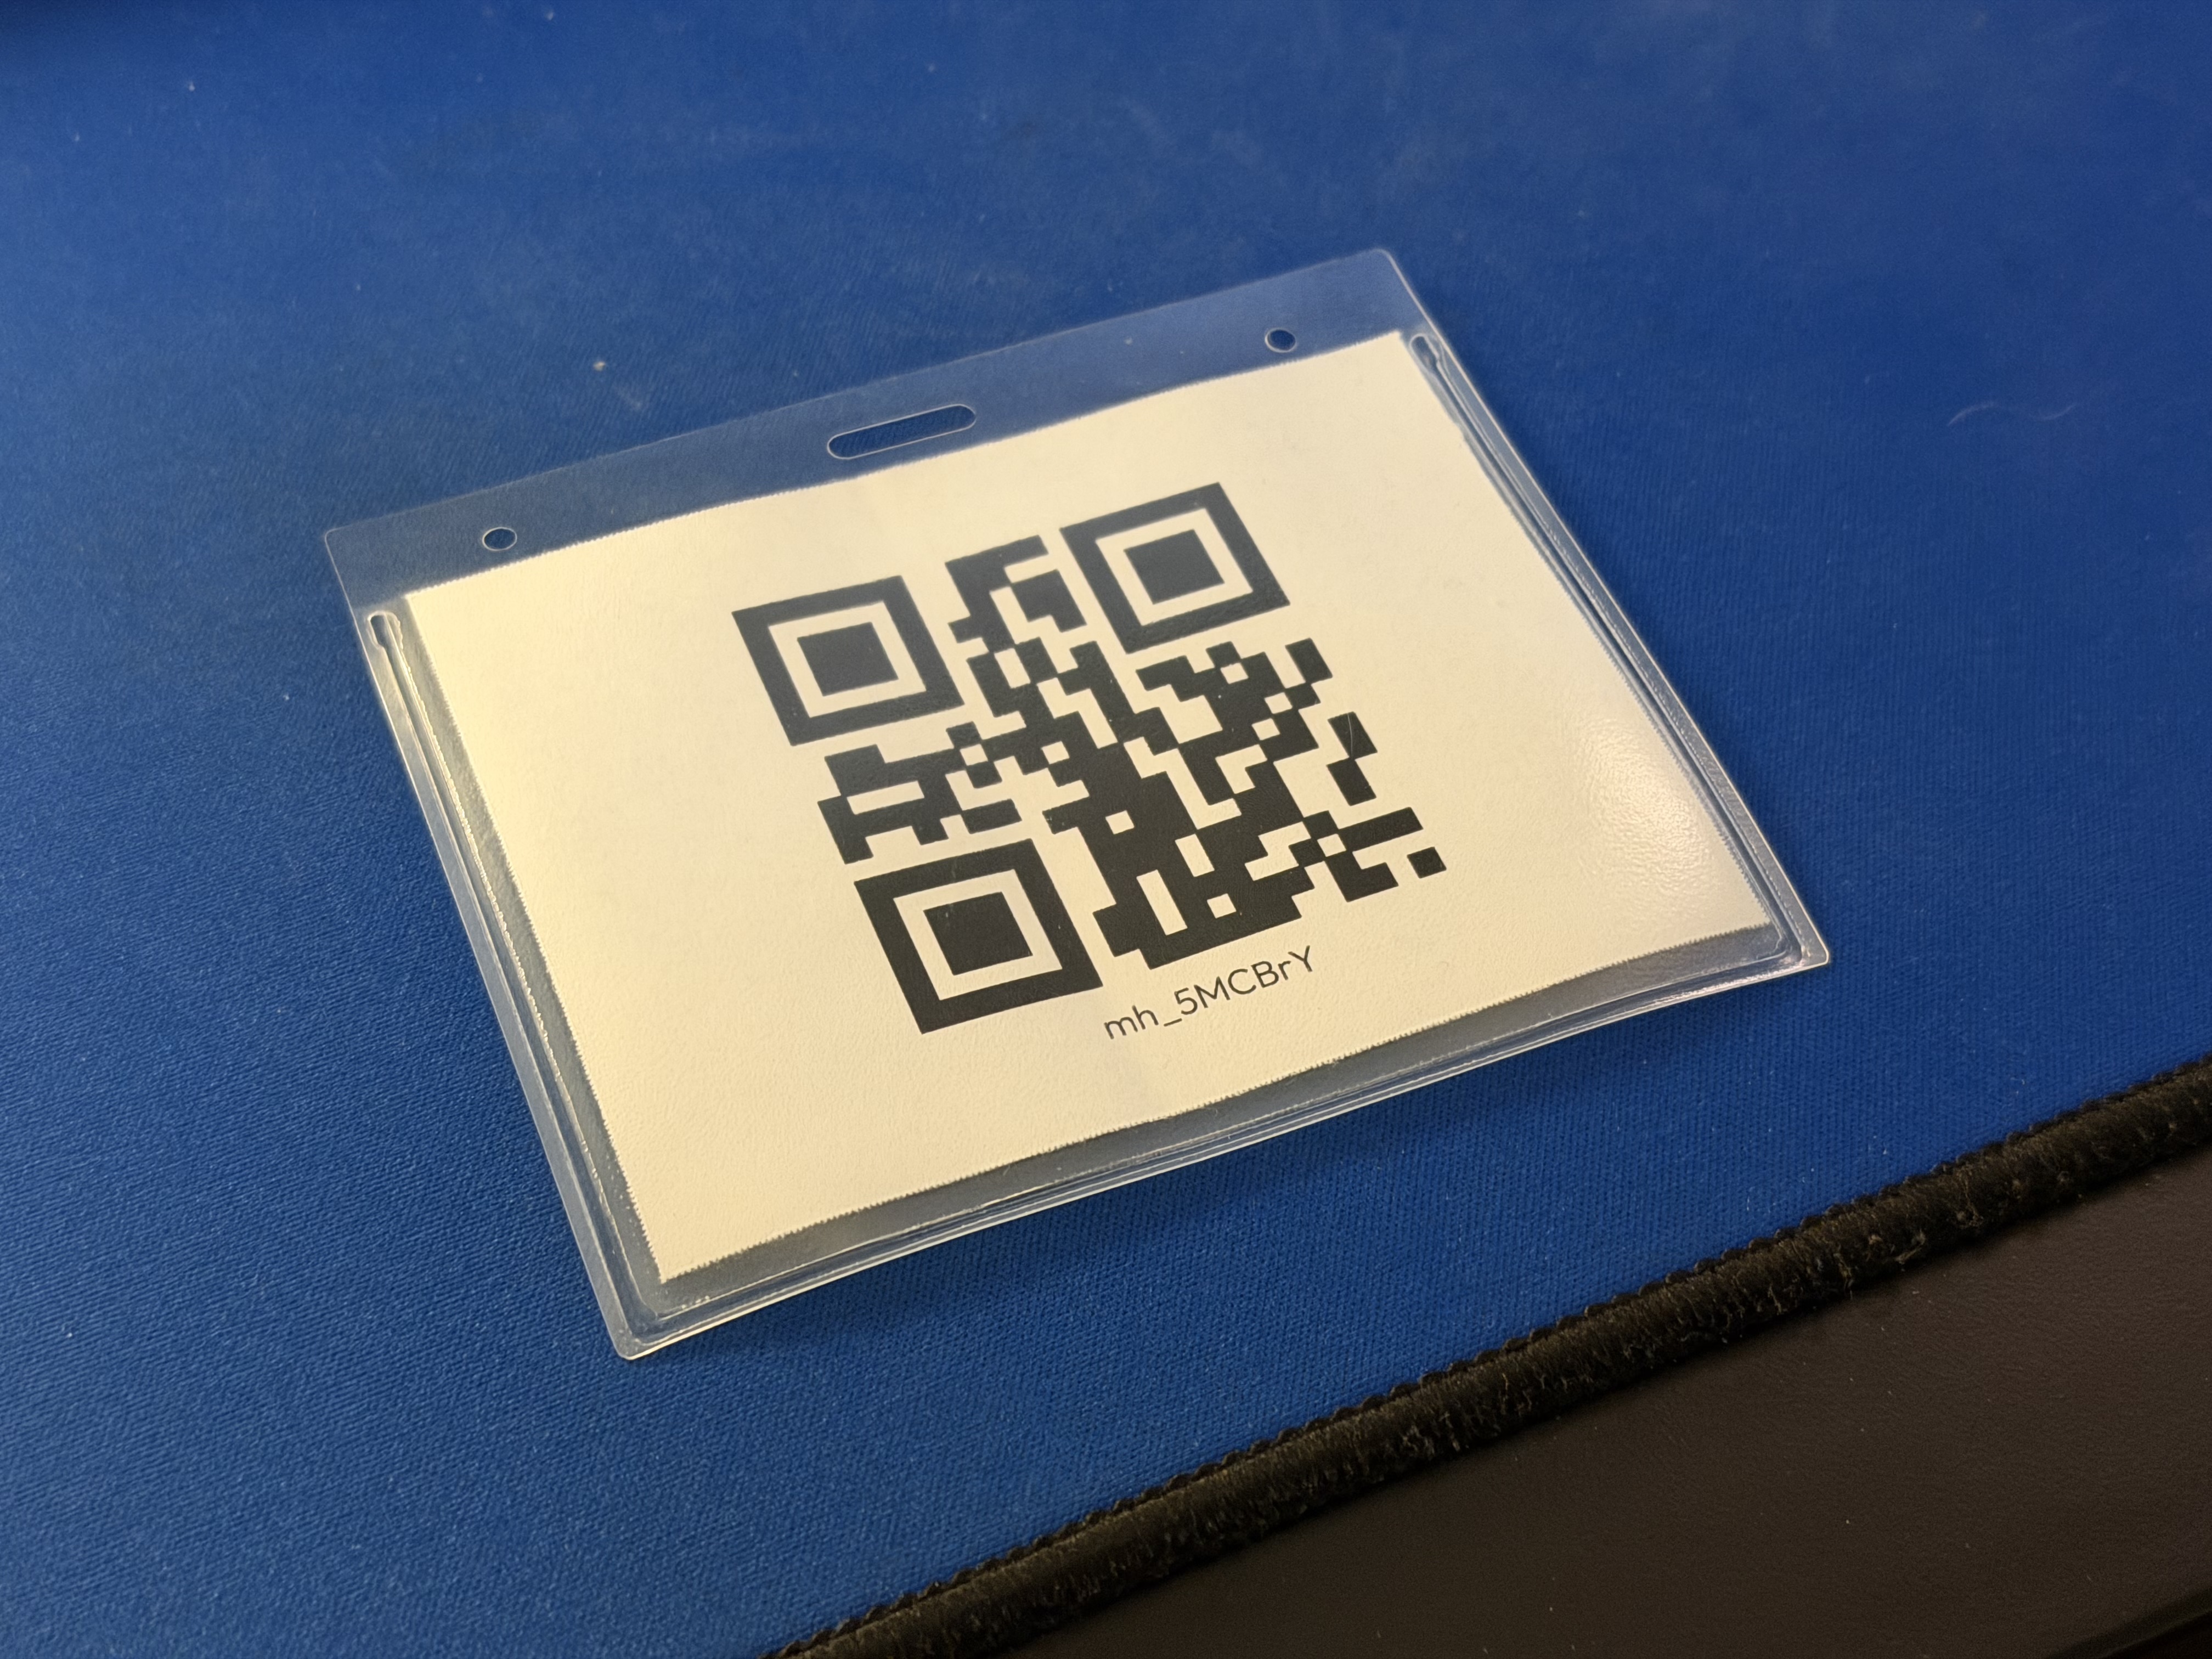
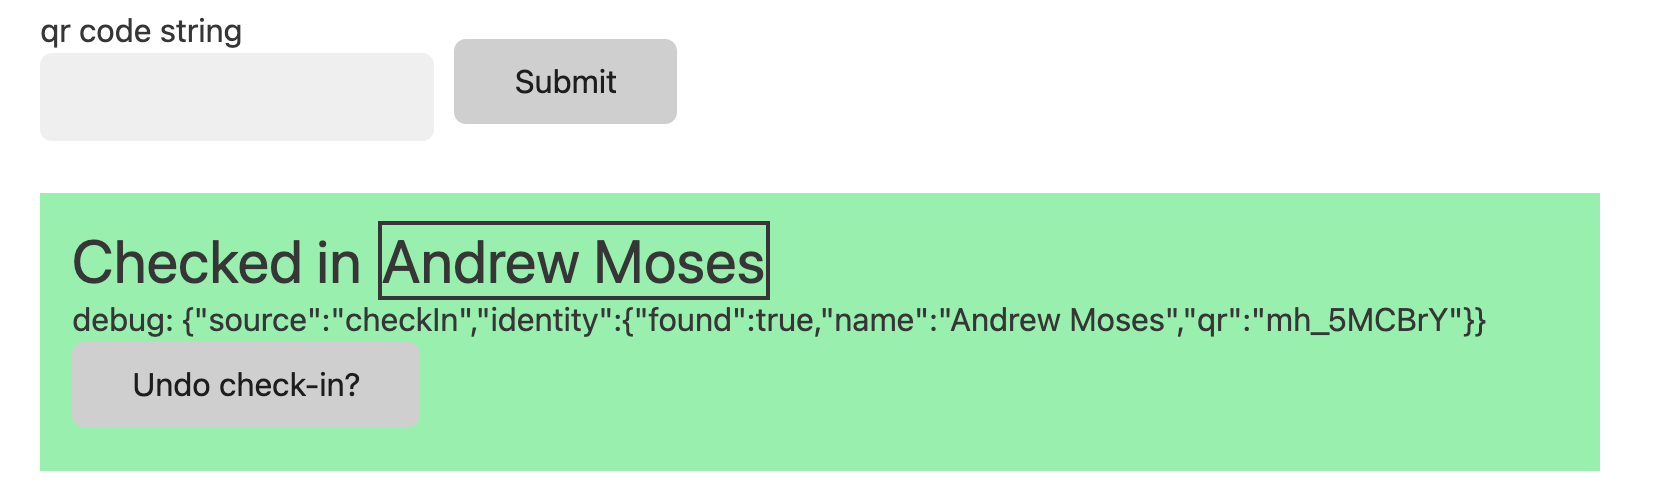
Now to the back of the tags. To both check the attrition rate of the event and track the number of participants getting food (…as well as prevent them from getting back in line for seconds and thirds), the name tags’ backs contain a scannable QR code.
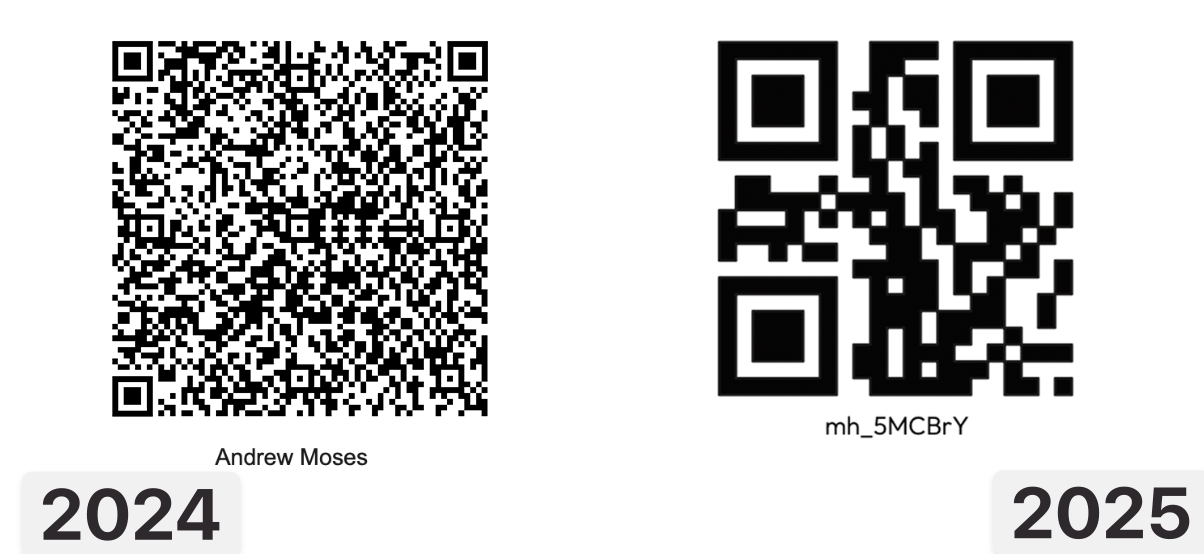
In previous years, the QR codes on the backs of hackers’ name tags were a JWT encoding the entirety of their application, including phone number, name, email, iat, and iss. That created a payload that looked something like this:
1{2 "phone": "123 456 7890",3 "name": "Andrew Moses",4 "type": "reserved",5 "email": "email@andrew.moses",6 "iat": 1704067200,7 "iss": "MadHacks Fall 2024"8}To sign the JWT we need to pick an arbitrary secret. I’ll choose “MadHacksEventUWMadisonTwentyTwentyFour”. When we sign that with HS256, we get:
eyJhbGciOiJIUzI1NiIsInR5cCI6IkpXVCJ9.eyJwaG9uZSI6IjEyMyA0NTYgNzg5MCIsIm5hbWUiOiJBbmRyZXcgTW9zZXMiLCJ0eXBlIjoicmVzZXJ2ZWQiLCJlbWFpbCI6ImVtYWlsQGFuZHJldy5tb3NlcyIsImlhdCI6MTcwNDA2NzIwMCwiaXNzIjoiTWFkSGFja3MgRmFsbCAyMDI0In0.lXc55wq4gO1cDCZT0lv7P0nUZ7gEDrKXacG2NZwGeVM
…
Imagine what that’ll look like on a 3” x 4” name tag!
Not only is it horrifically unreadable, but we’re using 261 characters to represent the payload. Putting this onto a QR code will lead to an incredibly high resolution, making it more difficult to scan (and to look at). JWTs have their uses, but I think it goes without saying that they are not the correct choice for this use case. Aside from the length concerns, there is no reason that the end-user scanning the code would need to arbitrarily access the attendee’s email or phone number.
The one benefit that JWTs do allow in the context of an event like MadHacks is their self-checking ability. The last section of a JWT (index 2 if you split on the periods) is its signature. Using it, you can check if the JWT was created by someone who has access to the aforementioned secret key. If we’re using the QR code as the single source of truth, we want to make sure that we’ll only allow valid tokens that were generated by MadHacks. If the QR codes were easy for anyone to generate, they could spoof their own and break into the event (or get multiple servings of food early).
The insight that allowed me to shrink the size of the QR codes down dramatically was that… all of the devices used to scan the name tags have access to the internet during the event. If we pre-generate codes for every attendee to use as a lookup key, we can have a dramatically reduced string size and a smaller QR code. In fact, just two base62 (a-z, A-Z, 0-9) characters would allow for 3,844 combos (62^2 = 3,844), which is way more than enough for the 419 participants who eventually attended.
However, I didn’t want people to be able to guess a random two-character string and have a 10% (419 / 3844) chance of hitting a valid participant, so I made the codes six characters in length. Because of the power of exponentiation, this raised the number of possible codes to fifty-six billion. The odds of hitting a valid code in this search space are 0.0000007377% (419 / 62^6), which, for a completely unfair comparison, is around 8,900 times less likely than being struck by lightning over the course of your life. Good enough!
I generated a code of this format for each participant using a Python script (adding entries to a set() until its length was 500). For aesthetic purposes, I prepended a mh_ (MadHacks) to each, which resulted in codes that looked like mh_XXXXXX.
With this change, the QR codes ended up looking nicer, scanning faster, and containing a much lower resolution.
#Mobile Wallet Passes
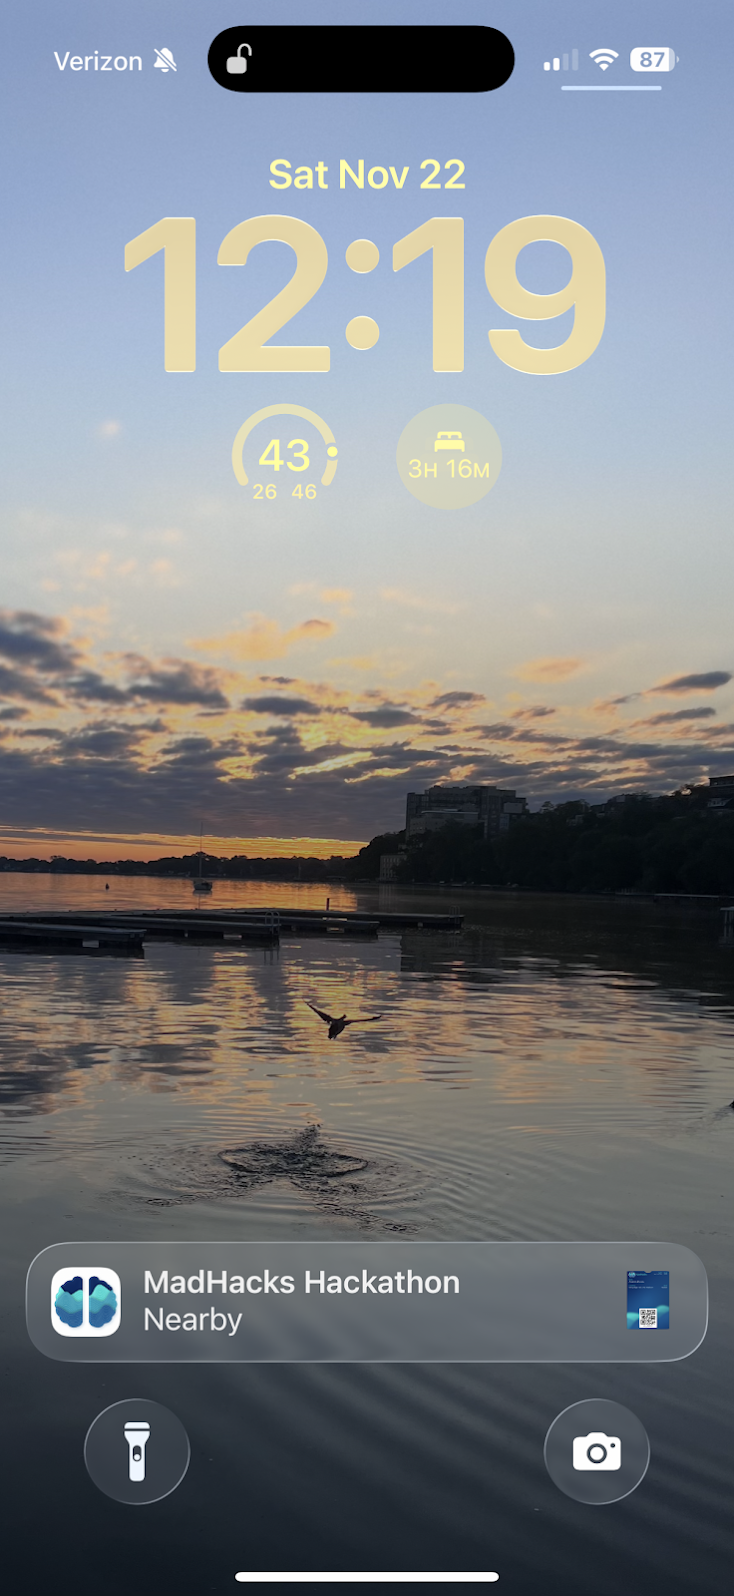
When participants arrive at MadHacks, they scan a QR code sent via email to mark them as attending. We then hand them their name tag and some merch (T-shirt & stickers).
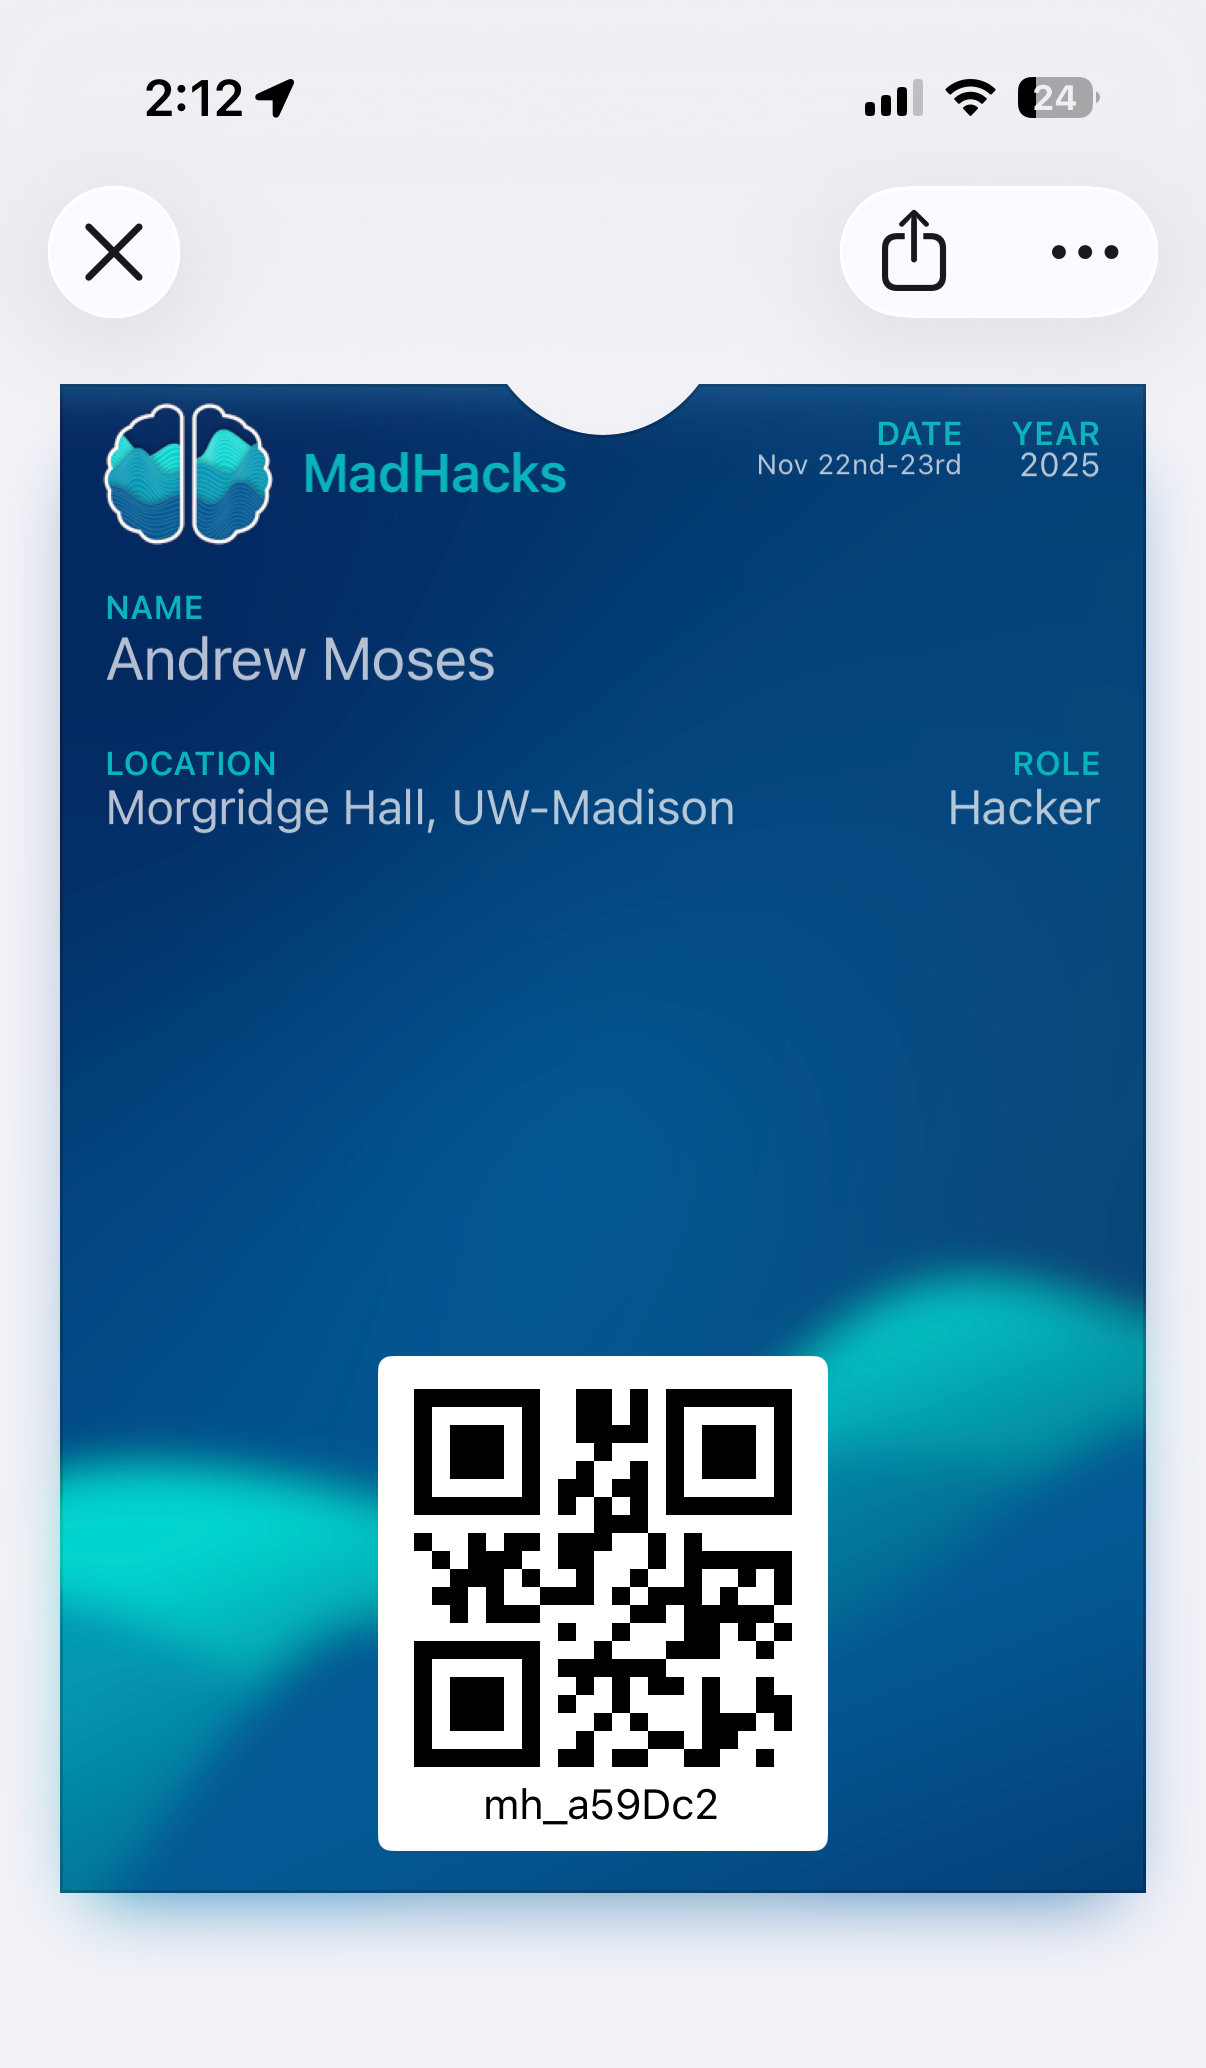
For this year, to speed things up a bit, I decided to create a system to generate a virtual pass for each attendee that they could add to their phones before the event began. This would make it easier for them to pull up as they got to the check-in desk, with the added benefit of being a nice souvenir. iOS and Android both have APIs that allow you to add a pass to a mobile wallet, so I did some research as to what I would have to generate. I had to implement two different systems for either operating system:
#Apple
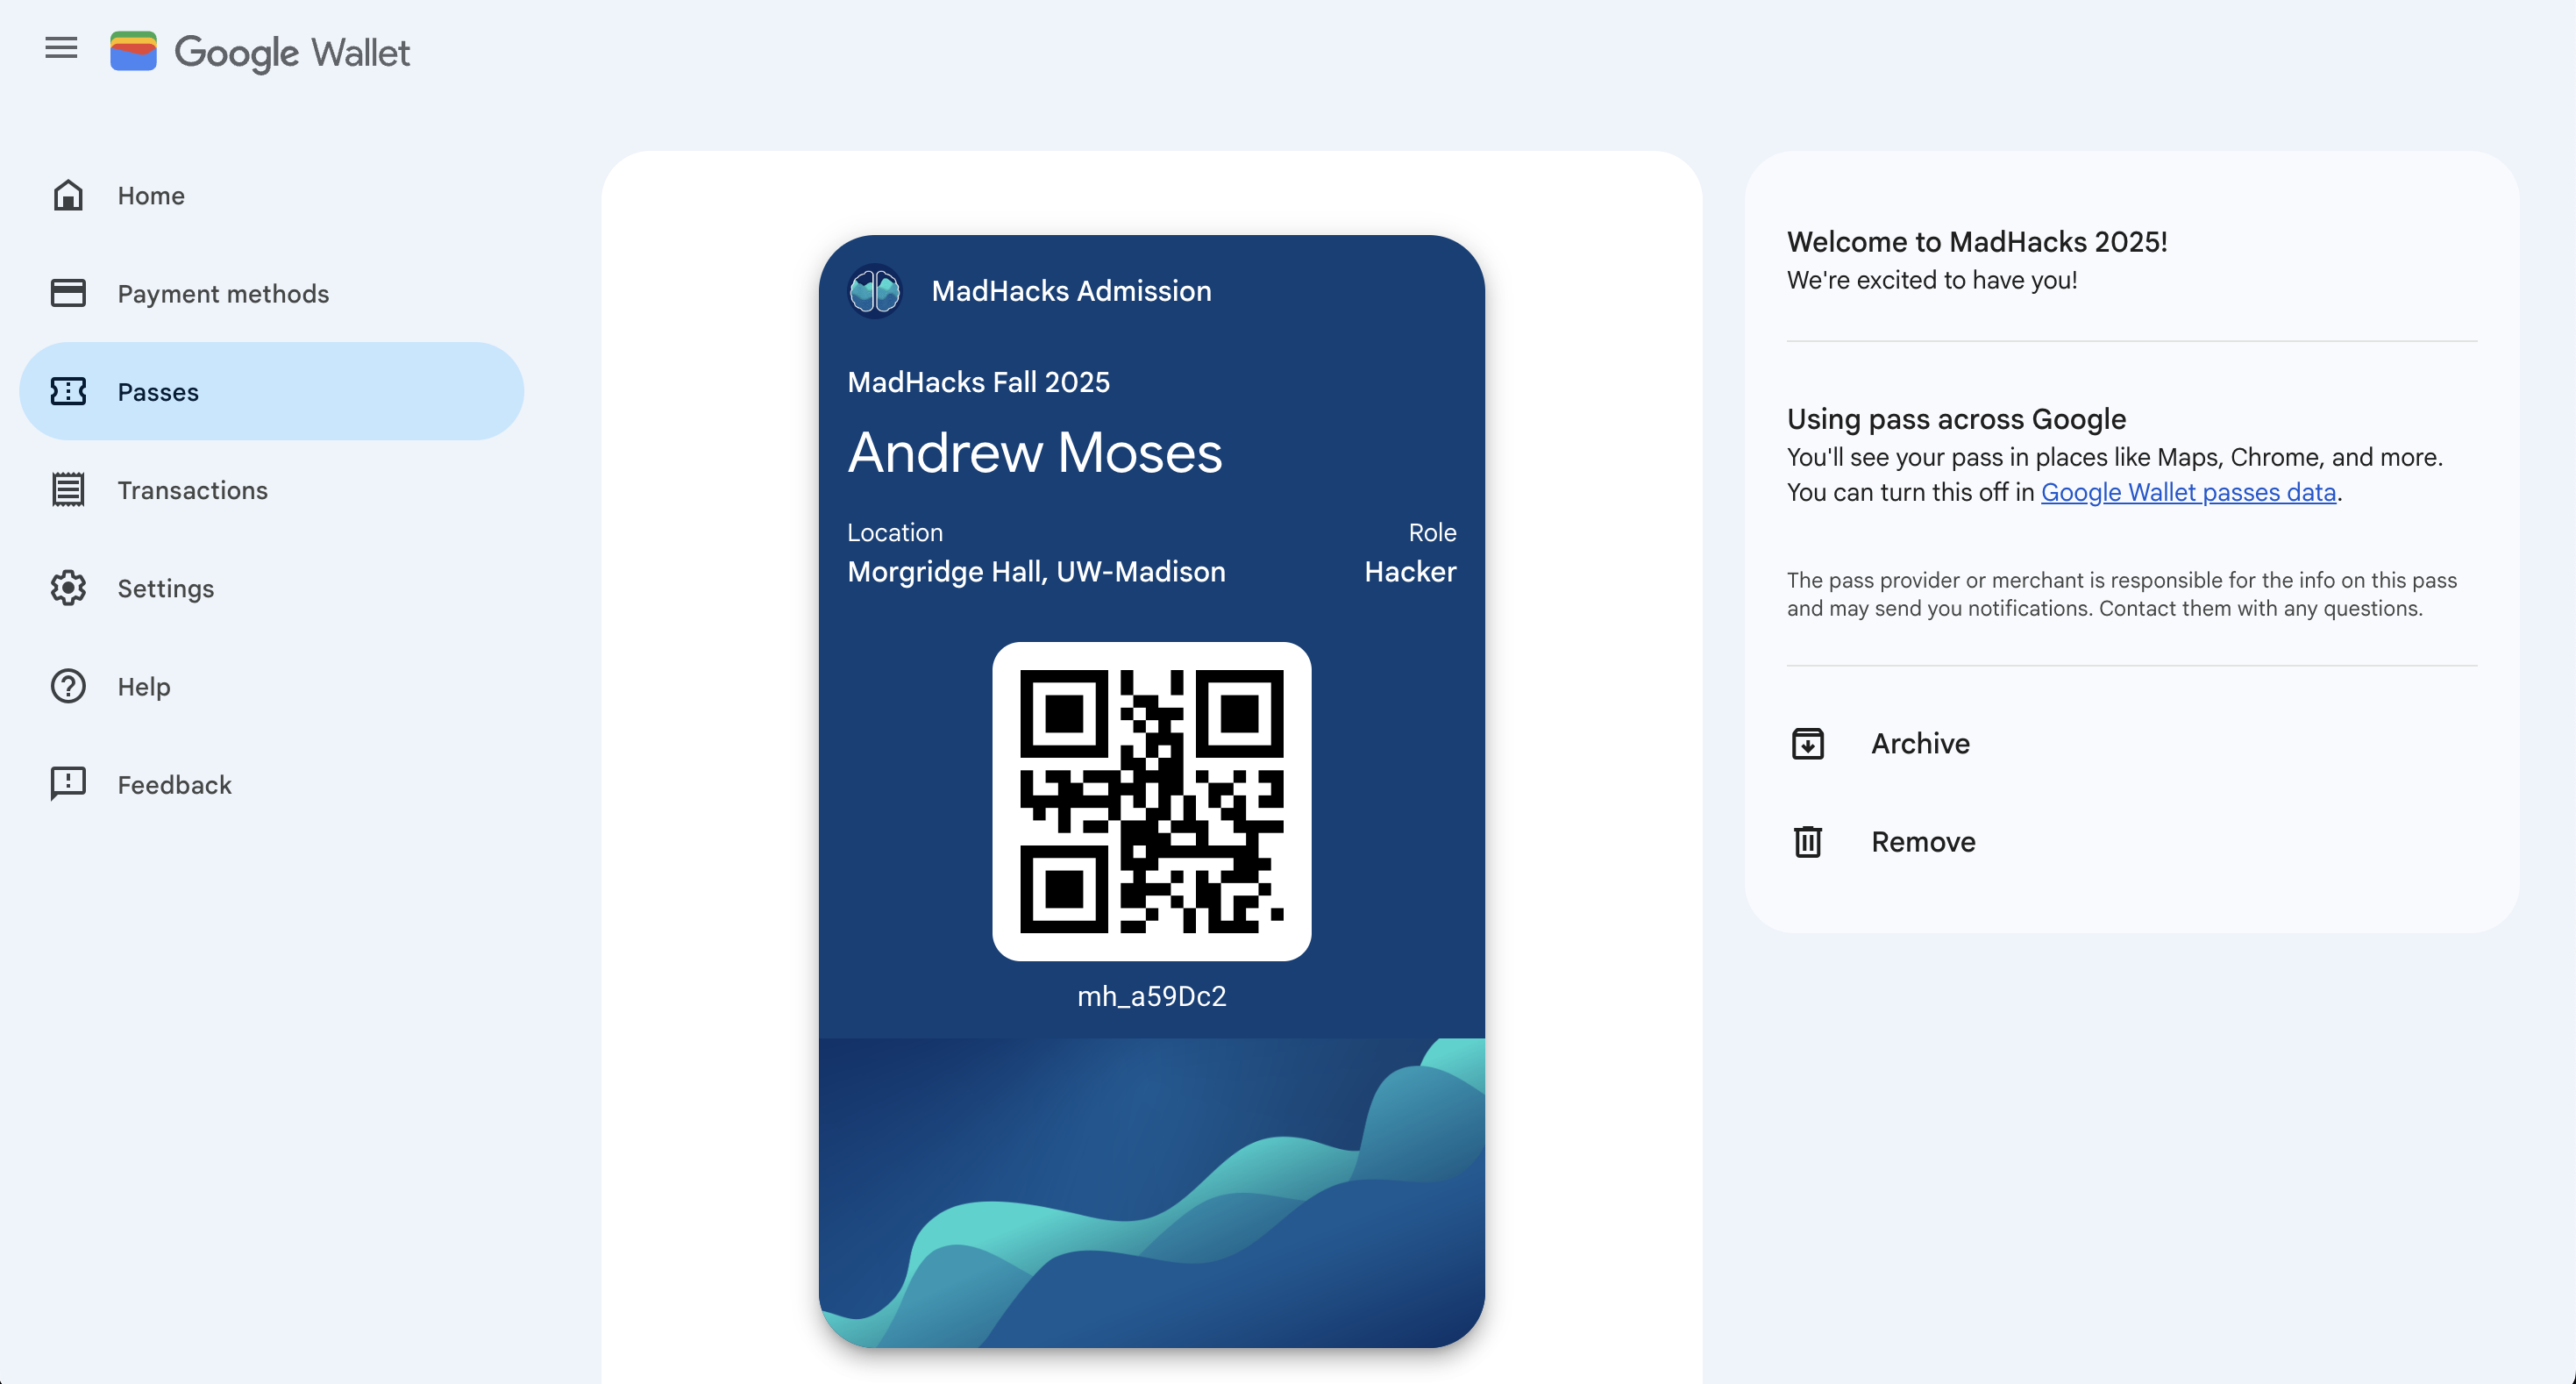
To create an iPhone-compatible pass, you need an Apple developer account. There’s a subscription cost of $99/year to generate the certificate needed to sign the passes (which you need for devices to accept and display them) which MadHacks very graciously reimbursed me for.
I followed the Apple Developer guide for creating the source files for the pass model itself. The model is essentially a folder that contains the text and QR code data displayed on the pass, along with all of the graphical assets like the background and logo. I used a handy website called pkvd.app to visualize the graphics as I drafted the design, which saved me an immense amount of time of having to re-generate the pass and load it onto my phone every time I made a change.
It was surprisingly simple to create a single pass and sign it from the command line. I very quickly had a demo of what I wanted the passes to look like:
The only issue, then, was somehow generating all of these passes and distributing them to participants who were admitted to the event. To dynamically create a pass, I would have to programmatically update the pass.json file, generate the pass manifest, and then sign the bundle with my certificate. When making this many passes, it’s actually recommended to generate the pass data on-demand instead of pre-generating hundreds of them in advance.
Fortunately, there is a fantastic Node.js package called passkit-generator that took care of a lot of the grunt work. You provide it with your signing certificate, pass model, and any dynamic parameters (like the name and QR code) and it substitutes them into your model and spits out a buffer of the pass. That’s exactly what I needed!
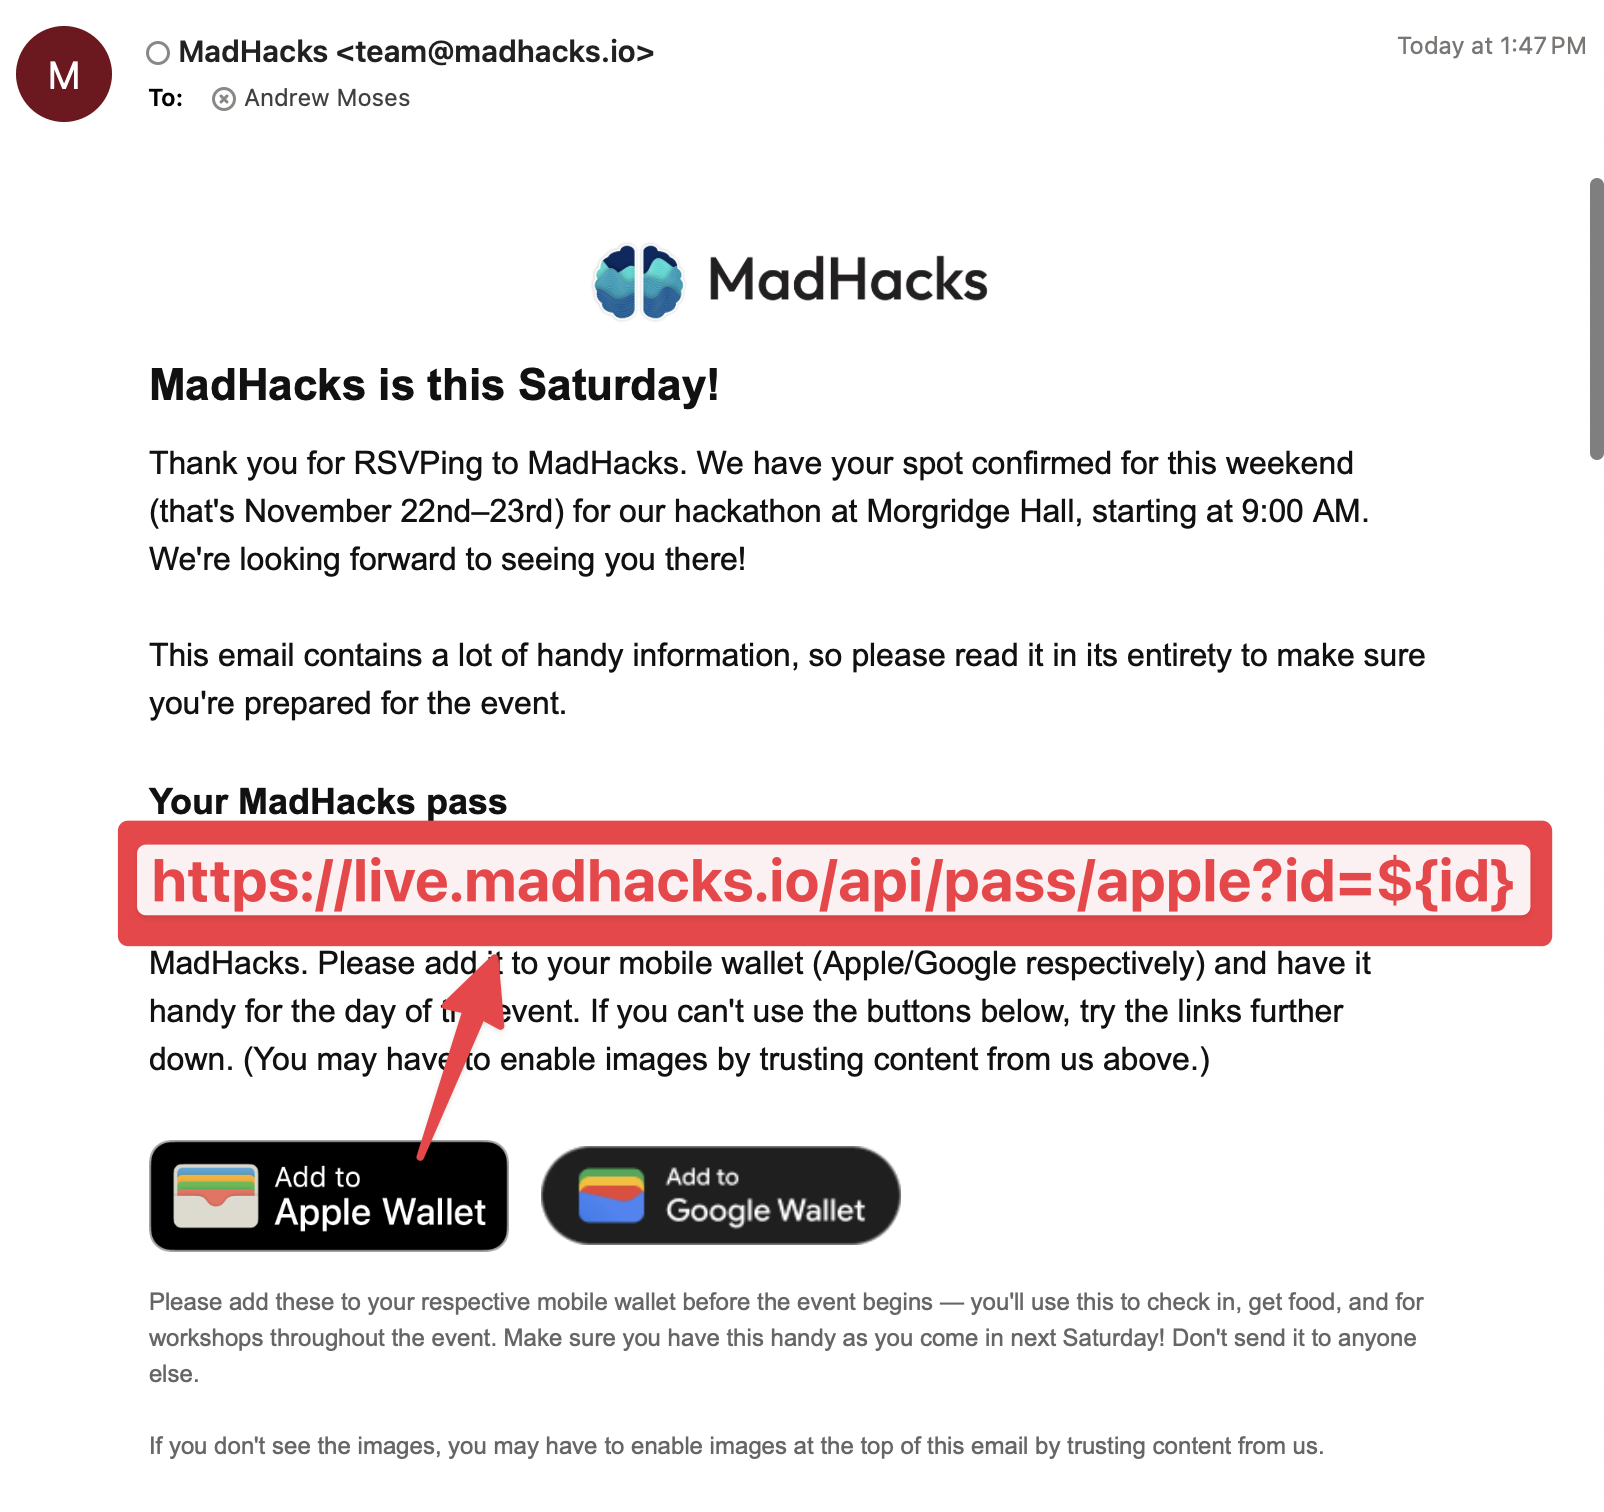
I made a +server.ts endpoint on the MadHacks SvelteKit application that would accept a QR code parameter and return a complete buffer of the wallet pass. When I sent out the emails to participants, I templated the “Add To Wallet” button to hit the endpoint with their QR code as a parameter.
That endpoint validated that the QR code string belonged to a real participant by doing a lookup to our Airtable database. If it did, it would take the corresponding attendee name, template it into the pass generation function, and pass back the buffer (with the MIME type 'Content-Type': 'application/vnd.apple.pkpass' so that the phone knew to interpret it as a pass). To the end user, it would just look like the “Add to Wallet” button immediately prompted them to download their pass.
Apple allows you to include metadata in your pass.json (what they call “semantics”) that allows it to suggest itself on your lock screen when relevant:
1"semantics": {2 "eventType": "PKEventTypeConvention",3 "eventName": "MadHacks Hackathon",4 "eventStartDate": "2025-11-22T19:00-08:00",5 "eventEndDate": "2025-11-23T23:21-08:00",6 "venueName": "Morgridge Hall",7 "venueLocation": {8 "latitude": 43.072842,9 "longitude": -89.40691010 }11},This made check-in even easier, since participants’ phones would preemptively suggest the pass as “nearby”.
#Android
For Android users, I was able to use the Google Wallet API to generate the equivalent generic passes. Their method of creating the pass models is entirely different (and a bit difficult to explain) and relies on sending the entire model in a POST request to create a new pass “class”. You can then create pass “objects” instantiated from the class. Thankfully, Google provides a “Codelab” web tutorial that walks through how to implement the exact “Add To Google Wallet” flow I was attempting, so it wasn’t too difficult.
I was able to use the same block of code from the Apple pass generation to validate the Airtable QR code and associate an identity. I put that on its own route (/api/pass/google/+server.ts instead of /api/pass/apple/+server.ts) and was done.
The only thing that I regret is not learning sooner that Android implemented native support for Apple’s .pkpass format, which means I could’ve used a single format for all devices. You live and you learn…
#Check-in Site
For checking headcount and attrition, organizers need a system to mark participants as attending the event when they arrive. They also need a way to accept walk-ins and issue them name tags.
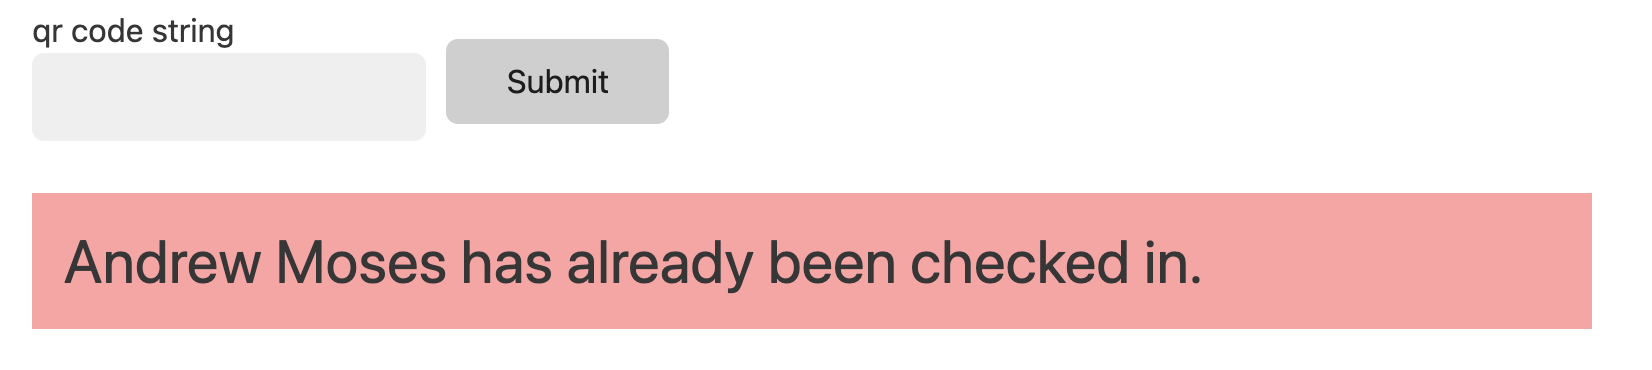
Because all of the participant records are in Airtable, MadHacks has historically used its “interfaces” feature to check hackers into the event. We had a custom dashboard that allowed a user to search for a participant by their QR code, name, or phone number, and then mark a corresponding “checked in” boolean on their record.
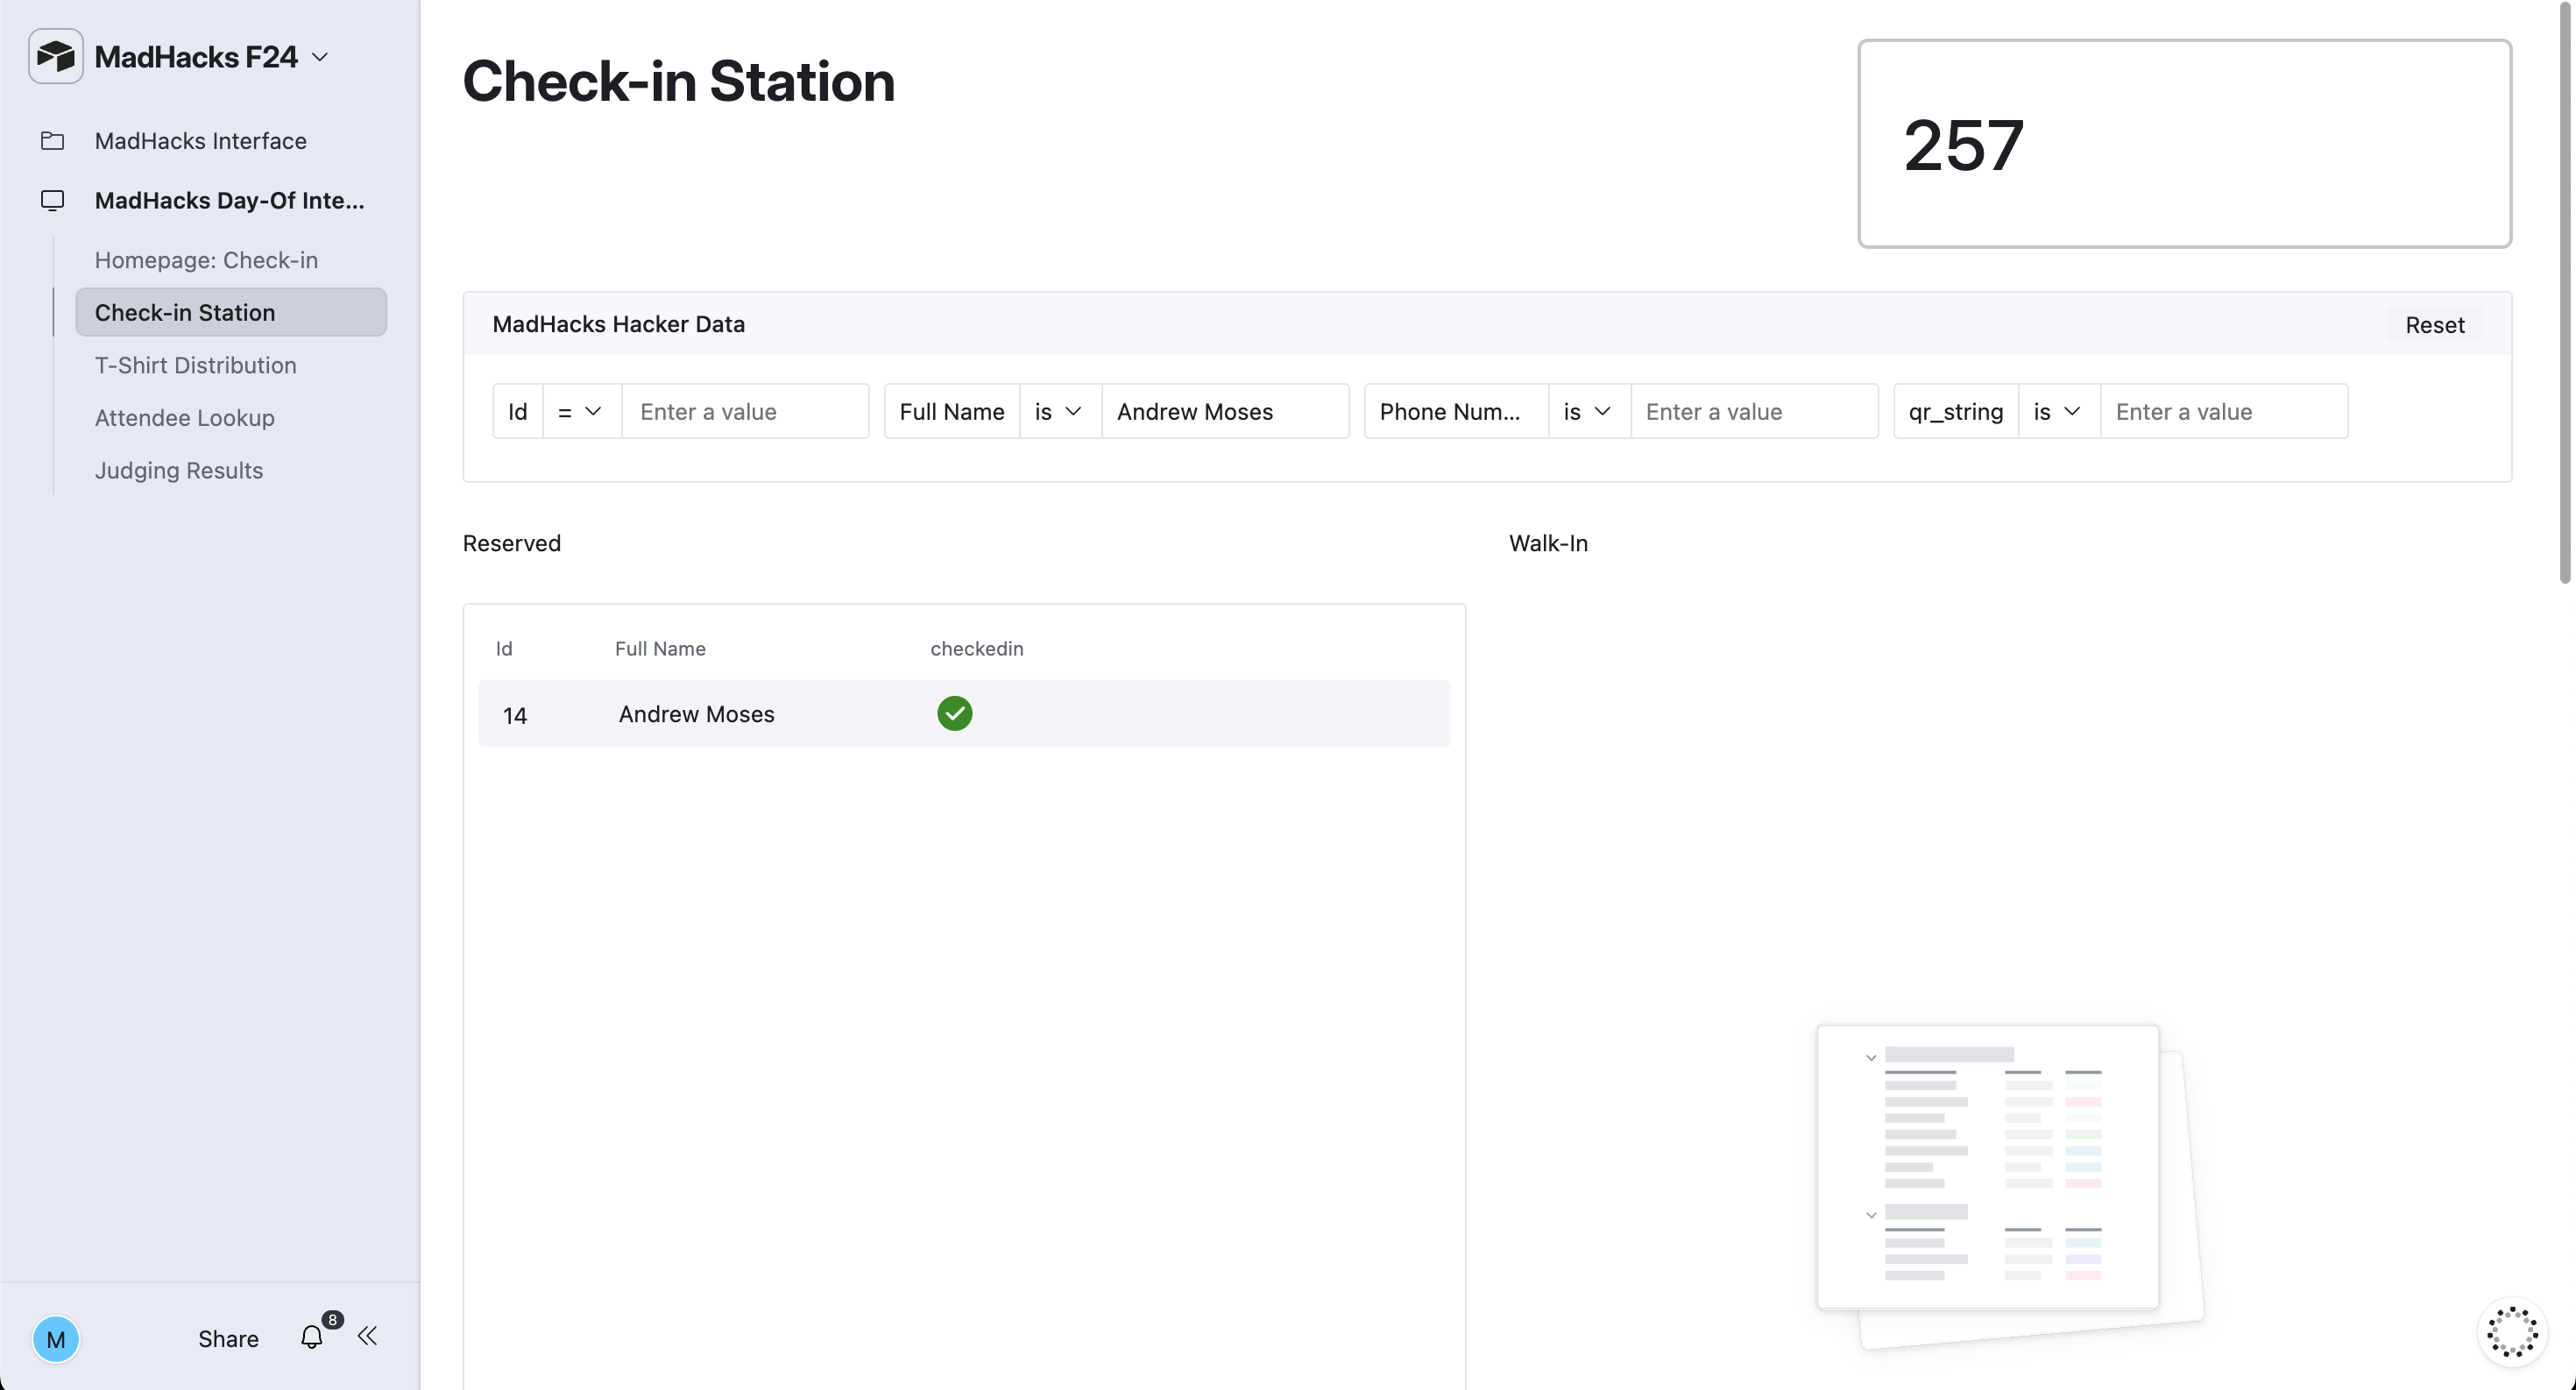
While this worked fine for MadHacks 2024, it still ended up being somewhat of a bottleneck for the line of 250 students waiting outside. Having to click into the input box, type someone’s email (without making a typo), toggle the check mark, and then delete the text to reset the dashboard… is just too much work when multiplied among hundreds of participants. This year, I wanted to design a webpage that would make many of the check-in functions easier.
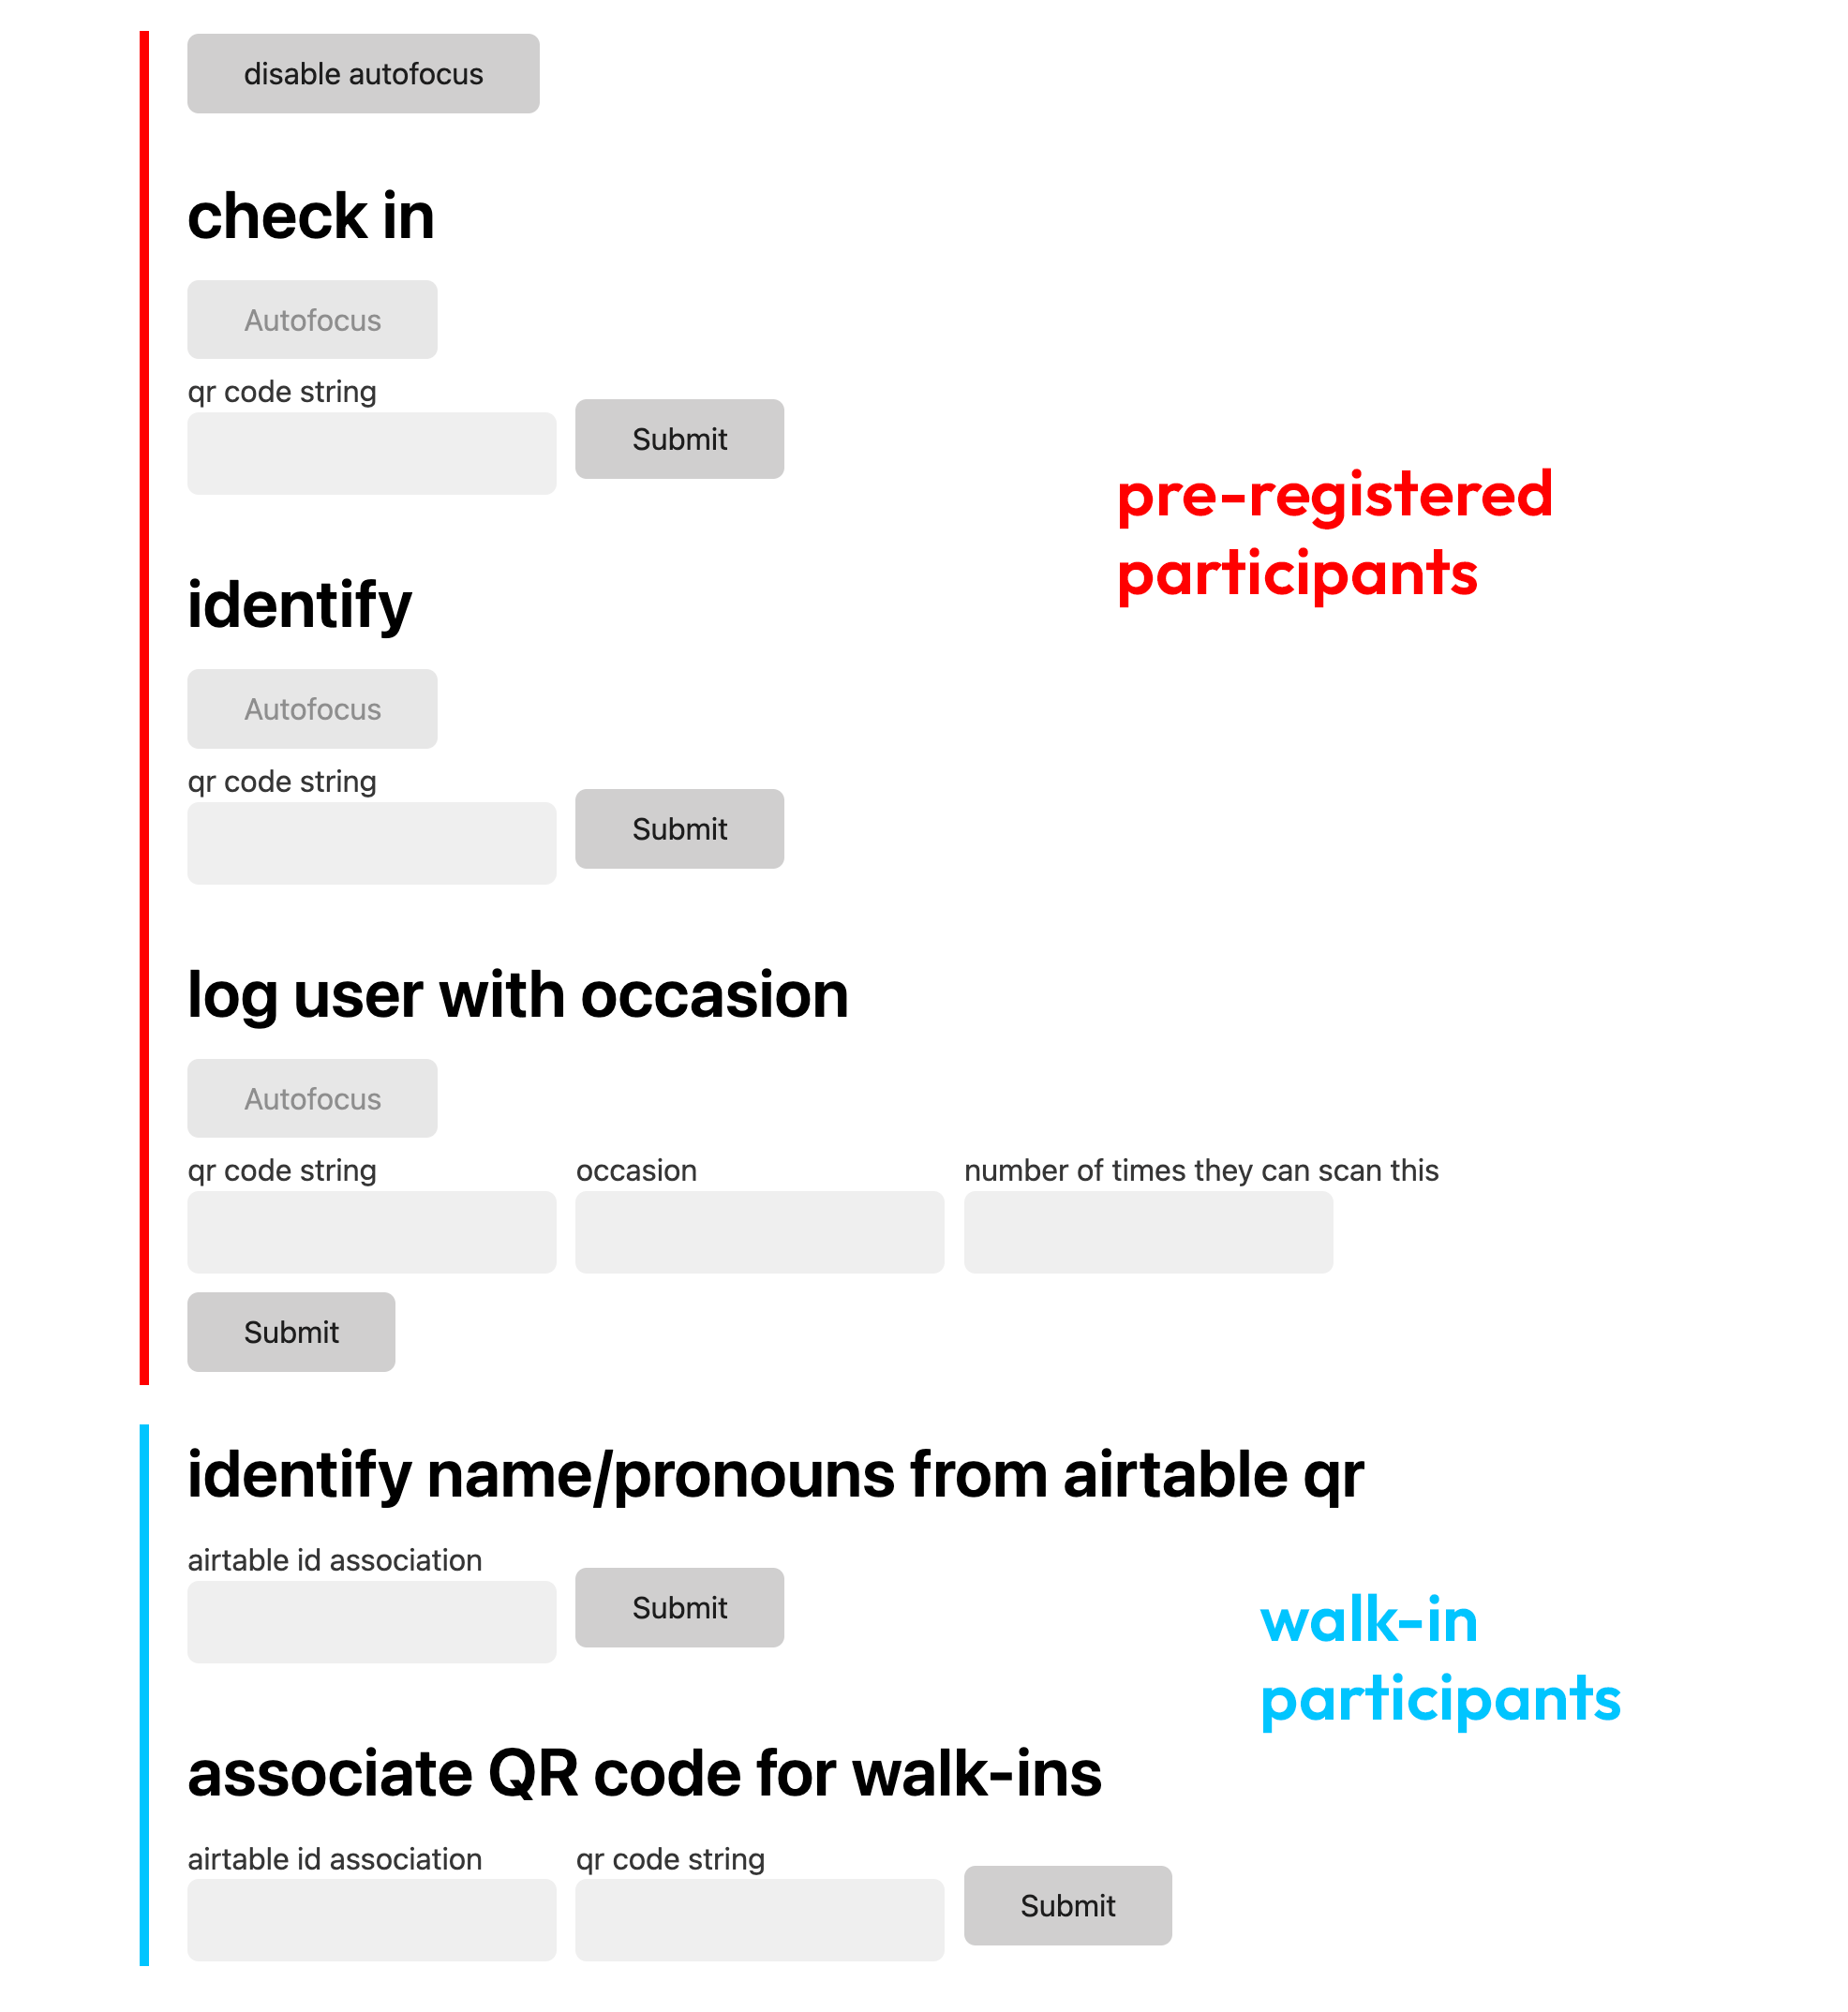
I used the same SvelteKit project I was using for the email sending (see above) to create a check-in route. The page itself is composed of multiple <form>s using Svelte form actions to communicate with the backend.
I know the UI isn’t the best. This project was made on a somewhat short deadline and I was more concerned about its functionality. Also, it wouldn’t be seen by participants. I used water.css to, at the very least, add some non-default styling to the input and button tags.
All of the options took advantage of the Airtable API, whose documentation is extremely nice to use. You’re able to pick the base that you intend to use and see the exact schema and relevant JavaScript types of the tables and fields.
As you can see in the image, some fields have an “autofocus” button. This set the respective autofocus tag on the input. Effectively, you could scan multiple QR codes without having to reset anything — the field would automatically clear itself and anticipate the next input.
Here’s a rundown on each of the options:
#Pre-Registered
Pre-Registered applicants were those who applied, were accepted, and who RSVP’d to MadHacks.
- Check-In: Given a participant’s QR code, this set their “checked in” field to true.
- Identify: Given a participant’s QR code, this listed their name.
- Log User With Occasion: This was a big feature of the platform. For analytics (and preventing people from getting second servings of food before everyone’s had their firsts), we would scan participants’ name tags at workshops and meals. It allows you to set the occasion (like
lunchordinner) and a maximum number of times you can scan for the occasion. It shows a message if you attempt to scan more than the maximum number of times. These scans are written to their own table.
#Walk-In
We had 150 walk-ins (participants who didn’t apply ahead of time) this year. Every participant has to have an entry in the database to be checked in and assigned a name tag.
I made an Airtable form — an abridged version of the main MadHacks application — that would ask walk-ins for their name, email, etc. When submitted, it would add them to a row in the table.
Because these walk-ins didn’t have pre-assigned name tags with QR codes on them, I had to think of a different solution for checking them in. Luckily, Airtable has an option to redirect form submissions upon completion. Even better, you could template in the ID of their row entry in the table!
I made it so completing the walk-in application form redirected to a route that simply generated a QR code containing their Airtable base entry ID. On the check-in dashboard, I could then:
- Identify Name/Pronouns From Airtable QR: Does what it says on the tin. When scanning a walk-in QR, this shows a box with the relevant full name and pronouns. We could then use a sharpie and some blank name tag templates to write the relevant info.
- Associate QR Code For Walk-Ins: By scanning the Airtable ID QR code and then the pre-filled QR code on the back of a name tag, you can effectively bind/associate an application with a tag code.
The result of all of this is a process that allows walk-ins to receive a name tag that functions the same as a pre-registered participant.
Given that other organizers would be using the site, I thought it was important to give the option to undo any submission, as well as to give detailed error messages.
Despite the bare-bones appearance, I’m pretty proud of the features of this tool.
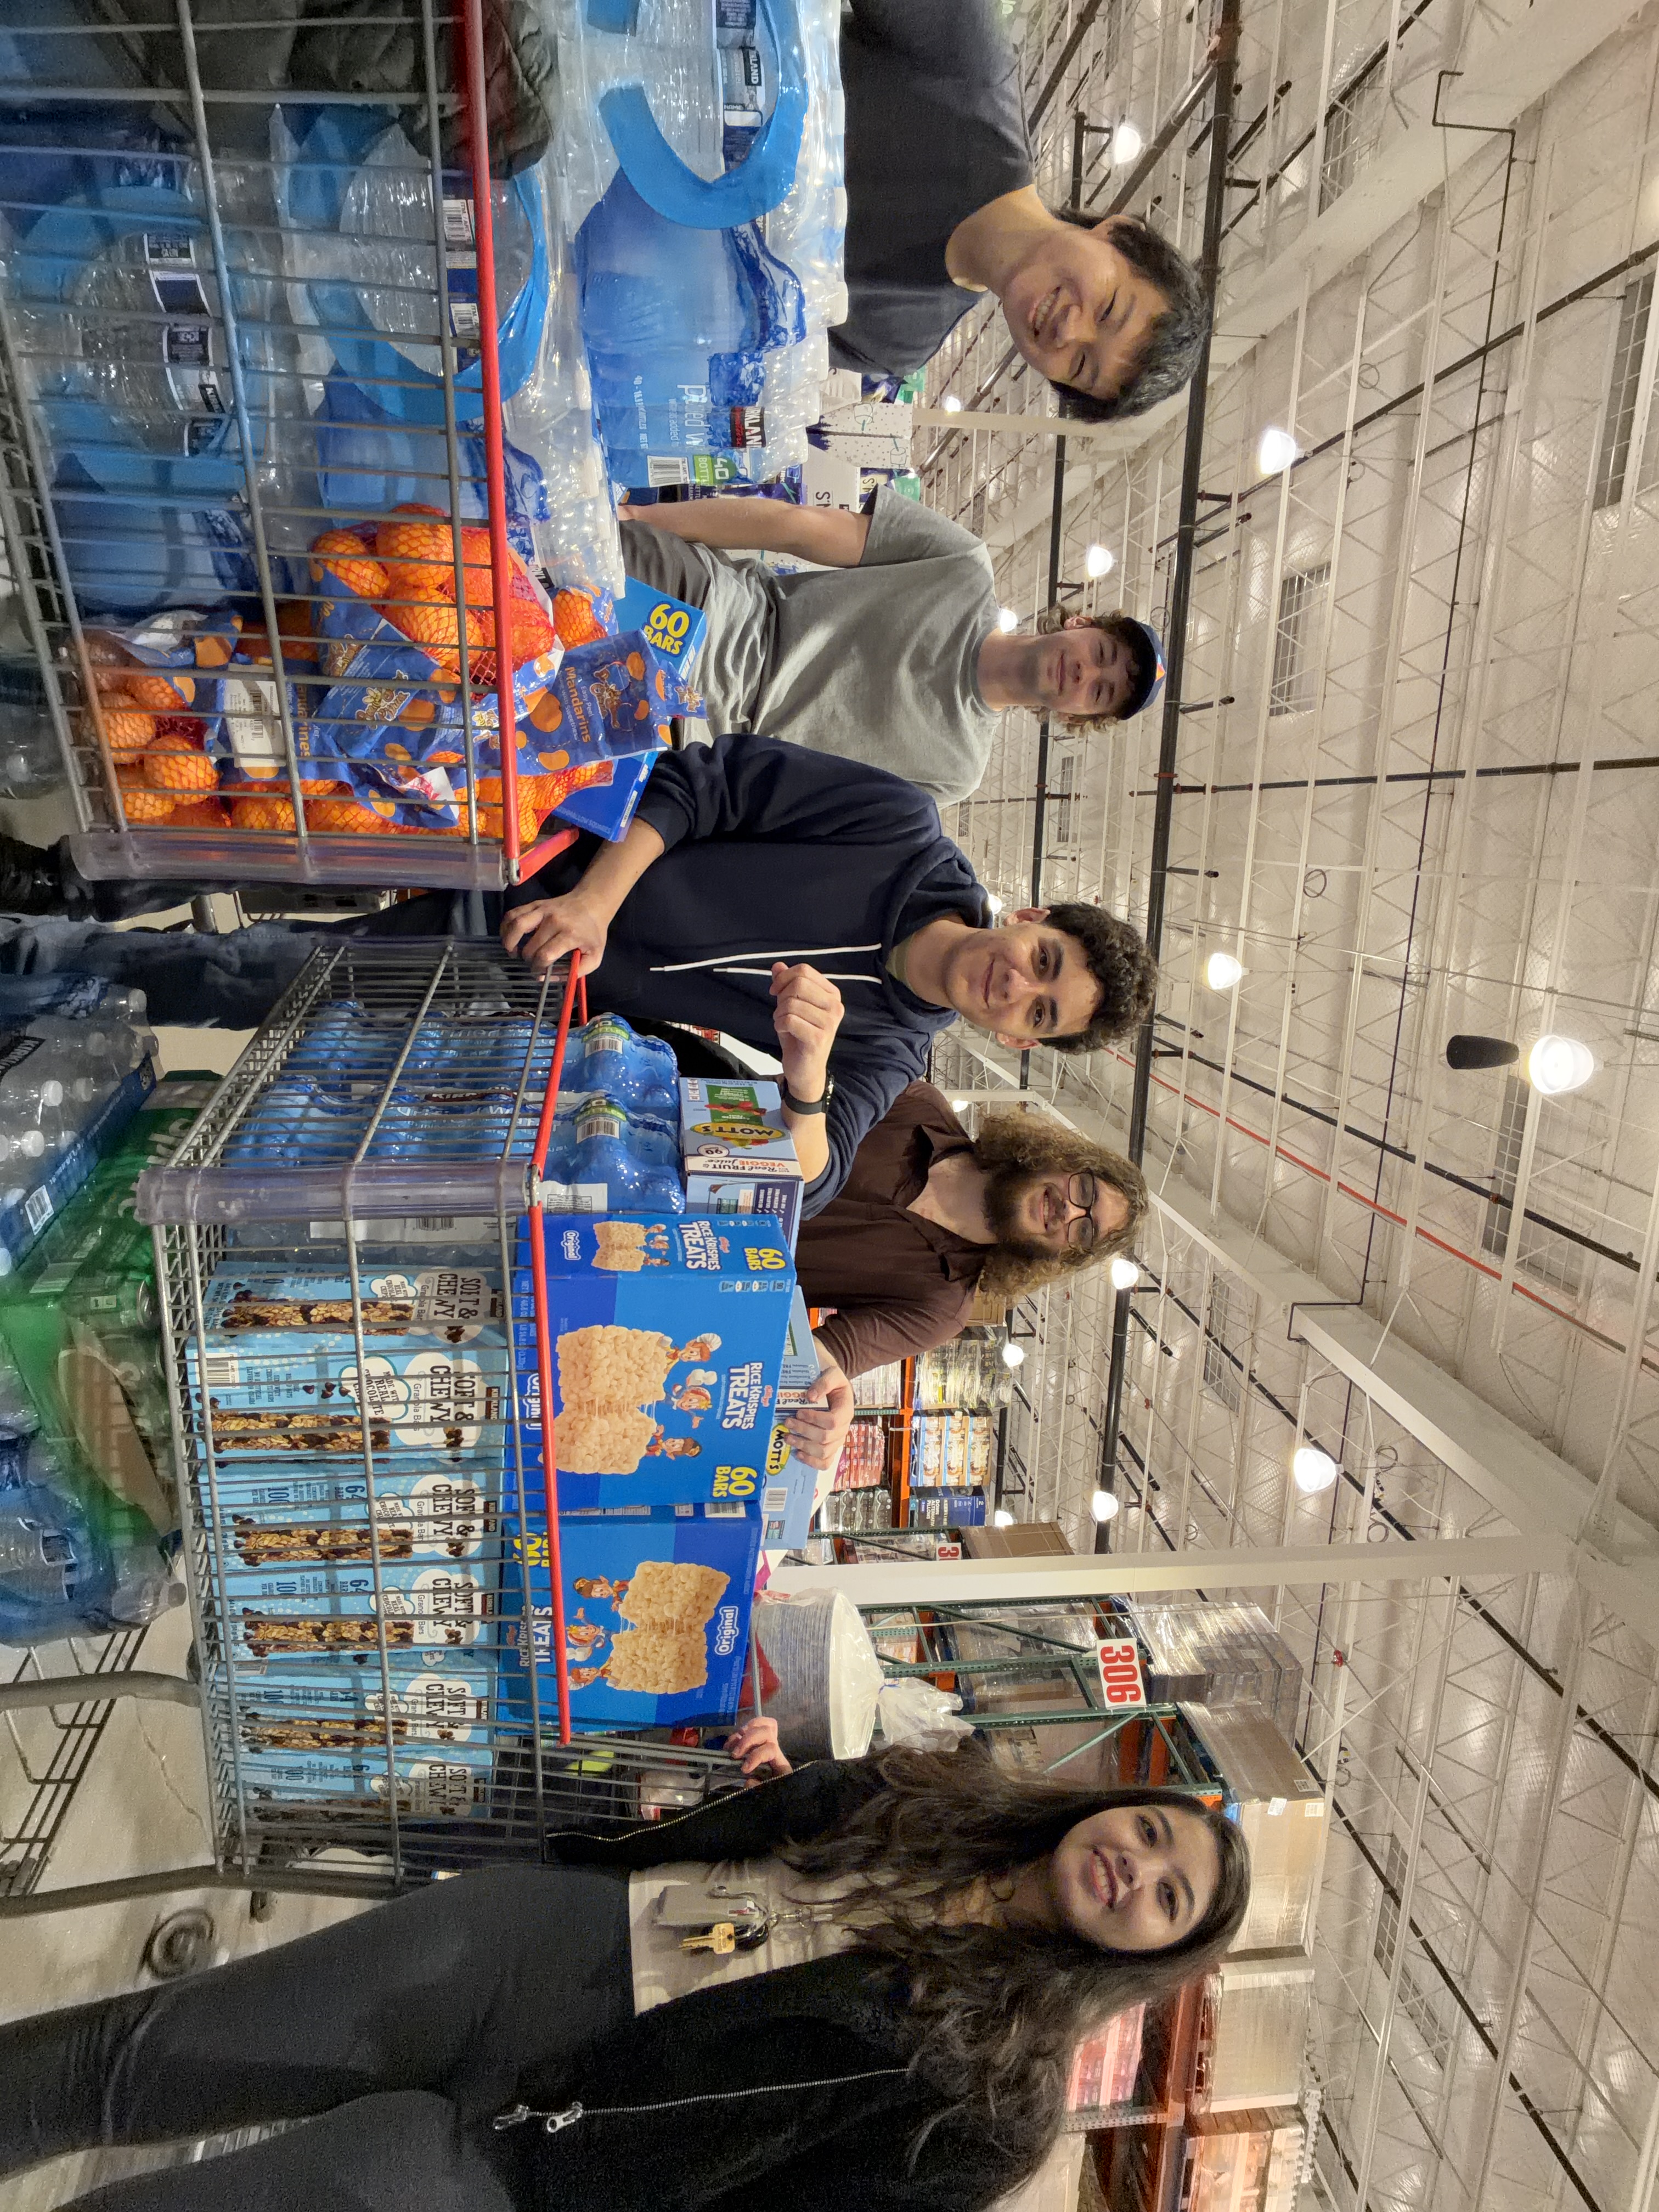
#Costco
We drove to Costco to get snacks, drinks, and tableware for the event. It was fun!


#Estimathon
I ran MadHacks’ Estimathon event this year. An Estimathon is an event popularized by Jane Street where you have to guess (estimate) the numerical answer to a number of trivia questions without access to the internet.
Jane Street graciously sent enough answering pads for the event, as well as nearly 60 T-shirts to give away as prizes for attending.
I was amazed at the turnout — it was the largest event that took place during the hackathon, with nearly 60 participants showing up and forming teams.

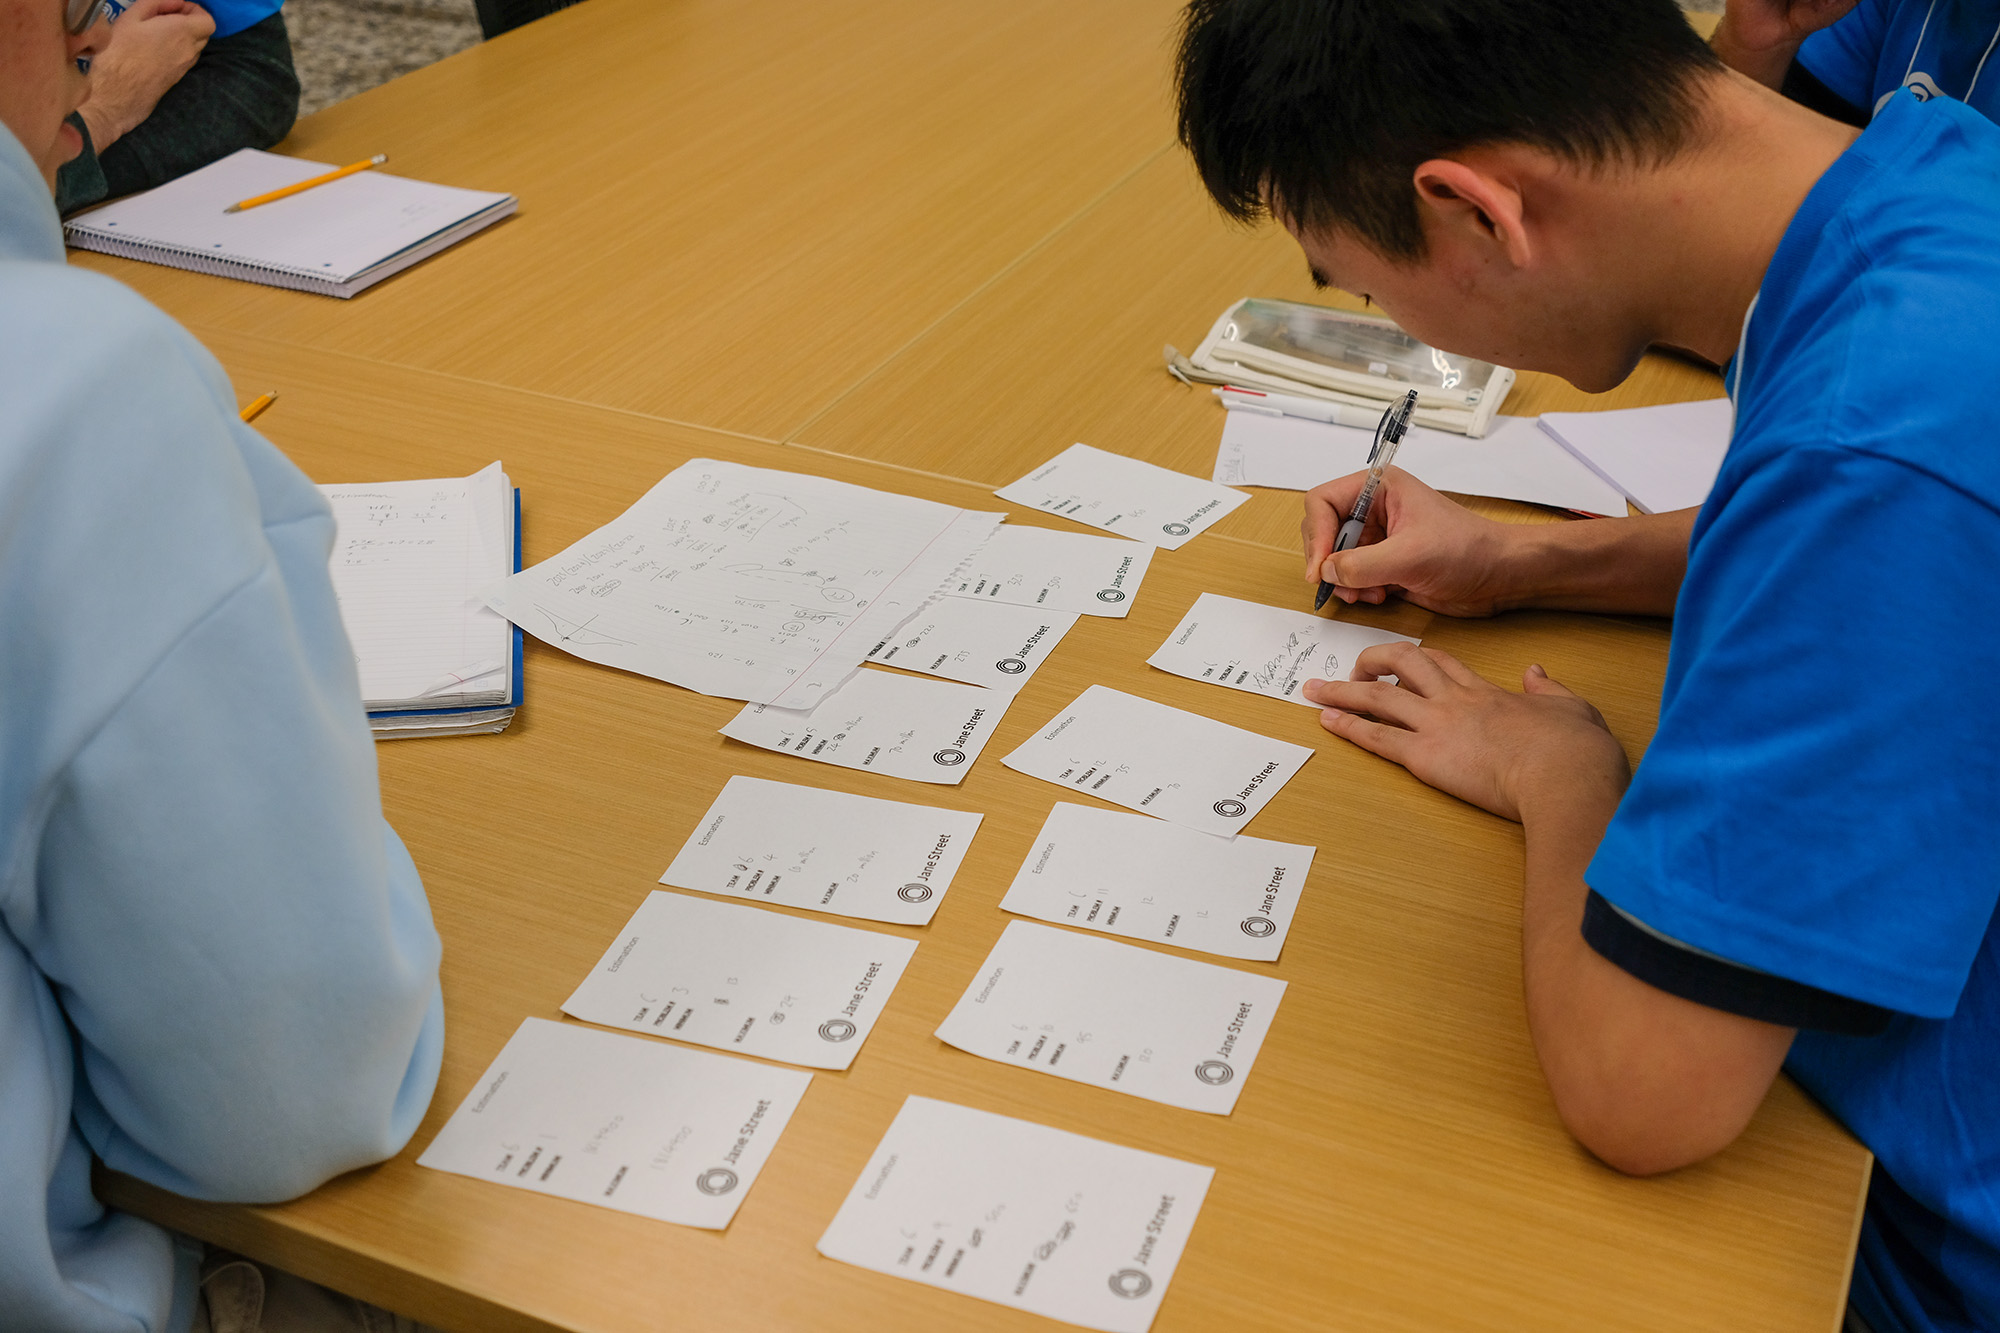
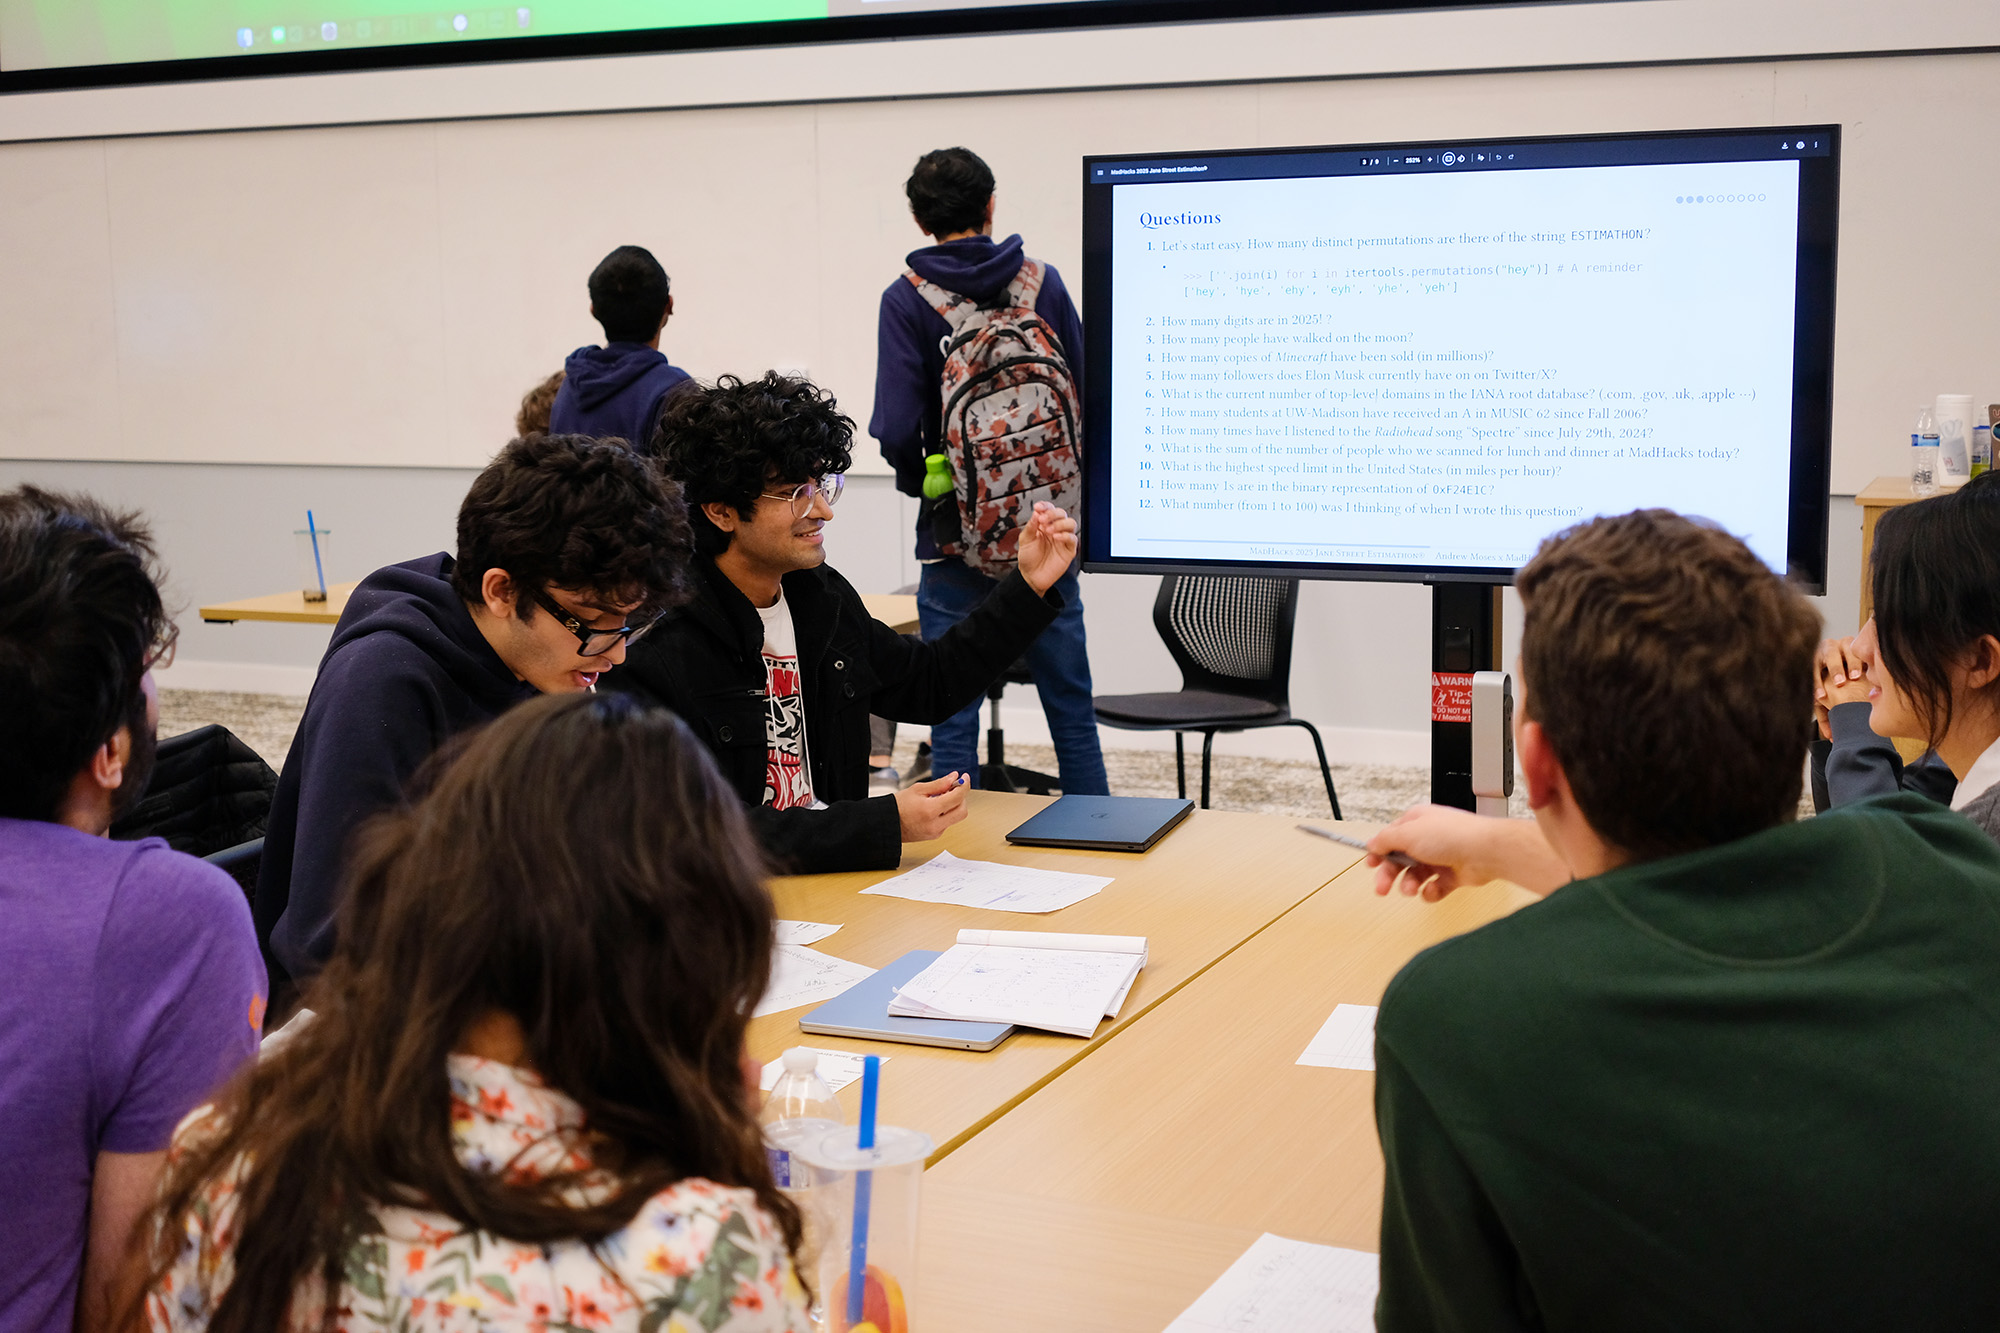
This was my first time running the event, and I had a blast coming up with the questions, watching as the teams deliberated, and seeing everyone’s reactions as I tabulated the scores. I had the spreadsheet mirrored to all the displays in the room, so the teams were cheering in real-time as each answer came in. Thankfully, I had enough shirts to give away, so it seems like everyone walked away happy. It was a great time.
Here’s the presentation if you’d like to try the questions for yourself.
#Judging
Historically, the judging process at MadHacks has been a bit of a mess. It’s a surprisingly difficult challenge to divide and assign nearly 100 projects among 30-40 judges and tabulate their results. MadHacks’ past is filled with brave organizers making valiant attempts to solve this challenge, with varying levels of success.
This year, a discussion of having a digital way to allow judges to input the project scores (rather than paper rubrics) quickly spiraled into the question of how to most accurately rank projects. It turns out that the method of summing the rubric scores is inefficient and potentially inaccurate among so many projects and judges. For example, a “9/10” rubric score could mean various things from different judges. Some judges will naturally be harsher or kinder, leading to unequal judge scores among subsets of projects (given that every judge doesn’t see every project).
There have been attempts to solve this problem before. Anish Athalye, while organizing HackMIT, created Gavel, which uses pairwise comparisons to attempt to reduce judge bias and improve scoring accuracy. While we could have used an off-the-shelf deployment of Gavel, simulations by Ben and Gil indicated that its algorithm could be improved to further increase project score accuracy. Thus began their work on their own judging system for MadHacks 2025 and beyond.
While I don’t know enough about the statistics they used in their approach to faithfully describe their implementation here, Ben has a blog post explaining the project’s creation and execution. Check that out if you’re interested in the math behind how to determine the rightful winners in a hackathon with 100+ projects.
#Other Printing & Superlatives
#Project Identifiers
MH 1570, the lecture hall used for judging, was projected to have nearly 400 people in it, so some organizers created a map for the judges and teams to know where to be in the room.
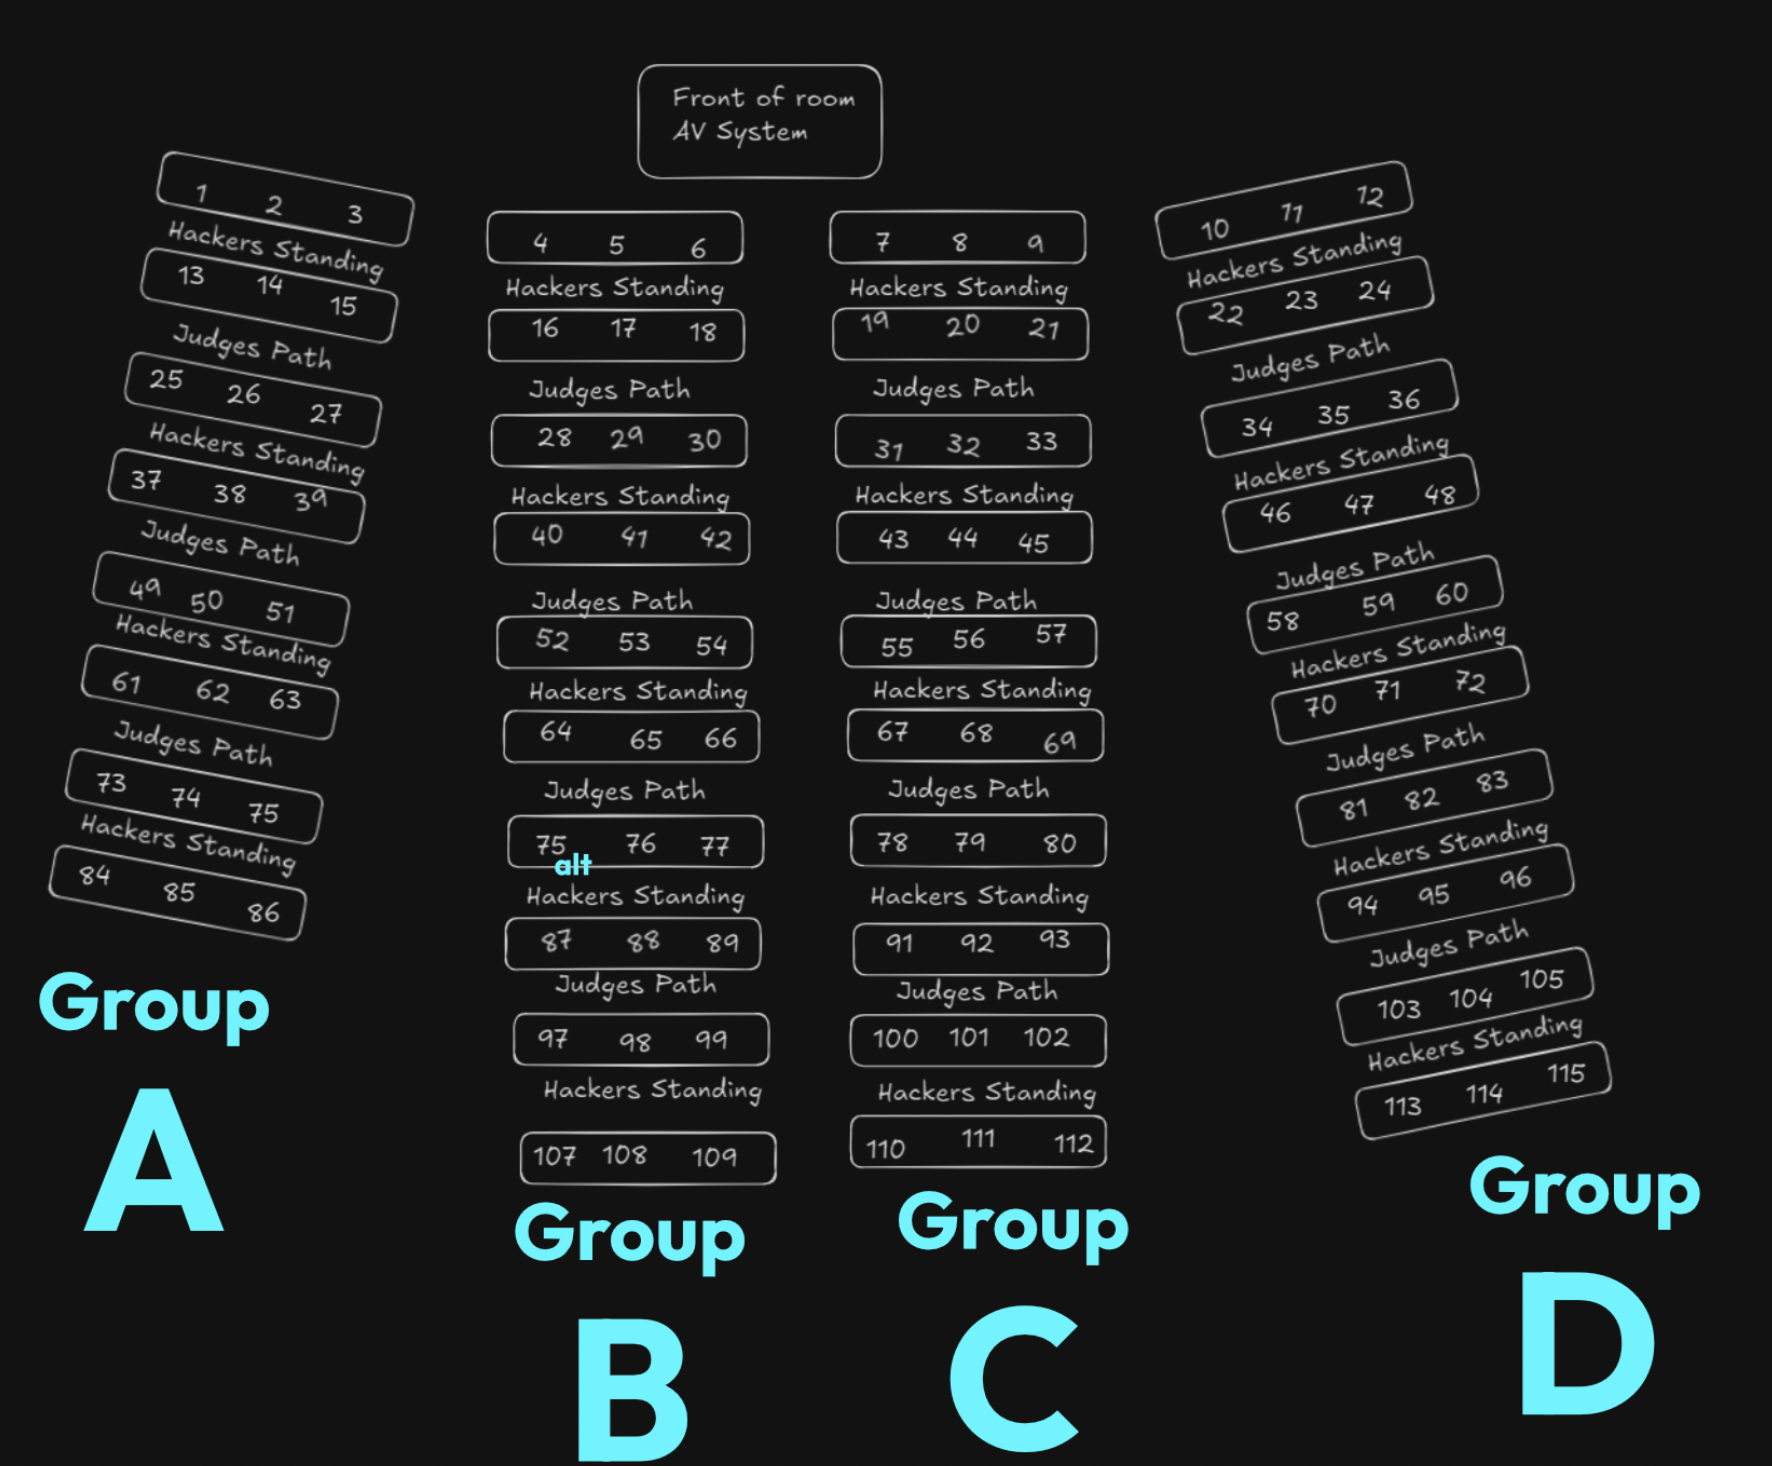
My edits in blue
To make the judging process easier, I split the room into four quadrants: A, B, C, and D. Each judge’s grading sheet had the names of the teams to visit, along with an ID that they could use to identify their position in the room — for example, B28, C80, etc. I had to place the “alt” next to one of the 75s because the creators of the map had accidentally duplicated a team number when creating it (and it was too late to redo the entire thing).
Projects are submitted to MadHacks using Devpost. Using a data export from Devpost, I mapped every team to a number and generated a .csv with the title of their project. I then printed a sheet for every team and distributed it to the proper points in the room per the map. Effectively, when the teams walked back into the room, they would find a paper at their respective spots with their number and team name printed.
It seemed that a nice effect of creating these was that teams had some kind of souvenir to take from the event. I saw a lot of participants posing with them and posting pictures with their sheets on LinkedIn.
It’s nice to have something personalized to you and your project, I suppose. It feels much more official!
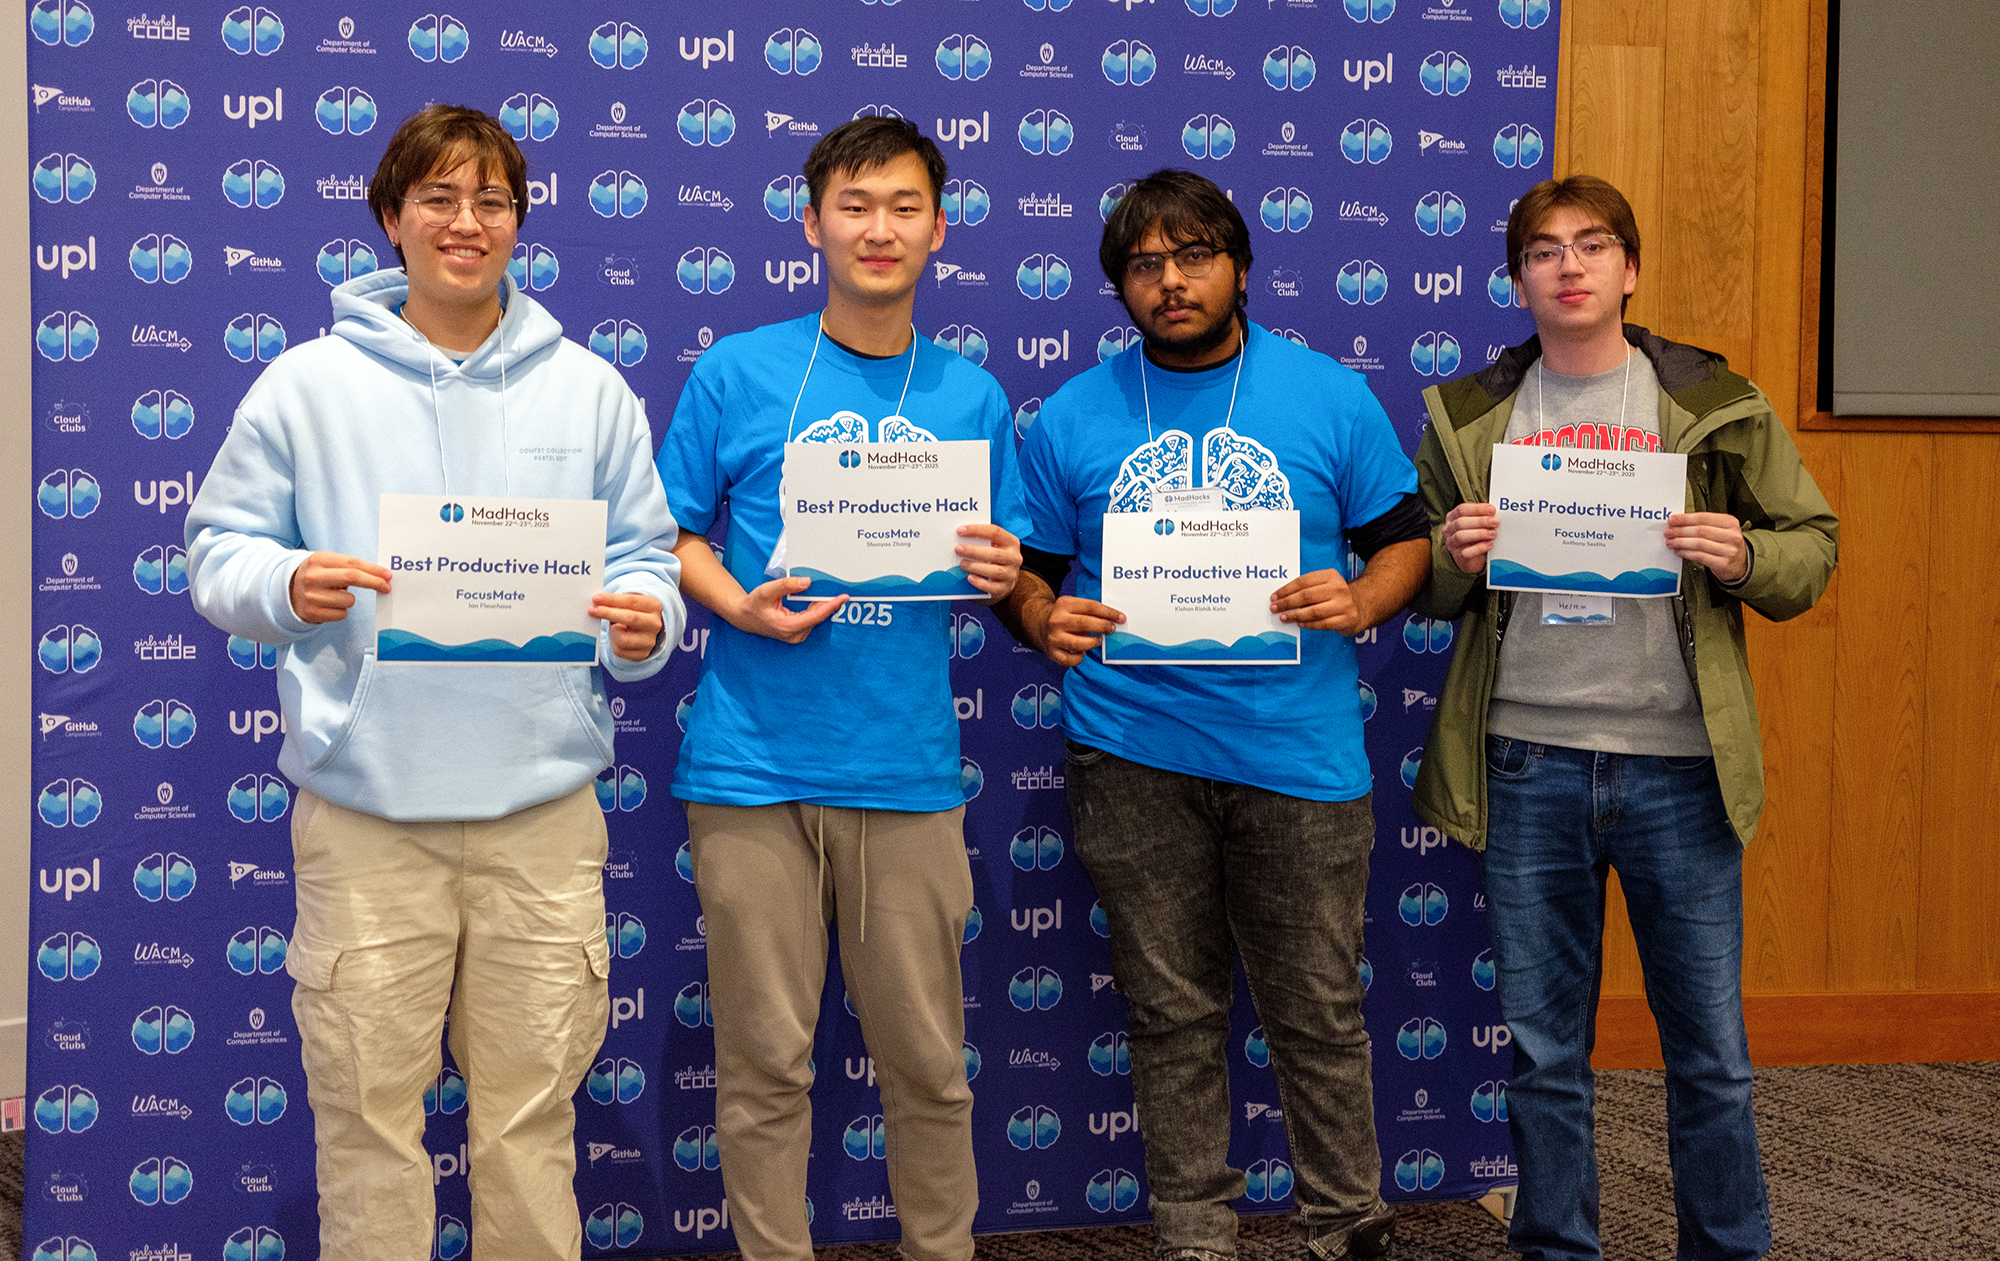
#Superlatives
Because we had fewer prize tracks this year, we decided to supplement some of the spots with superlative awards — Best of <X>, Most Creative <Y>, etc. During the judging period, Nico and I combed through the Devpost submissions to decide which teams won the awards. We chose:
- Best Beginner Hack
- Best Community Hack
- Best Productive Hack
- Best AI Project
- Most Social Project
- Most Dangerous Hack3
As with the other printouts, I designed a template and data merged the appropriate team names and hackers onto them. I printed them on cardstock (which hopefully made them feel a little more official than printer paper), and presented them. The recipients all seemed pretty thrilled to get recognition for their projects, so I think the superlatives worked out pretty well (and will probably make their return in future events)!
#Offline Site
For one of his workshops, Gil hosted a “HackY2K” mini-hackathon where he pretended like an internet outage had genuinely occurred and hackers wouldn’t be able to use online resources. He prepared an entire repository of offline docs and examples for sample projects for people to consult during the blackout period.
I really liked this theme, but I was a little suspicious of people being unable to resist the allure of the internet and AI tools for the entire hour. So, I wondered: was there a way that we could confirm that hackers weren’t accessing internet-connected resources during the event?
I couldn’t think of a solution that directly queried the Wi-Fi status of the device — anything that doesn’t rely on us using our own router (which we weren’t, everyone was on UWNet) ran into the catch-22 of being unable to communicate any information to us.
The best solution that I could think of was to have everyone keep a webpage open that would show whether or not they had internet access. If we told everyone to load up a page while they still had internet, then disconnect from Wi-Fi once loaded, we could start using fetch on the client to ping a server we know is up. If we get a response, we know the computer still has internet. If not, we know it doesn’t!
Yes, there are some extremely trivial ways around this, but my hope was that people would be too busy programming to figure out how to exploit the system.
I used SvelteKit (shocker!) for the site. The repo’s open source, but there’s nothing special other than the single index page that has the checking logic.
There are a number of URLs that I could have used to check for connectivity, but I stuck with https://www.google.com/generate_204, a URL that Chrome uses to check for its internet connection under the hood. If the fetch request returns a 204 No Content, then we know that we’ve got internet access. I put that on a setInterval of 2000ms (two seconds) and made sure the fetch parameters included cache: 'no-store' to prevent the browser caching the response.
If the fetch succeeded, I set the color of the background to red, and if it failed, I set it to green. Every time the fetch request failed, I also generated a sha256 hash of the current timestamp to give the screen’s contents some variability (to stop people from screenshotting/freezing the page). That’s it! We told people to leave the tab open, and, as Gil and I walked around, we checked to make sure that their screens stayed green.
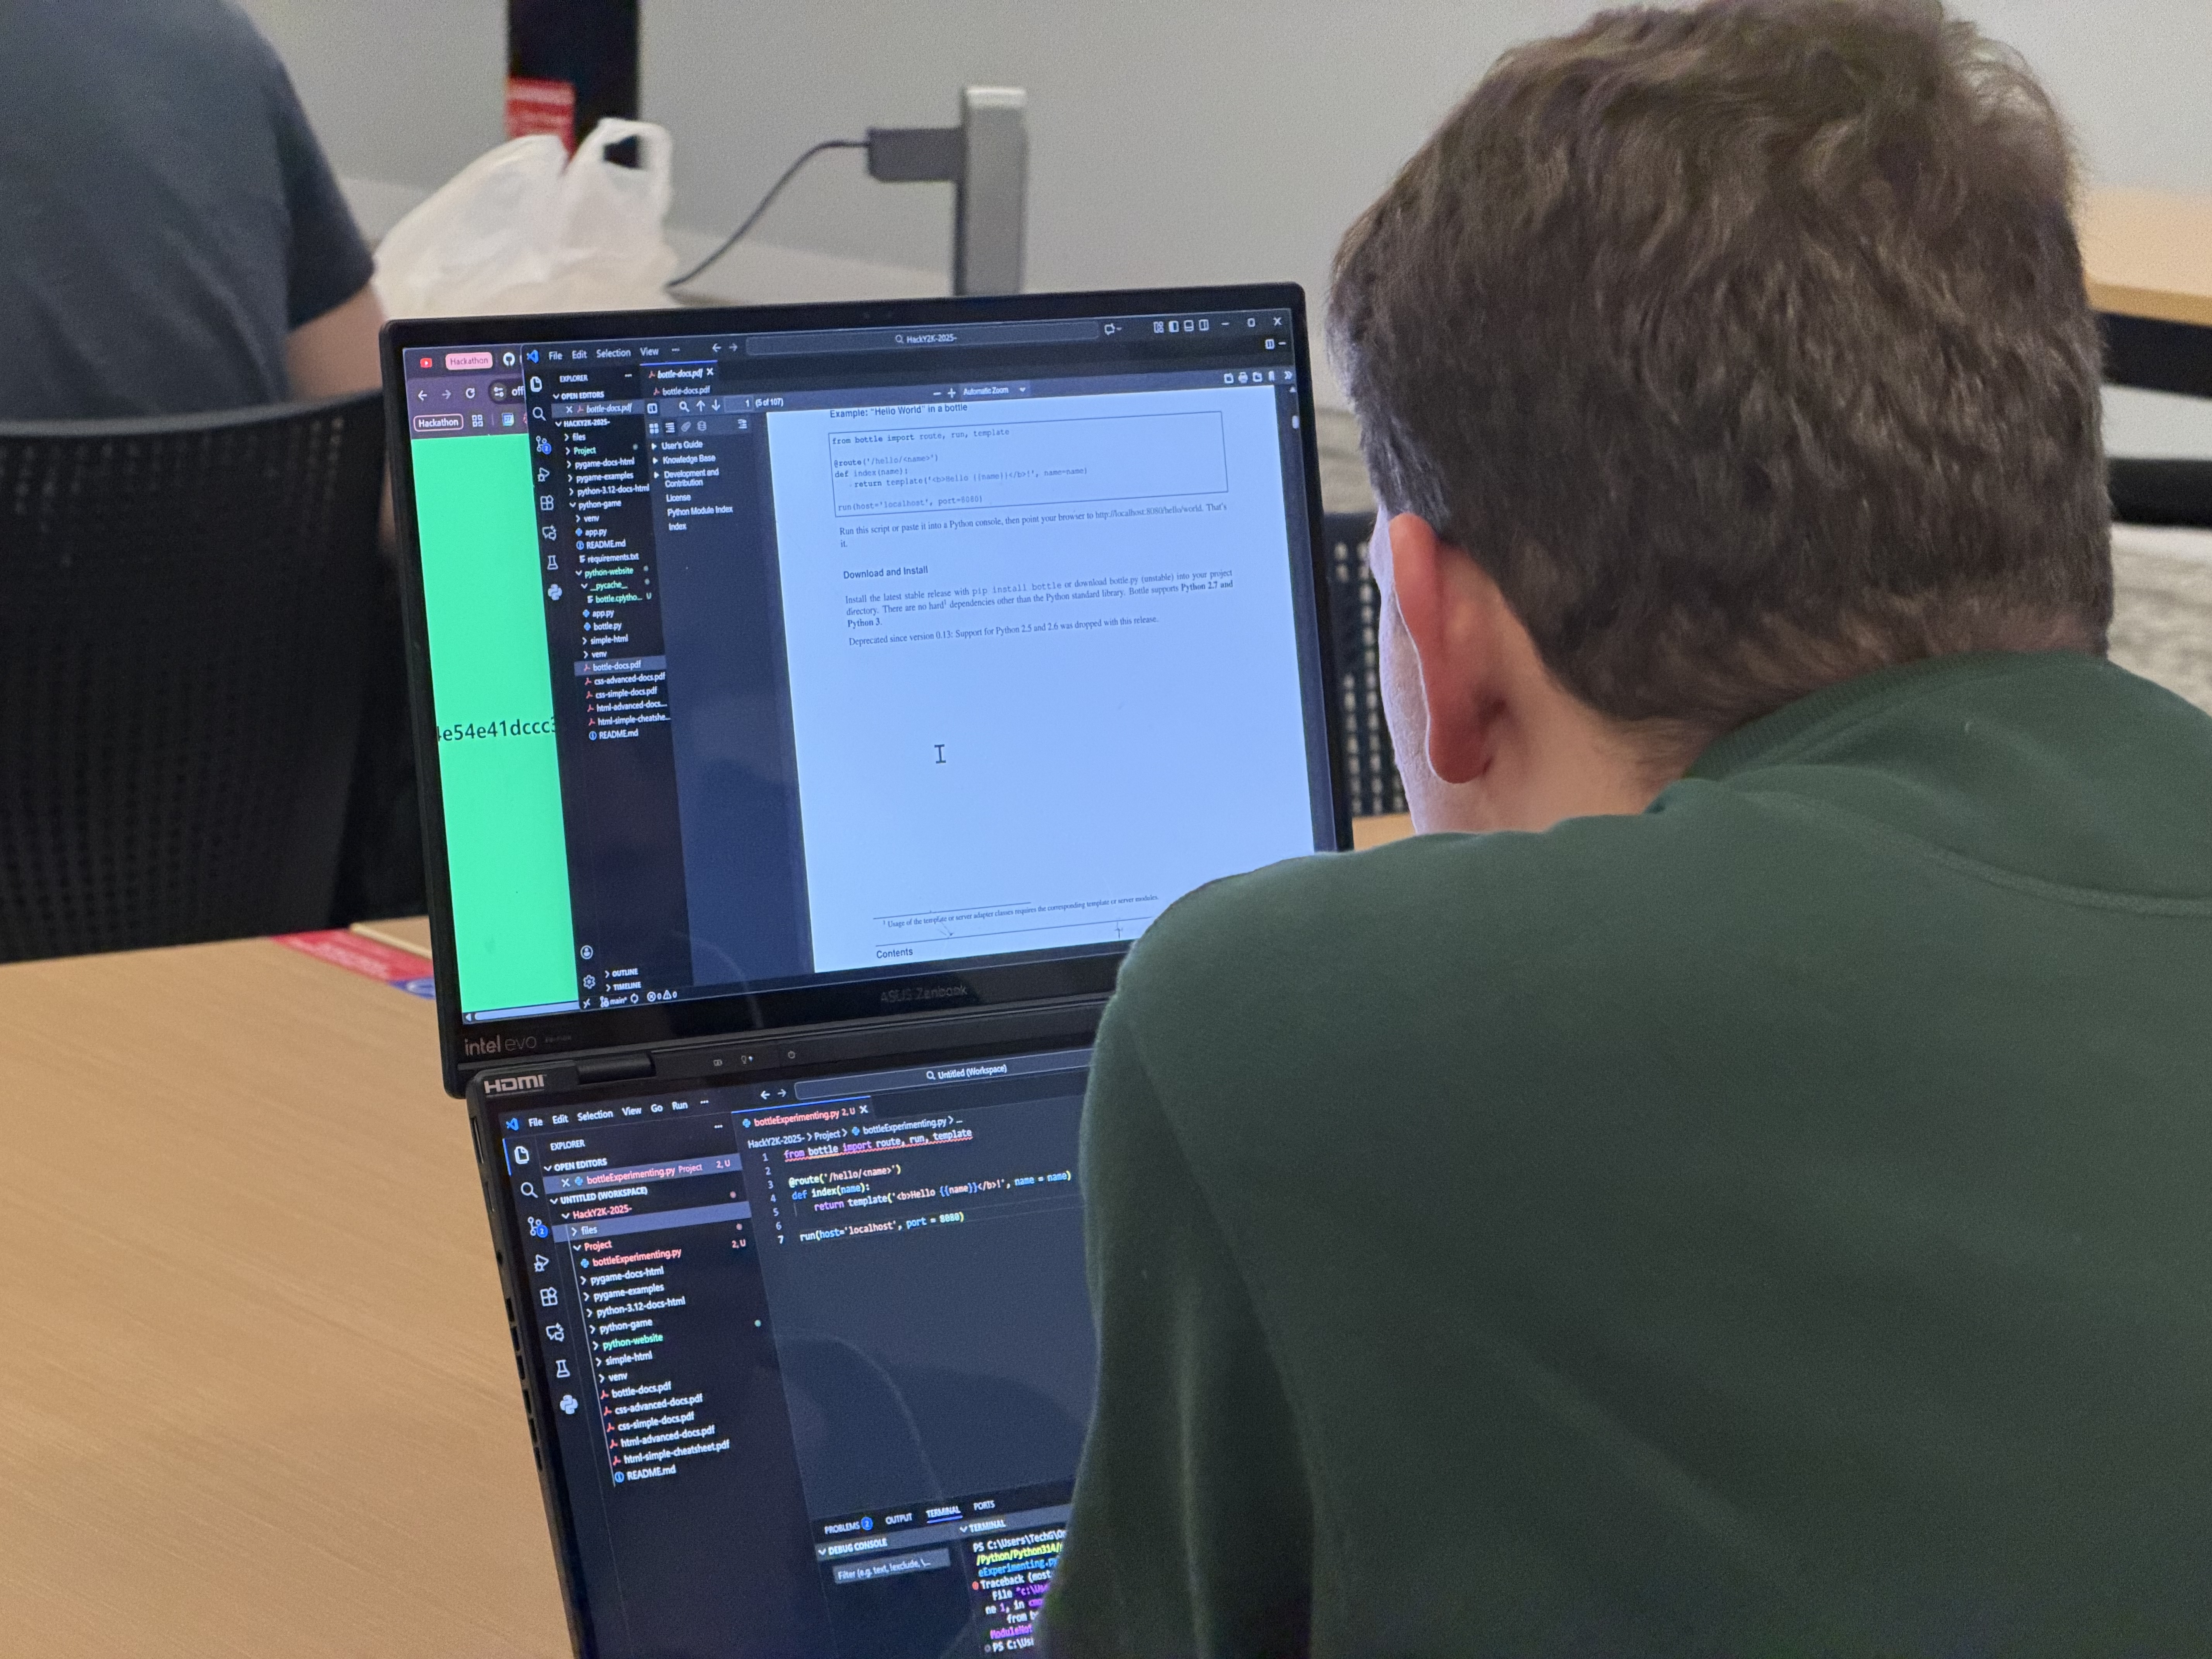
A participant split-screening the offline check website, viewing documentation
Overall, I think this deterred most people from cheating during the event? I was more concerned about the possibility of participants using the AI tools integrated directly into their IDEs (inline autocomplete/chat), and I didn’t see much of that, so I’ll count this as a success.
#AI Use
This section is a little different from the others.
I have many thoughts — both positive and negative — about generative artificial intelligence and its relation to programming. I’ve been using LLMs since OpenAI allowed beta playground use of davinci-002, and have watched the field’s evolution closely in the past three years. I still intend to, at some point, write a larger blog post regarding my general thoughts on the technology.
With that being said, I fear that AI tools are fundamentally ruining what hackathons intend to be.
At its core, I believe that the point of attending an event like MadHacks is twofold. Firstly, it’s an opportunity to be surrounded by a community of like-minded computer scientists who enjoy the virtues of programming and who have fun creating projects. Secondly, it’s to provide an artificial environment by which, at the end of an arbitrary period, you’ll have created a project of your own.
AI provides a myriad of conflicts with these goals, which raises questions such as: does the time limit of a hackathon mean anything if you can now create a sufficiently impressive project with a single prompt? Is it fair that competitors with the premium, most cutting-edge models have a distinct advantage over the rest of the participants?
Do the people showing up even care about programming?
From what I saw at this year’s MadHacks, I am concerned that people have grown confused about the aforementioned purposes of attending a hackathon. With the singular focus of winning the event, large swaths of students have put away their pages of framework-specific documentation and esoteric languages in favor of picking up an LLM to generate project ideas and write the code for them. I am immensely worried about what this means for the future of hackathons.
Given that not everyone is programming using AI, there is a sudden disadvantage in not using generative models while coding. How many students feel that they’re losing a competitive edge programming by hand?
The majority of participants in the hackathon using the same handful of models also inadvertently creates homogeneity among the project ideas represented in the event. ChatGPT, Claude, and Gemini are the most fluent in HTML, so, naturally, the projects submitted will be overly biased towards being web based. More so, the models are generally more competent in using mainstream, well documented stacks and frameworks, so all projects tend to be created with, for example, React instead of Svelte. I would’ve killed to see a single Minecraft mod or mobile app.
That’s not even mentioning the visual uniformity of LLM projects — the blue and purple Tailwind gradients, the rounded corners, the animations on every element. A lot of the projects I saw this year seemed to have a level of polish unbecoming of the constraints of a hackathon.
Let me be a little more concrete with an example. One of the winners of MadHacks 2024 (last year’s) was an application called “MoodMelody”. Throughout the night, the team behind the project made 59 commits to their repository. Their project was an app that periodically used your webcam to take pictures of your face to play Spotify songs based on your estimated emotion. If you were smiling, it would queue up a happy song. Frowning, a somber one, etc.
I was recently shown an advertisement from a creator sponsored by Anthropic. In the video, they demonstrated that, with one prompt, they were able to create a full-fledged Node.js web app that, using a library, detects the emotions of your face and suggests music corresponding to your emotional state. Sound familiar…?
What’s the point of the hacking period being 24 hours if you’re able to complete the core features of your project in the first 30 minutes?
If everyone has access to these tools — and the access is becoming more prevalent, as the companies behind LLMs target universities with free trials and dedicated product features — what hackathons become is something far removed from an event where students gather to celebrate the art of programming. And let me clarify — I do think it’s incredible to have participants of any skill level be able to create a project in the time span of the event. I think, generally, having as many people as possible able to engage in development is a positive thing. However, when manifested through one-shot prompting, it is nowhere near the spirit of learning or competition that hackathons attempt to inspire.
My fear is that hackathons are converging to a competition of those who know the best models to run, the best skills to enable, or those who have the money to run the most expensive extra high reasoning models. This level of gatekeeping stands in stark contrast to the historical nature of computer scientists, who, typically, are all for sharing and collaborating on technologies. That’s how thousands of pieces of open source software have changed the world — heck, that’s how the entire internet was created! This inequity makes hackathons fundamentally unfair, and forces others to abandon their love of programming for its own sake to simply stand a chance at competing. Through all of this, the code essentially becomes the proxy for an idea. And while, historically, having a great project idea was a necessity to win, the mainstay of the event was your team’s technical implementation.
I would personally much rather have a participant come into MadHacks and spend the entire hacking period outside of their comfort zone. If they were able, at the end of the countdown clock, to have produced a project that they created by themselves and were proud of, I would consider that orders of magnitude more of a success than a student on a $200 Claude Max plan telling Opus 4.6 to make me a project to win this hackathon. make no mistakes. Finishing a hackathon is an achievement in and of itself.
I don’t have the answers to these questions, but I do know that hackathons are going to have to change in response to the proliferation of AI use one way or another. If not, there’s going to be an increasingly deep imbalance between those showing up for the purposes of writing code for the love of the craft versus those showing up to prompt an LLM hoping to win a $399 television.
#Conclusion
That’s the extent of my contributions to MadHacks 2025. It was nerve-wracking to create and deploy so many new systems, but I was grateful that (despite the bumps) things functioned well and the event was received positively.
It’s especially rewarding working on MadHacks given its scale. With all due respect to the other hackathons at UW, none of them push the number of participants that we receive (and are relatively small-scale operations by comparison).4 Most of the projects I talked about in this post were born out of necessity given the quantity of hackers who attend the hackathon.
As I’m sure you can imagine, orchestrating an event of this caliber is no easy feat, and there are disagreements every step of the way. I’d be lying if I said that the hackathon organization process isn’t sometimes filled with petty, superfluous drama. However, I hope that you can see how much effort and care is put into even the smallest sections of these types of events. Multiply this among the smaller, unrecognized parts of organization — catering, accounting, planning, outreach-ing — and you can get a glimpse of just how much care gets put in to make the two-day hackathon experience as fun as possible for those who attend. ■
#Footnotes
-
I love the anchor’s opening line “…most of us are sleeping tonight, but hundreds of UW-Madison students will be programming until the sun comes up”. It feels like such a respectful explanation of people willingly doing something they love (and the phrase “programming until the sun comes up” is very retro-hacker-chic). ↩
-
There is an indication on the printer that tells you how to load the paper — you can see it in the image of the bypass tray in the article. However, because this was a multi-copy, double-sided print job, that “forwards” was not always really forwards and would end up reversed, backwards, or both. This behavior would also somehow change between single and double sided print jobs (and I promise I wasn’t changing any settings other than those). What I eventually did was add a dummy sheet to the first page of the PDF and then feed through a regular sheet of printer paper that was clearly marked, so I could tell how the paper would be transformed after being fed through. ↩
-
This one was typecast solely on a project by a team of mechanical engineers who strapped a chair onto an FRC robot chassis. While there are some ethical questions about submitting a project that only you and your friends can create with your access to the thousands of dollars of engineering equipment as a part of your robotics team… I still thought they deserved some amount of recognition for actually going through with it. ↩
-
As far as I can tell with the information available online, MadHacks is both the largest in-person hackathon of both UW-Madison and Wisconsin as a whole. MadHacks 2025 smashed our record with a total of 419 checked-in participants. ↩